The Mini Owl Amigurumi || Easy Step-by-Step crochet tutorial is the perfect beginner-friendly project for anyone who wants to dive into the whimsical world of Amigurumi. Whether you’re a new crocheter or looking for a quick and adorable handmade gift, this amigurumi pattern will guide you through every step of creating a tiny, colorful owl.
These little owls are not only charming and fun to make, but they also require very little yarn and minimal tools. You can use scrap yarn in any color combination, and they work up so quickly that you might just find yourself making a whole parliament of owls in a weekend. They’re ideal for keychains, bag charms, ornaments, or simple decorations.
In this post, you’ll find a detailed step-by-step crochet tutorial with clear instructions and stitch explanations to ensure success. We’ll also cover the fabric measurements, materials needed, and how to customize your Mini Owl Amigurumi with expressive eyes and playful wings. Now, grab your hook and let’s get started on this cute amigurumi pattern!
🧶 Materials & Measurements for Your Mini Owl Amigurumi
To start your Mini Owl Amigurumi, it’s important to gather the right tools and materials. Here, we’ll list everything you’ll need and provide optional fabric cuts and safety details.
-
Yarn Selection
For this project, worsted weight cotton or acrylic yarn works best. Choose one main color for the body, a contrast color for the wings and beak, and a third color for the belly patch if you like. This pattern is very forgiving, so it’s a great stash-buster. -
Hook Size and Tools
Use a 3.0 mm crochet hook for tight, neat stitches. You’ll also need:-
Yarn needle
-
Scissors
-
Stitch marker (helpful for counting rounds)
-
Stuffing (polyfill or cotton)
-
6 mm safety eyes or black thread for embroidery
-
Optional: felt pieces for belly and eye background
-
-
Finished Size
Your Mini Owl Amigurumi will measure about:-
Height: 6 cm (2.4 inches)
-
Width: 4.5 cm (1.8 inches)
-
Depth: 4 cm (1.6 inches)
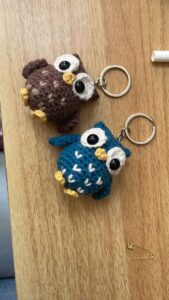
It’s small enough to fit comfortably in your palm, making it ideal for keychains.
-
-
Fabric Cuts (Optional)
If you’d like to line or accent the belly and eye area with felt:-
Two small white felt circles (1.2 cm) for behind the eyes
-
One oval (2.5 cm x 2 cm) for the belly
These can be glued or stitched onto the owl’s body.
-
-
Safety and Tips
Use child-safe alternatives like embroidery for eyes if gifting to small children.
Double knot all ends to prevent unraveling.
Keep stitches tight to prevent stuffing from showing through. -
Skill Level
This is an easy-level amigurumi pattern, great for beginners learning basic stitches like single crochet (sc), increase (inc), and decrease (dec). No advanced shaping is required.
🪡 Step-by-Step Crochet Instructions: Mini Owl Body
This section outlines the body of your Mini Owl Amigurumi, worked in the round from the bottom up using continuous spirals.
-
Crochet the Body Base
-
Rnd 1: Start with a magic ring, 6 sc into ring (6)
-
Rnd 2: Inc in each st (12)
-
Rnd 3: (1 sc, inc) x6 (18)
-
Rnd 4: (2 sc, inc) x6 (24)
-
Rnd 5–10: sc in each st around (24 per round)
-
-
Add Some Shaping
Continue with even stitches to build up the body height:-
Rnd 11–15: sc in each st (24)
This creates a nice oval cylinder shape, ideal for the owl’s chubby look. At this point, insert the safety eyes between rounds 8 and 9, about 5 stitches apart.
-
-
Start Decreasing to Close
-
Rnd 16: (2 sc, dec) x6 (18)
-
Rnd 17: (1 sc, dec) x6 (12)
-
Rnd 18: dec x6 (6)
Stuff firmly before closing. Fasten off and use the tail to sew the hole shut.
-
-
Shape the Ears (Optional)
Use your fingers to pinch the top edges into slight points to mimic tiny owl “horns.”
You can sew or embroider tiny triangle tufts if you want more definition. -
Add Felt or Embroidered Belly Patch
If using felt, glue the small oval to the lower center of the owl’s body.
For embroidery, stitch a few horizontal rows in a contrast color to resemble feathers. -
Customize with Embroidery or Details
Embroider small “v” shapes on the body to give the appearance of feathers.
Add blush with yarn or powder for cheeks.
Optional: stitch tiny talons using black thread at the base.
🪽 Wings, Eyes, and Beak Details
These cute details bring your Mini Owl Amigurumi to life. We’ll crochet the wings, embroider or add felt features, and attach them securely.
-
Crochet the Wings (Make 2)
-
Rnd 1: Magic ring, 6 sc
-
Rnd 2: (1 sc, inc) x3 (9)
-
Rnd 3: sc in each st
Flatten into an oval shape and sew one to each side of the body at about round 10.
-
-
Make the Beak
-
Ch 3, turn
-
Sc in 2nd chain from hook, sl st in next
-
Fasten off and shape into a triangle
-
Sew between the eyes at round 9
-
-
Attach the Eyes
If you haven’t used safety eyes, sew black or brown buttons, or felt circles with tiny pupils.
For extra expression, angle the eyes slightly inward for a curious look. -
Customize Wing Positioning
Sew wings flat against the body for a tidy finish, or angle them outward for a more animated appearance. You can also embroider feather lines on them for texture. -
Add Tufts or Eyebrows
Use scraps of yarn to add small tufts at the top or eyebrows for more personality.
These can be playful or sleepy depending on placement. -
Decorate with Accessories
Add a bow, scarf, or mini flower crown to personalize your Amigurumi owl.
These are great touches if making sets for different seasons or characters.
🎁 Finishing Touches, Custom Ideas & Gifting Tips
You’re almost done! In this final section, we’ll go over how to finish and use your Mini Owl Amigurumi, and offer creative ideas for variations and presentation.
-
Make It a Keychain
Attach a small loop of chain or yarn to the top of the owl and connect to a keyring.
Reinforce with a few extra stitches so it can handle daily use on bags or zippers. -
Add a Scent or Sound (Optional)
Place a drop of essential oil inside for a scented plushie.
You can also insert a small rattle or bell for a sensory toy. -
Create a Whole Collection
Use different color palettes to make a rainbow of owls.
Try adding sleepy eyes, glasses, or graduation caps for themed gifts. -
Perfect for Handmade Gifts
These mini owls are great stocking stuffers, party favors, or teacher appreciation gifts.
Package in a small box with a tag that says “Owl always be here for you!” -
Use for Craft Fairs or Online Shops
These quick-make owls are ideal for selling at fairs or Etsy.
List them as eco-friendly, handmade, or customizable items. -
Share Online with Credit
If you’re sharing your finished work on social media, mention the amigurumi pattern source or link back to your own version.
Engage with the Amigurumi community using hashtags like #MiniOwlAmigurumi or #crochetowl.
Conclusion: Your Adorable Mini Owl Amigurumi is Ready!
Congratulations! You’ve just completed your very own Mini Owl Amigurumi || Easy Step-by-Step crochet tutorial. This small but charming project is a delightful way to practice your Amigurumi skills, experiment with color, and create gifts that come from the heart.
From beginners to advanced crocheters, this amigurumi pattern is a joyful reminder that great things come in small packages. With endless customization options and minimal materials, the Mini Owl Amigurumi is bound to become one of your go-to creations.
Whether you’re gifting it, selling it, or keeping it, your little owl will stand out as a symbol of creativity and care. So go ahead—make another, and spread the handmade joy!


