If you’re a Toy Story fan or looking for a charming handmade gift idea, this Mr. Potato Toy Story Amigurumi is the perfect crochet project. Not only does it capture the quirky charm of the beloved character from the Pixar series, but it also allows you to explore new techniques in Amigurumi design and shaping. This project is great for both intermediate crocheters and advanced beginners ready to level up their skills.
Making your own Mr. Potato Amigurumi brings the joy of creating something from scratch while celebrating a classic animated icon. With his goofy eyes, bushy mustache, and interchangeable parts, Mr. Potato Head is not only nostalgic but also offers a lot of fun details to recreate in yarn form. He’s a great addition to any child’s toy collection, movie-themed décor, or crochet showcase.
This guide will walk you through everything you need to craft your own Mr. Potato Toy Story Amigurumi, from the required materials to step-by-step instructions. We’ll also incorporate essential Amigurumi techniques and give tips for customizing your finished project. Whether you’re making it for yourself or as a gift, you’ll love bringing this playful character to life!
Materials, Measurements & Getting Started
Before diving into the actual crocheting, it’s important to have all the right supplies and a clear understanding of the structure you’re about to build. This Amigurumi project consists of several parts: the body, limbs, facial features, and accessories like the hat and mustache.
1. Yarn Selection
Choose worsted weight acrylic yarn for durability and ease of use. You’ll need the following colors:
-
Brown for the body
-
White for the eyes and gloves
-
Black for the mustache, eyebrows, and shoes
-
Pink or red for the lips
-
Blue or green for optional accessories (like a hat)
2. Hook Size
Use a 3.5 mm (E) crochet hook. This smaller size helps keep stitches tight and prevents stuffing from leaking out—crucial for all Amigurumi toys. Always make a tension swatch if you’re unsure.
3. Stuffing & Accessories
You’ll need polyester fiberfill to stuff each component. You may also need a stitch marker, yarn needle, scissors, and safety eyes (optional). For movable facial features, consider attaching them with hook-and-loop tape or small buttons.
4. Final Size & Measurements
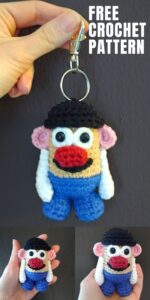
The completed Mr. Potato Toy Story Amigurumi should measure approximately 8 to 10 inches tall (20–25 cm) and about 4 to 5 inches wide (10–13 cm) depending on your stitch tension and yarn type.
5. Optional Fabric Base
If you’d like to make the doll freestanding, you can cut a small oval from felt or plastic canvas (about 4 inches wide by 3 inches deep) and place it at the bottom of the body before final stuffing.
6. Safety Note
If gifting to a small child, be sure to securely attach all parts and avoid small detachable pieces. Instead of safety eyes, embroider them on for a fully soft toy.
Amigurumi Crochet Pattern – Body, Arms, Legs & Ears
Let’s start crafting the base of your Mr. Potato Amigurumi. This section covers the body and limbs, using classic Amigurumi techniques like working in spirals and shaping with increases and decreases.
1. Body (Brown Yarn)
-
Rnd 1: Begin with a magic ring, 6 sc into ring
-
Rnd 2: inc in each st (12 sts)
-
Rnd 3: (sc, inc) around (18 sts)
Continue increasing until you reach 48 sts, then work evenly for about 20 rounds to form the body’s middle section.
Start decreasing in the same pattern to shape the top. Stuff firmly before closing.
2. Legs (Make 2 – Black Yarn)
-
Start with a magic ring: 6 sc
-
Increase to 12 sts and work evenly for 5 rounds.
-
Flatten and sew directly to the bottom of the body, spaced evenly apart to help the doll stand upright.
Optional: Add a bit of plastic inside the soles for extra support.
3. Arms (Make 2 – White Yarn)
-
Magic ring, 6 sc
-
Increase to 9 sts, work evenly for 6 rounds
-
Do not stuff the arms too much; keep them soft for easy shaping.
Sew to the sides of the body just below the midsection.
4. Ears (Make 2 – Brown Yarn)
-
Ch 4, sc in second ch, hdc, dc
-
Fasten off and leave a tail for sewing
Stitch ears symmetrically on each side of the head.
5. Bottom Patch (Optional – Brown or Beige Yarn)
You can crochet a small oval patch and attach it to the back to replicate Mr. Potato’s removable panel or playfully exaggerate the cartoon element.
6. Assembly Tips
Use pins to test placement before permanently sewing. This helps with balance and proportion. Take your time to ensure symmetry between arms and legs.
Facial Features & Expressions
Mr. Potato Head is known for his humorous, movable features. While we won’t make them detachable in this version, you can easily sew them on or modify with Velcro to replicate the original toy’s fun interaction.
1. Eyes (White & Black Yarn or Safety Eyes)
-
Crochet two flat circles (white):
Magic ring, 6 sc. Increase in next round to 12 -
Add black pupils: smaller circle or embroider directly
Sew them close together on the front, about 1/3 down from the top of the body.
2. Nose (Pink Yarn)
-
Magic ring, 6 sc
-
Increase to 9, work 2 rounds evenly
-
Lightly stuff and sew between the eyes
3. Eyebrows (Black Yarn)
-
Chain 7, sc back across
-
Sew above each eye and curve slightly for expression. Try slanting one for extra personality.
4. Mustache (Black Yarn)
-
Chain 10, sc across, then sl st around for border
-
Or, make two small black curves for either side of the mouth
-
Attach directly below the nose, centered
5. Mouth (Red or Pink Yarn)
-
Create a small oval or heart-shaped lip base
-
Chain 6, work 3 rounds with increases to shape
-
Sew under the mustache and above the bottom half
6. Optional Accessories
Add a small blue or green hat using a flat circle and a short rim. You can also crochet a flower, bowtie, or monocle depending on your version of Mr. Potato.
Customization, Finishing & Care
With the main body and facial features in place, it’s time to finish up and explore ways to personalize your Amigurumi Mr. Potato Toy Story doll. This is where the magic really comes to life.
1. Add Buttons or Hook-and-Loop Tape
To replicate the classic toy, add Velcro to the back of the face features. This allows kids to reposition eyes, nose, and mouth—just like the original Mr. Potato Head toy!
2. Make Mrs. Potato Head
Switch up the colors and add eyelashes, earrings, or a purse. Change the mouth to a smile or heart shape. Use yarn in pastel tones and blush cheeks for a feminine touch.
3. Create a Display Stand
Use cardboard or wood to build a small platform for your character to stand on. You can crochet a decorative rug or background to enhance the Toy Story theme.
4. Gift Ideas
Place the finished toy in a decorative box with tissue paper. Add a tag that says, “You’ve got a friend in yarn!” It’s great for birthdays, movie nights, or collector’s gifts.
5. Washing & Maintenance
Hand wash your Amigurumi gently with mild soap and cool water. Press dry with a towel and air dry completely before displaying again. Avoid machine washing.
6. Share Your Project
Snap a photo and share your Mr. Potato Amigurumi on social media. Tag fellow crocheters or post in Toy Story fan groups. Use hashtags like #Amigurumi #ToyStoryCrochet to reach like-minded makers.
Final Thoughts – A Handmade Tribute to Toy Story
Creating your own Mr. Potato Toy Story Amigurumi is not just a rewarding crochet project—it’s a way to honor one of animation’s most iconic and beloved characters. With customizable features and endless creative options, this plush version of Mr. Potato Head offers both challenge and charm.
Whether you’re crafting for fun, decorating a themed room, or surprising someone with a handmade gift, this Amigurumi pattern delivers joy with every stitch. The beauty of crochet is that it’s always adaptable—feel free to add your own flair, experiment with facial expressions, or even build a full Toy Story character set!
So grab your yarn, your hook, and your favorite movie soundtrack, and start stitching your own hilarious version of Mr. Potato. He may not come alive when you’re not looking—but he’ll always bring a smile!


