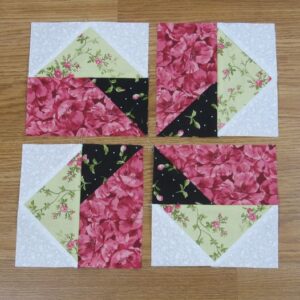
Quilting is an art form that has been cherished for generations. Among the various quilt patterns, the Seesaw Traditional Quilt Block stands out due to its unique and captivating design.
This tutorial will guide you through creating your very own Seesaw Quilt Block, perfect for incorporating into your next quilting project.
We’ll cover the necessary materials, fabric cuts, and step-by-step instructions to help you craft this beautiful block.

Materials Needed for the Seesaw Quilt Block
Before diving into the creation of the Seesaw Quilt Block, it’s essential to gather all the necessary materials. The right materials ensure that your quilt patterns come out looking crisp and professional.
First, you’ll need high-quality quilting cotton fabric in at least two contrasting colors. This contrast will highlight the seesaw pattern effectively. Additionally, having a reliable cutting mat, a rotary cutter, and a clear acrylic ruler is crucial for precise fabric cuts.
Lastly, ensure you have a sewing machine with a ¼ inch foot, coordinating thread, and an iron for pressing seams. With these materials at hand, you’ll be ready to start your quilting journey with the Seesaw Traditional Quilt Block.
Cutting the Fabric for the Seesaw Quilt Block
Accurate cutting is a critical step in creating any quilt block, and the Seesaw Quilt Block is no exception. Here’s a detailed breakdown of the fabric cuts required for a 12-inch finished block.
Begin by cutting two 4.5-inch squares from each of your chosen fabrics. These squares will form the central seesaw design. Next, cut four 2.5-inch squares from both fabrics. These smaller squares will be used to create the outer sections of the block.
In addition to these, cut two strips of fabric measuring 2.5 inches by 12.5 inches. These strips will border the seesaw design, helping to frame the block and give it a cohesive look. With all your pieces cut, you’re ready to move on to piecing your quilt block.
Piecing the Seesaw Quilt Block
The magic of quilting lies in the piecing process, where individual fabric pieces come together to form a cohesive design. For the Seesaw Quilt Block, we’ll start by assembling the central seesaw section.
Begin by pairing each 4.5-inch square with a contrasting 4.5-inch square. Sew these pairs together along one edge, using a ¼ inch seam allowance. Press the seams open to reduce bulk. Next, arrange these paired squares in a 2×2 grid, ensuring the contrasting colors alternate to create the seesaw effect. Sew the pairs together, forming a larger square.
For the outer sections, take the 2.5-inch squares and arrange them around the central block. These will form the points of the seesaw. Sew the squares into pairs, and then attach them to the central block. Press all seams open.
Adding the Border to the Seesaw Quilt Block
Adding a border to your Seesaw Quilt Block not only frames the design but also stabilizes the edges, making it easier to join with other blocks. The 2.5-inch by 12.5-inch strips we cut earlier will serve this purpose.
Start by sewing one strip to the top edge of the block and another to the bottom edge. Use a ¼ inch seam allowance and press the seams open. This will ensure the border lies flat and the block remains square.
Next, sew the remaining two strips to the sides of the block. Again, press the seams open to reduce bulk. Your Seesaw Quilt Block is now complete, bordered, and ready to be incorporated into a larger quilt project.
Tips for Perfecting Your Seesaw Quilt Block
Creating a flawless quilt block takes practice, but these tips can help you achieve a professional finish. Firstly, always use a scant ¼ inch seam allowance. This small adjustment ensures that your pieces fit together perfectly, accounting for the fabric taken up by the seams.
Secondly, pressing seams open or to one side consistently helps in reducing bulk and keeps your quilt top flat. Use a hot iron and steam to set the seams, ensuring crisp, clean lines.
Finally, measure twice and cut once. Accurate cutting is fundamental to piecing quilt blocks successfully. Using a sharp rotary cutter and a clear ruler will help you achieve precise cuts, ensuring your Seesaw Quilt Block comes together seamlessly.
Incorporating the Seesaw Quilt Block into a Quilt
Now that you have mastered the Seesaw Quilt Block, it’s time to think about how to incorporate it into a larger quilt. This block can be used as a focal point or repeated in a series to create a stunning quilt top.
Consider alternating the Seesaw Block with solid blocks or other quilt patterns for a varied and interesting quilt design. You can also play with color variations to create a more dynamic look. The possibilities are endless with such a versatile block.
When piecing your quilt top, ensure all blocks are squared up and of consistent size. This will make the final assembly much easier and ensure your quilt lies flat and even.
Final Thoughts on the Seesaw Quilt Block
The Seesaw Traditional Quilt Block is a beautiful and versatile addition to any quilter’s repertoire. Its unique design adds a touch of whimsy and charm to any quilt. By following this tutorial and using the provided tips, you can create a stunning Seesaw Quilt Block with ease.
Remember, quilting is both an art and a science. Precision in cutting and sewing combined with creative fabric choices will yield the best results. Happy quilting, and enjoy the process of creating your Seesaw Quilt Block!
With this tutorial, you’re well on your way to mastering one of the many captivating quilt patterns available to quilters today. Embrace the challenge, enjoy the creativity, and most importantly, have fun with your quilting projects.


