The holiday season is the perfect time to add a handmade touch to your decorations. If you’re looking for a quick and festive project that brings cheer and warmth, learning how to make a mini Christmas wreath crochet is a delightful way to get started. This adorable project is great for beginners and advanced crocheters alike, and it’s perfect for gifting or adorning your tree, doors, or holiday cards.
Creating a mini Christmas wreath crochet pattern allows you to play with vibrant yarns, charming embellishments, and traditional colors. The best part is that you only need a small amount of yarn, and the project can be completed in less than an hour—making it perfect for last-minute crafting or relaxing evenings with a cup of cocoa.
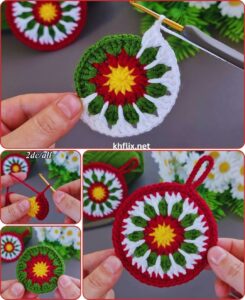
In this tutorial, we’ll walk through everything step by step: from gathering materials and cutting the right yarn lengths to crocheting the base, decorating with bows and berries, and finishing with a hanging loop. So grab your hooks and let’s bring holiday joy to life through crochet!
🎁 Materials & Yarn Cuts Needed for the Mini Wreath
Before diving into the crochet stitches, we need to gather the right tools and prepare your materials. Setting everything up ahead of time helps you stay organized and enjoy the process without interruptions.
-
Yarn Selection
-
Use worsted weight (Category 4) acrylic or cotton yarn.
-
Main colors: Green (for the wreath), red (for bow and berries), white or gold (for accents).
-
Optional sparkle or metallic yarn can be used for festive detail.
-
-
Yarn Quantities
-
Green: approx. 10g (80–100 cm)
-
Red: approx. 3g for bow (30–40 cm)
-
Accent color: small scraps, about 10–20 cm per detail
-
-
Crochet Hook
-
Recommended hook size: 3.5 mm (E) or 4.0 mm (G)
-
Use a smaller hook if you want tighter stitches and firmer structure.
-
-
Additional Tools
-
Tapestry needle for sewing parts
-
Scissors
-
Stitch markers (optional)
-
Glue gun or fabric glue for embellishments (optional)
-
Small decorative items: mini bells, pom-poms, or buttons
-
-
Support Structure (Optional)
-
For added stiffness, you can crochet around a 2-inch plastic ring or metal hoop.
-
Alternatively, cut a ring shape from sturdy cardboard and cover with yarn.
-
-
Finished Size
-
Final wreath will measure approximately 3–4 inches in diameter.
-
Perfect for keychains, gift tags, ornaments, or fridge magnets.
-
🧶 Crochet the Wreath Base – Step by Step
Now let’s create the wreath’s circular base. This is the foundation of your mini Christmas wreath crochet pattern, and we’ll be working in the round.
-
Crocheting Around the Ring
-
If using a plastic or metal ring, begin by attaching green yarn with a slip stitch.
-
Crochet single crochets (sc) around the ring until it’s completely covered.
-
Keep stitches snug and close together to hide the ring.
-
-
Without a Ring (Using Chains)
-
Chain 30, join with a slip stitch to form a circle.
-
Round 1: sc around the ring (30 stitches total).
-
Round 2: 1 sc, 1 hdc, 1 dc in next stitch, 1 hdc, 1 sc – repeat to create a ruffled, leafy look.
-
-
Adding Texture
-
To mimic pine leaves, alternate between sc and dc.
-
Or use the loop stitch every few stitches to give a bushy appearance.
-
-
Fasten Off and Weave In
-
After completing the base, fasten off securely.
-
Use your tapestry needle to weave in ends or tie off at the back.
-
-
Make it Fluffy
-
If you’d like a thicker wreath, repeat the base in a second round and stitch them together.
-
Use polyfill stuffing for a puffy, 3D effect.
-
-
Optional Sparkle
-
Use metallic or gold thread to surface stitch swirls or garlands on the wreath.
-
Embroider tiny stars or snowflakes using white yarn.
-
🎀 Adding Bows, Berries & Holiday Flair
Your wreath base is complete—now it’s time to decorate! These additions bring color, texture, and a joyful spirit to your mini Christmas wreath crochet pattern.
-
Crocheting the Bow
-
With red yarn, chain 15.
-
Row 1: sc in 2nd ch from hook and across. (14)
-
Fasten off and roll into a bow shape. Secure the center with a yarn wrap.
-
Sew or glue the bow to the top or bottom of your wreath.
-
-
Crocheting the Berries
-
With red yarn, make a magic ring.
-
Round 1: 6 sc in ring. Pull tight and sl st to join.
-
Make 2–3 berries and stitch them around the bow area.
-
-
Using Mini Pom-Poms or Beads
-
Attach tiny red pom-poms or beads if you prefer not to crochet berries.
-
Secure with glue or stitch carefully.
-
-
Additional Decorations
-
Sew on tiny buttons, bells, or pearls to mimic ornaments.
-
Add snow accents by stitching with white yarn or adding fabric paint.
-
-
Personalized Touch
-
Use embroidery thread to write a small initial or holiday word on the back.
-
Stitch on a charm or small tag with the year for keepsake purposes.
-
-
Balance Your Design
-
Place embellishments symmetrically or cluster them for a playful look.
-
Remember not to over-decorate; keep it cute and lightweight for keychains.
-
🔗 Final Touches: Hanging Loop & Assembly
With your wreath decorated and assembled, you only need one final step: adding a loop so you can hang or gift your creation!
-
Making the Loop
-
Cut a 10–12 cm piece of yarn or ribbon.
-
Fold in half and sew or glue the loop to the back of the wreath.
-
For a keychain version, attach a jump ring or keychain clasp through a stitch.
-
-
Reinforcing the Structure
-
If your wreath feels floppy, add a layer of felt or cardboard behind it.
-
Sew the wreath to a stiff fabric backing to maintain its shape.
-
-
Fridge Magnet Version
-
Attach a small round magnet to the back using hot glue.
-
Makes a cute and functional holiday kitchen decoration!
-
-
Packaging for Gifting
-
Wrap your mini wreath in tissue paper or place in a small box.
-
Include a handwritten card with care instructions: “Handmade – spot clean only.”
-
-
Selling at Craft Fairs
-
Label each piece with its materials and year made.
-
Price suggestion: $5–$10 per wreath depending on embellishments and size.
-
-
Social Media & Sharing
-
Post your finished wreaths on Instagram or Pinterest using hashtags like #crochetchristmas #crochetwreath #holidaycrochet.
-
Encourage your followers to try the free crochet pattern and tag your account!
-
✨ Conclusion: Handmade Holiday Cheer in Every Stitch
Learning how to make a mini Christmas wreath crochet brings so much heartwarming joy into your home and crafting routine. It’s a small project with big impact, combining traditional holiday charm with your own unique touches. Whether you hang it on a tree, give it as a stocking stuffer, or use it as a car charm, this little wreath will always carry the spirit of handmade love.
This easy crochet pattern is also an excellent stash-buster and can be adapted endlessly—change the colors, vary the textures, or personalize for each recipient. And most importantly, you’ll enjoy the process just as much as the finished piece.
So grab your yarn, spread some holiday cheer, and bring this festive mini wreath to life—one stitch at a time! 🎄


