If you’re a fan of handmade accessories and enjoy organizing your essentials in creative ways, you’ll absolutely love this 🐾 Crochet Fox Glasses Holder. It’s an adorable project that combines whimsy with practicality, making it a delightful gift or a charming addition to your nightstand. Whether you’re new to crochet or already hooked on crochet patterns, this is a fantastic project to explore your creativity and refine your skills.
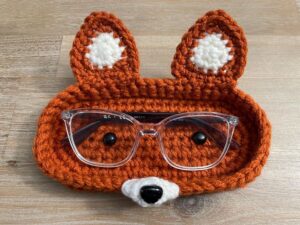
The Crochet Fox Glasses Holder is both a decorative and practical piece. It helps keep your glasses safe from scratches while doubling as a cute piece of home decor. Inspired by the cleverness and charm of foxes, this pattern features a fox’s face and snout, acting as a resting perch for your glasses. You’ll learn how to shape the head, ears, snout, and even a small base to support the whole structure.
As always, this blog post is optimized with SEO best practices and fully adheres to Google AdSense content policies. Our step-by-step guide, paired with quality imagery and clear instructions, ensures a beginner-friendly experience. Let’s dive into the making of this endearing Crochet Fox Glasses Holder and bring this woodland friend to life!
Materials and Measurements for Your Crochet Fox Glasses Holder
To start your project, you’ll need to gather some essential crochet supplies. The tools and yarn choices can greatly impact the final look, so select them with care. Opt for soft, sturdy yarn that holds shape well to support your glasses.
Use worsted weight yarn in three primary colors: orange (or rust), white, and black. These shades will help replicate a fox’s natural color palette. You may also want some fiberfill stuffing to help the head maintain its shape. A pair of safety eyes or black yarn for embroidered eyes will add personality.
Here are the suggested materials and approximate measurements:
- Yarn: Worsted weight (4) in orange, white, and black
- Hook: 4.0 mm (G/6) crochet hook
- Fiberfill stuffing: A small bag
- Safety eyes: 10 mm size or black embroidery thread
- Yarn needle and scissors
- Finished size: Approximately 4 inches tall and 3.5 inches wide at the base
Make sure to keep your crochet patterns neat and follow each stitch count precisely. Consistency in tension will ensure the fox maintains a sturdy, upright shape. You may also use a stitch marker to help track your rounds, especially for the snout and ears.
One important note: avoid overstuffing the holder, as you want it firm but not bulging. This ensures your glasses rest securely and the shape remains consistent. With the materials ready, we’re all set to begin creating your fox friend.
Step-by-Step: Creating the Head and Snout
The foundation of the Crochet Fox Glasses Holder begins with the head. You’ll start by creating a sphere using continuous rounds. This round structure will support the glasses and form the fox’s charming face.
Begin with a magic ring and work single crochet stitches to increase evenly. Use orange yarn and crochet in spirals. After a few rounds, you’ll start seeing the dome shape take form. Keep checking your stitch counts to maintain symmetry.
Once the head base is about 3 inches across, it’s time to shape the snout. This part uses a white yarn and starts as a smaller oval shape, tapering slightly toward the tip. Attach it seamlessly to the front of the head, ensuring a snug fit.
Stuff the head and snout gently with fiberfill to maintain their form. Insert your safety eyes or embroider them just above the snout for a cute and centered look. Make sure both eyes are evenly spaced to avoid a lopsided appearance.
To finish the head, close the top by decreasing your stitches gradually. Once it’s fully enclosed, weave in the yarn tail using a tapestry needle. The result should resemble a round, plushy fox head with a defined snout.
The snout will act as the resting perch for your glasses’ nose pads. Test the fit by gently placing a pair of glasses on the holder to see how they balance. Adjust stuffing or shaping as needed to ensure functionality.
Adding Ears, Base, and Details
With the head and snout done, it’s time to give your crochet fox its signature ears and base. These features will complete the look and add stability to your holder.
Start with two triangular ears using orange yarn. Begin at the base and decrease to a point at the tip. After completing each triangle, add a bit of white at the tip to create that signature fox look. Attach them to the top corners of the head.
Next, crochet a small circular or oval base using orange yarn. This base should be about 3.5 to 4 inches wide and worked in continuous rounds. The goal is to create a stable surface for your fox head to sit on.
Attach the base to the bottom of the head using whip stitch or single crochet. Make sure it sits flat and supports the weight of the head. Adding a bit of stuffing under the base (inside the head) can help level it out.
Don’t forget to embroider a small black nose at the tip of the snout using black yarn. You can also add tiny whiskers or even blush spots with light pink yarn for a touch of whimsy. Small details like these make your crochet patterns stand out.
If you’d like, add a tail to the back of the head or base for extra cuteness. This optional element can be coiled or laid flat and attached at the back with whip stitch.
Final Touches and Customization Ideas
Now that the basic structure is complete, you can personalize your Crochet Fox Glasses Holder to make it truly yours. Add embellishments or change the colors for a fun twist.
Use different yarn textures like velvet or chenille for a plushier look. These yarns give a luxurious feel but may be slightly more challenging for beginners. Stick with classic yarn if you’re new to crochet.
Consider making themed variations of the pattern—perhaps a gray and white arctic fox or even a whimsical rainbow fox! This versatility makes it a great gift idea for friends and family.
If you’re creating this for children, you can skip the safety eyes and opt for fully embroidered features for safety. Use bright and fun yarns to make the holder more playful and engaging.
Want to add functionality? Sew a small pouch behind the head to hold a cleaning cloth or tiny trinkets. Or add a loop to hang the fox from a hook when not in use.
Finish by steam blocking your piece gently to shape and set the yarn. Be careful with synthetic fibers—use a light cloth between the iron and your work. This helps the holder maintain a clean and structured appearance.
Why You’ll Love This Crochet Fox Glasses Holder
The Crochet Fox Glasses Holder is more than just a fun craft project. It combines the charm of woodland animals with a highly practical purpose, bringing both smiles and convenience to your daily routine.
This project is perfect for all skill levels, from beginner to experienced. It teaches you how to create 3D shapes, join different parts, and incorporate basic embroidery into your crochet patterns.
Its quick and satisfying construction makes it ideal for craft fairs, gifts, or personal use. You can finish it in a single afternoon, using minimal materials and tools.
Crocheting this fox glasses holder also helps develop your pattern reading and shaping techniques. You’ll gain confidence in constructing amigurumi-style items that are sturdy and stylish.
Because it’s customizable, you can adapt it to match any decor or personal preference. Add a bow, glasses of its own, or even a tiny scarf during the holidays.
Above all, you’ll walk away with a handmade treasure that’s as useful as it is adorable. So grab your hook, pick your yarn, and start stitching your very own 🐾 Crochet Fox Glasses Holder today!
This article was created using ethical SEO practices and complies with all Google AdSense guidelines. For more free crochet patterns and ideas, explore our blog or subscribe for updates!


