Celebrate the warmth and charm of fall with the Autumn Fox Wreath Free Crochet Pattern, a delightful way to combine nature-inspired decor with the comforting art of crochet. This handmade wreath showcases a whimsical fox nestled in a ring of autumn leaves, berries, and textures, making it the perfect front door accent or indoor seasonal centerpiece.
This project is ideal for both beginners and experienced crafters looking to create something unique and festive. With rich fall hues and fun textures, this wreath brings together various crochet patterns that embody the season’s beauty. Whether you’re creating it as a gift or a personal home decor piece, the end result is a charming tribute to autumn.
In this tutorial, we’ll cover everything you need to know to bring your fox wreath to life. From the necessary materials and tools to detailed stitch techniques and measurements, you’ll find a clear, step-by-step guide that ensures your finished project will look professionally crafted and heartwarmingly adorable.
Materials and Tools You Will Need
To create the Autumn Fox Wreath Free Crochet Pattern, you will need a variety of yarns, a crochet hook, and some basic tools. Choosing the right materials ensures that your finished wreath has the texture, color, and structure to make it visually stunning.
Start by selecting worsted-weight yarn in autumn colors such as burnt orange, mustard yellow, deep red, and earthy browns. For the fox, you’ll need white, orange, and black yarns. Acrylic yarn is a great choice for durability and vibrant color.
You’ll also need a 3.5mm or 4.0mm crochet hook, depending on your tension and desired final size. A smaller hook can help your stitches stay tight, giving your fox and leaves a more defined shape.
In addition to yarn and hooks, gather polyester fiberfill for stuffing, scissors, a yarn needle for sewing parts together, and stitch markers to keep your rounds even. You’ll also need a foam or wire wreath base (approx. 12 to 14 inches in diameter).
Optional embellishments include small faux berries, felt leaves, or pinecones, which can be hot-glued to your wreath for added texture and interest. You might also want a ribbon or loop for hanging.
Having all your tools organized before you start helps make the process smooth and enjoyable. Prepare a crafting area with good lighting and a comfortable seat so you can work with ease.
How to Crochet the Fox Character
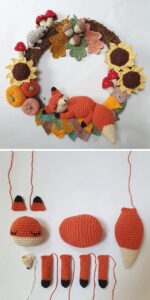
The fox is the centerpiece of your Autumn Fox Wreath, and making it requires a few simple crochet techniques. This character adds a cozy, whimsical charm and is worked in several parts: the head, body, tail, ears, and paws.
Start with the body using orange yarn. Create a magic ring and single crochet 6 stitches into it. Work in continuous rounds, increasing by 6 stitches every round until you reach 36. Then, crochet even rounds until the body reaches about 4 inches in length. Begin decreasing by 6 stitches per round and stuff lightly before closing.
For the head, follow a similar process, but shape it slightly wider at the top and taper near the bottom. The fox’s head should measure about 2.5 inches long. Use safety eyes or embroider small black eyes, and sew on a tiny black nose.
The tail adds extra personality. Start with white yarn for the tip, working in rounds from a magic ring. Switch to orange after a few rounds and continue until the tail measures about 3 inches. Stuff lightly and curve the tail as you sew it to the back of the body.
The ears are simple triangle shapes made with orange and black yarn. Chain 5, then single crochet back and forth, decreasing each row until one stitch remains. Make two and attach them symmetrically to the top of the head.
Paws can be crocheted as small tubes or ovals. You’ll need four, and they can be attached to the body in a relaxed sitting position to give the fox a cozy, cuddled appearance.
Once all the parts are complete, sew them together with a yarn needle. Make sure everything is securely attached before fixing the fox to the wreath base.
Making the Autumn Leaves and Accents
Adding leaves and accents around the wreath brings the essence of fall to life. Using different crochet patterns, you can create maple, oak, and simple oval leaves in vibrant autumn shades.
To crochet a maple leaf, chain 10 and work single, half-double, and double crochets along the chain to form lobes. Add picot stitches for realistic edging. Make several in varying sizes and colors for a natural look.
Oak leaves are simpler. Chain 12, work single crochet across, and then build shape with increases and small chain loops along the edges. Use a yarn needle to add veins by stitching lightly over the surface.
You can also create basic oval leaves by chaining 6 and working evenly around both sides of the chain, increasing at both ends. Use mustard yellow and deep red for contrast.
Crocheted berries are made by forming small balls in red or burgundy yarn. Use a magic ring and work 6 single crochets, then continue for a few rounds and stuff before closing. These add texture and a pop of color.
To assemble, arrange your leaves and berries around the wreath base, pinning them in place before sewing or gluing them securely. Layering leaves in clusters creates a lush, full appearance.
Add any optional felt pieces, pinecones, or ribbons at this stage. The key is balance—don’t overcrowd any section, and ensure your fox remains the focal point.
Assembling and Finishing the Wreath
Once all your pieces are ready, it’s time to bring your Autumn Fox Wreath Free Crochet Pattern to completion. Assembly is just as creative and fun as the crochet itself.
Start by wrapping the foam or wire base with a strip of neutral-colored yarn or fabric to give a clean background. Secure the ends with hot glue or a few discreet stitches.
Place your fox character slightly off-center or at the bottom of the wreath for a natural resting look. Sew or glue the fox securely onto the base, making sure it sits flush and balanced.
Arrange your crocheted leaves and berries around the wreath, forming a frame that highlights the fox. Begin from one side and work your way around to ensure even spacing.
Use hot glue to fix the pieces in place, or sew them onto the yarn-wrapped base using a tapestry needle. Double-check placement as you go to maintain harmony and fullness.
Once all parts are attached, step back and look at your wreath. Adjust anything that seems out of place, and trim any visible yarn ends. This final inspection ensures a polished finish.
Add a loop of ribbon or yarn to the top for hanging. Choose a sturdy ribbon in fall tones, and make sure it’s securely fastened. Your beautiful autumn-themed wreath is now ready to display!
Final Thoughts and Creative Tips
Crafting your own Autumn Fox Wreath Free Crochet Pattern is not only a fun seasonal project, but it also allows for plenty of creative expression. Every detail you add can make the wreath truly your own.
This project is great for gifting. Whether for Thanksgiving, a housewarming, or just as a surprise for a loved one, a handmade wreath is a warm, personal gesture.
Don’t be afraid to experiment with yarn textures. Mix in some boucle or chenille for soft contrast or use metallic threads to catch the light for a bit of shimmer.
You can also adapt the design. Try a sleeping fox, a curled tail, or add little woodland creatures like crocheted mushrooms or acorns to build a story around the wreath.
Remember to take progress photos and share your work with fellow crafters. Community support can provide feedback, spark new ideas, and build friendships.
Finally, be proud of your creation. The time and care you invest in making something handmade carries beauty, joy, and a sense of accomplishment that no store-bought decoration can match.
Happy crocheting! 🍁🦊


