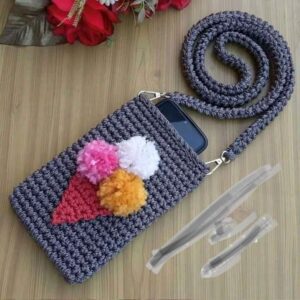
If you’re looking for a stylish, functional, and handmade accessory, this beautiful and charming crochet cell phone case is a perfect project. Whether you’re protecting your device or giving a thoughtful gift, a crochet phone case adds a personal touch to everyday technology. Best of all, it’s a quick project that you can complete in just a few hours.
Made with simple stitches and customizable designs, this crochet pattern is perfect for beginners and experienced crafters alike. You can personalize it with colors, buttons, straps, or even initials. Plus, it offers a great way to use up leftover yarn while making something practical and elegant.
In this blog post, we’ll guide you step-by-step through creating your own crochet cell phone case. From materials to sizing and stitch instructions, everything is clearly laid out so you can confidently follow along. Get your hooks ready—this small project is about to become your favorite go-to gift or market item!
Materials and Preparation for the Crochet Pattern
Before starting your crochet cell phone case, it’s essential to prepare your materials and understand the measurements. Choosing the right yarn, hook, and design will make all the difference in how the final product fits and functions.
For this pattern, choose 100% cotton yarn or a blended worsted weight yarn (category 4). Cotton offers structure and durability, which is ideal for a phone case that gets used often. Acrylic yarn works too, but may stretch more over time.
You’ll need a 3.5mm to 4.0mm crochet hook depending on your tension. A smaller hook makes the stitches tighter and more protective for your phone. If you crochet loosely, consider going down a size.
To fit most standard phones, the finished size should measure approximately 4 inches wide x 6.5 inches tall (10 cm x 16.5 cm). Adjust the pattern slightly if your device is larger or smaller. Always measure your phone before beginning.
Here’s a full list of what you need:
-
Worsted weight yarn in two colors (main and accent)
-
Crochet hook (3.5mm or 4.0mm)
-
Scissors
-
Tapestry needle
-
Optional: button or snap closure, strap ring, stitch markers
You won’t need fabric or lining for this version, but if you’d like to sew in a soft inner liner, cut a piece of cotton fabric 4.25 x 7 inches (10.8 x 17.8 cm) and hand-sew it after the crochet is complete.
Having everything ready before starting makes this crochet pattern much more enjoyable. Keep your tools organized, and make sure to do a gauge swatch to ensure the final size will fit your phone properly.
How to Crochet the Cell Phone Case – Step-by-Step Pattern
Let’s get into the step-by-step instructions for making this beautiful and charming crochet cell phone case. This beginner-friendly pattern is worked from the bottom up in rounds and features a flap with an optional button closure.
Step 1: Foundation and Base
-
Chain 16 (adjust based on your phone’s width).
-
Round 1: Sc in 2nd chain from hook and across (15 sc), then work 3 sc in the last stitch.
-
Continue around the opposite side of the chain, working 14 sc, and then 2 sc in the last stitch to join the round.
-
You should now have 34 stitches around. Place a stitch marker to keep track.
Step 2: Building the Body
-
Round 2–22: Work 1 sc in each stitch around (34 sc). Continue until your piece measures about 6.25 inches tall.
-
You can switch colors halfway for a striped design or work in a solid color for a classic look.
-
Fasten off the yarn at the end of Round 22 if you’re changing colors for the flap.
-
Reattach yarn at the center back of the case to begin flap shaping.
Step 3: Flap Closure
-
Row 1: Sc in next 16 stitches only, turn.
-
Row 2–6: Ch 1, turn, sc across (16).
-
Row 7: Ch 1, turn, sc2tog, sc across to last 2 sts, sc2tog. (14)
-
Row 8–9: Repeat previous row (12 then 10 sts).
-
Row 10: Ch 1, sc across, fasten off.
Step 4: Button Loop (Optional)
-
Join yarn at center of flap tip.
-
Chain 8, join with sl st to same spot to create a loop.
-
Fasten off and weave in all ends.
-
Sew a button on the front of the case body to align with the loop.
If you’d like to add a strap, crochet a long chain (approx. 100 chains), then sc across to make a sturdy cord. Attach to both top sides of the case or sew on metal rings for a detachable strap.
This crochet pattern is adaptable and can include textured stitches like hdc or even bobbles for decorative flair. You can also add a pocket to the back for cards or earbuds.
Creative Variations and Customizations
The best part about crafting your own crochet cell phone case is the freedom to personalize it. There are countless ways to adapt this basic crochet pattern to suit your style or your recipient’s preferences.
Change the stitch pattern for added texture. For example, alternating rows of single crochet (sc) and half double crochet (hdc) can create a subtle ribbed design. The grit stitch (sc, skip 1, dc in next) also adds a lovely woven look.
Want to create a themed case? Try adding appliqué shapes such as hearts, stars, or initials. These small touches can be sewn onto the case after completion, turning a basic case into a customized accessory.
For a luxurious upgrade, line the inside with soft felt or cotton fabric. Cut a rectangle of 4.25 x 7 inches (10.8 x 17.8 cm), fold it in half, and hand-stitch it inside after crocheting. This extra step helps protect your phone’s screen.
You can also explore closure alternatives. Instead of a button, use Velcro, magnetic snaps, or even a loop-and-toggle closure made from wooden beads. Choose a closure that fits the aesthetic and practical use of your case.
Want your case to double as a wallet? Add a zippered pouch or extra pocket to the back. Just crochet a small rectangle and sew it securely onto the case, creating extra space for cash or cards.
Lastly, if you’re making these for gifts or craft fairs, consider branding them with custom tags or labels. Handmade gifts gain even more value with thoughtful presentation.
Selling and Sharing Your Crochet Pattern Online
Once you’ve mastered the beautiful and charming crochet cell phone case, you might want to sell your finished items or share your crochet pattern online. Here are tips to do it successfully and stay within Google AdSense policies.
Start by writing a clear, concise crochet pattern. Use standard US crochet terms, define all abbreviations, and break down steps for easy reading. Include finished measurements, materials list, and gauge.
Offer a downloadable PDF version of the pattern on platforms like Etsy, Ravelry, or your blog. This allows users to print the instructions or keep them on their device without distractions.
Include original photos of your finished item in your post or listing. Google AdSense prefers unique, high-quality content, so make sure your blog features your own work and descriptions.
Incorporate your keywords—like crochet, crochet pattern, and crochet phone case—naturally in the post title, meta description, headers, and throughout the content. Avoid keyword stuffing, which can hurt SEO.
Encourage readers to share their projects by tagging your social media or using a unique hashtag. Engagement helps boost your content visibility and builds community around your designs.
Lastly, make sure your blog follows all Google AdSense guidelines: include a privacy policy, avoid excessive pop-ups, and provide real value in your content. Keep the focus on the craft and clear instructions.
By following this guide, you can create a beautiful and charming crochet cell phone case that’s both stylish and practical. Whether you make it for yourself, a loved one, or your online shop, this project is sure to impress with its blend of utility and handmade charm.


