If you’ve been searching for a beautiful scarf and easy to learn pattern, look no further. This tutorial is tailored especially for beginners who want to create something stylish, warm, and handmade without feeling overwhelmed. This crochet project is simple, rewarding, and the perfect way to introduce yourself to the world of crochet patterns.
What makes this scarf so special is how quickly it comes together. Using basic stitches and easy-to-find materials, you’ll be surprised at how professional your first project can look. Even if you’ve never picked up a hook before, this guide will walk you through the process step by step—with helpful tips and tricks to keep you confident and excited from start to finish.
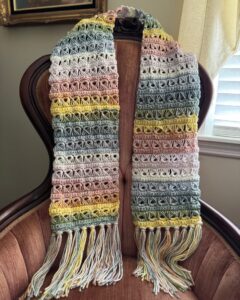
The beauty of this scarf lies in its versatility. Whether you want to wear it in the winter or gift it to a loved one, the color choices and yarn textures can be customized endlessly. By the end of this project, you’ll have a stunning piece that you’ll be proud to say you made with your own hands.
Materials Needed and Fabric Cuts
To get started with your beautiful scarf and easy to learn project, you’ll need only a handful of affordable materials. Gathering the right supplies before you begin will ensure a smooth and enjoyable crocheting experience.
First and foremost, choose a soft worsted-weight yarn. Acrylic or a wool blend works great, especially for scarves meant to keep you warm. Select three skeins (approx. 300g total) of yarn in a color you love. For a more dynamic look, consider using ombre or variegated yarn for subtle color shifts throughout the project.
Next, choose the right hook. For this scarf, a 5.5 mm (I-9) crochet hook is ideal. It works perfectly with worsted-weight yarn and helps maintain an even stitch without being too tight or too loose. If you tend to crochet tightly, consider going up to a 6 mm hook.
You’ll also need a pair of scissors, a yarn needle for weaving in the ends, and optionally a stitch marker to help you track the beginning and end of rows if you’re new to the craft.
As for measurements, this scarf will measure 60 inches (150 cm) in length and 7 inches (18 cm) in width once completed. You can always adjust these measurements to suit your preferences—longer for a wrap-around scarf, or shorter for a trendy neckerchief style.
Once all your materials are gathered, you’re ready to dive into the pattern and start creating something beautiful.
Step-by-Step Instructions for the Pattern
Now let’s dive into the actual crochet pattern for this beautiful scarf. You’ll be working with basic stitches—perfect for those who are still learning. Don’t worry if it takes a few tries to get it right. The key is to practice and enjoy the process.
-
Foundation Chain: Start by making a slip knot and chaining 24 stitches. This will be the width of your scarf. You can adjust this number if you want a wider or narrower scarf. Just make sure your stitch count is even for the pattern to work correctly.
-
Row 1: Work a half double crochet (HDC) into the third chain from the hook, then continue with HDC in each chain across the row. You should have 22 stitches. Chain 2 and turn.
-
Row 2 to End: From this point, you’ll repeat a simple stitch pattern. Work 1 HDC into each stitch across. Chain 2 and turn at the end of each row. Continue until your scarf reaches the desired length—about 60 inches is a good standard.
-
Finishing the Edges: Once the body of your scarf is complete, you can finish off with a single crochet border all around to give it a clean, polished look. This step is optional but highly recommended, especially if you’re giving the scarf as a gift.
-
Fasten Off and Weave In Ends: Cut your yarn, leaving a few inches of tail. Use your yarn needle to weave in the loose ends securely, so they don’t come undone over time.
-
Block Your Scarf (Optional): To enhance the final look and softness of your scarf, lightly block it. Pin it to a towel in the desired shape and lightly steam it, or dampen and let it air dry flat.
This pattern is simple, effective, and helps you build confidence with your basic crochet skills. And the best part? It looks far more advanced than it really is!
Customization Ideas for the Crochet Scarf
Once you’ve mastered the base crochet pattern, you’ll find endless opportunities to customize your scarf to suit your personal style or to make thoughtful handmade gifts.
One easy variation is using multiple colors. Try working each section in a different color to create stripes, or use a gradient yarn to make a natural ombre effect throughout the piece. This adds interest without making the pattern more difficult.
Another way to elevate the look is to add fringe or tassels. Simply cut lengths of yarn (around 6–8 inches), fold them in half, and pull them through the ends of your scarf. This adds flair and a cozy, bohemian vibe.
If you’re feeling adventurous, you can also introduce texture. By alternating rows of HDC with front post or back post stitches, you can create ridges and patterns that make the scarf visually interesting and even warmer to wear.
Want to go even further? Try adding buttons and creating a neck wrap style or infinity loop by sewing the ends together. You can also attach crochet flowers or appliqués to personalize it for the recipient.
This project is incredibly versatile, and once you’ve made one, you’ll likely want to make more in different colors, lengths, and styles.
Tips for Beginners and Final Thoughts
Crocheting your first scarf is a rewarding experience, and with this beautiful scarf and easy to learn pattern, you’re setting yourself up for success. Here are a few final tips to help you make the most of your project:
-
Practice tension: Try to keep your tension consistent throughout the project. This will help your stitches look even and make your scarf more uniform.
-
Don’t be afraid to unravel: If you make a mistake, simply pull out a few stitches or even a whole row and try again. It’s all part of the learning process!
-
Use a stitch counter or row counter app: Especially helpful if you need to put the project down and return to it later.
-
Watch tutorials: There are many great videos that show how to do HDC and single crochet borders. Seeing the movements can be easier than reading about them alone.
-
Crochet with good lighting: Working in a bright space can help you see stitches clearly and prevent eye strain.
-
Relax and enjoy: Remember, the journey is just as important as the finished product. Crochet is a meditative and enjoyable craft, and every scarf you make will be better than the last.
In conclusion, this beautiful scarf and easy to learn pattern is perfect for beginners looking to practice their stitches while creating something functional and fashionable.
It uses only basic crochet techniques and is easily customizable with colors, borders, and embellishments. Whether you’re crocheting for yourself, a friend, or a special occasion, this scarf is a simple project that delivers stunning results.


