The holidays are the perfect time to get creative with your decorations, especially when you can mix festive charm with sustainability. This Christmas Tree Ornament in Recyclable Lid is not only beautiful but also eco-friendly. By combining simple materials like plastic jar lids and yarn, you can make something stunning and meaningful for your Christmas décor.
This tutorial is ideal for beginners and experienced crafters alike. It provides a step-by-step crochet pattern that’s easy to follow and doesn’t require a lot of time or expensive materials. You’ll learn how to create a miniature Christmas tree within the frame of a recycled lid, turning everyday trash into holiday treasure.
Using the terms crochet and crochet pattern strategically throughout the post helps this content stay optimized for search engines, making it easier for others to discover this fun DIY. So, let’s dive into this cheerful craft that celebrates both creativity and sustainability!
Materials and Tools You’ll Need
Before you begin crocheting your Christmas tree ornament in a recyclable lid, let’s gather everything you need. The beauty of this crochet pattern is that it uses simple tools you likely already have at home or in your crafting kit.
You’ll need a round recyclable lid — like one from a peanut butter jar or a plastic bottle. The size can vary, but ideally, you want a lid with a diameter between 6–8 cm (2.5–3 inches) to allow enough space for your crochet tree and decorations. Make sure it’s clean and dry before using it.
Next, select your crochet hook, typically between 2.5mm and 3.5mm, depending on your yarn. You’ll also need green yarn (for the tree), white or red yarn (for the background), and yellow yarn (for the star or ornaments). Worsted-weight yarn or DK yarn works best for small projects like this.
Other essential tools include a yarn needle, stitch marker, hot glue or craft glue, scissors, and some optional embellishments such as beads, sequins, or miniature bells. These will give your ornament a lovely festive sparkle.
If you want a softer or more “filled-in” background behind the lid, you can also cut out a small circle of felt fabric to glue at the back. A piece of cardboard or even reused holiday wrapping paper can also be used to seal the back of your ornament.
Finally, to hang your finished ornament, have some ribbon or twine on hand. You’ll attach this to the top of your ornament later to make it easy to hang on your Christmas tree.
Creating the Crochet Tree and Background
Now that you’ve gathered your materials, it’s time to work on the most important parts of this crochet pattern — the Christmas tree and the background. These two pieces come together inside the lid to form the focal point of the ornament.
Begin by crocheting the background circle. This should fit snugly inside the recyclable lid. Use white yarn to mimic snow or red for a more traditional holiday color scheme.
Background Circle Pattern:
-
Round 1: Make a magic ring, ch 2, 12 dc inside the ring, sl st to join
-
Round 2: Ch 2, 2 dc in each stitch around (24 dc), sl st
-
Round 3: 1 dc, 2 dc in next repeat around (36 dc), sl st
-
Adjust size by adding or subtracting rows to fit your lid
-
Fasten off and weave in the ends
-
Test the fit and glue it into the lid when you’re ready
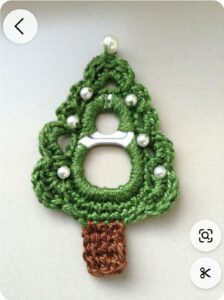
Next, crochet the Christmas tree. We’ll build it using three decreasing triangle rows to give it a layered look.
Mini Crochet Tree Pattern:
-
Row 1: Ch 9, sc in 2nd ch from hook, sc across (8 sc)
-
Row 2: Ch 1, turn, sc2tog, 4 sc, sc2tog (6 sc)
-
Row 3: Ch 1, turn, sc2tog, 2 sc, sc2tog (4 sc)
-
Row 4: Ch 1, turn, sc2tog twice (2 sc)
-
Row 5: Ch 1, turn, sc2tog (1 sc), fasten off
-
Add a small yellow star or button to the top for decoration
Once your tree is finished, use a yarn needle to sew it onto the background circle. You can also hot glue it if you prefer. Add a few stitched or glued-on beads as ornaments.
This is where your crochet creativity really shines—each ornament can be personalized with unique details and embellishments!
Assembling the Ornament in the Lid
Now that your crochet pieces are ready, it’s time to assemble your Christmas tree ornament in the recyclable lid. This step transforms your small crochet art into a framed, tree-ready decoration.
First, take your clean lid and, if necessary, paint the rim with acrylic paint or cover it with washi tape to match your color scheme. A glittery gold or deep green always adds a nice festive touch. Let it dry completely before gluing.
Next, insert and glue the crochet background securely into the lid. Use craft glue or hot glue around the inner edges to hold it in place. Press gently and allow it to set for several minutes before moving on to the next step.
Once your background is secure, center the Christmas tree in the middle of the lid and glue it down if you haven’t already sewn it on. Press gently with your fingers or a flat object to ensure even placement.
Add embellishments like beads, glitter, or sequins for a sparkly touch. These can be sewn or glued on, depending on your preference. Just be sure not to overload the small surface area—balance is key for this design.
Cut a small circle of felt or cardboard slightly larger than the back of the lid and glue it in place. This will give the ornament a clean and finished appearance, hiding all your stitches and glue marks.
Finally, loop a piece of twine, ribbon, or yarn through the top rim of the lid and tie it securely. This is what you’ll use to hang your ornament on the tree!
Variations and Final Thoughts
One of the joys of working with a crochet pattern like this is how easily it can be customized. The basic concept of using a recyclable lid as a frame opens the door to all sorts of creative possibilities—let’s explore a few!
For a rustic look, use jute twine and natural colors like cream, forest green, and brown. Add a small pinecone or cinnamon stick to the back for a delightful scent and earthy appeal.
If you’re going for bright and colorful, make your tree rainbow-striped or alternate the background with metallic yarn. Add buttons, bows, or glitter for that extra festive flair that kids love.
Want a more sophisticated design? Use velvet yarn or thread, gold accents, and glass beads for a luxe finish. These elegant ornaments are great for gifting or selling at holiday craft fairs.
Make an entire collection of crochet lid ornaments—not just trees! Try snowmen, reindeer, gingerbread men, or even crocheted text like “Joy” or “Noel.” Use the same lid frame and background circle format to keep a cohesive look.
These ornaments are also wonderful for eco-conscious gifting. Add them to wrapped presents, attach them to a wine bottle, or include them as party favors. You’re not just giving a gift—you’re sharing creativity and sustainability.
In the end, this crochet Christmas tree ornament in a recyclable lid blends fun, creativity, and environmental care. It’s a wonderful project to do with family, teach in workshops, or simply enjoy during a quiet winter evening.
Conclusion
Crafting a Christmas tree ornament in a recyclable lid is a joyful way to celebrate the holiday season while reducing waste and embracing creativity. This easy and eco-friendly crochet pattern is perfect for making memories, decorations, and gifts that are both meaningful and sustainable.
Whether you’re looking for a fun weekend project or a handmade touch for your Christmas tree, this ornament delivers. It’s small, impactful, and endlessly customizable. Plus, by using recycled materials, you’re doing your part for the planet while sharing the joy of crochet.
So grab your hooks, yarn, and that forgotten peanut butter lid—because it’s time to stitch your way to a greener and more festive holiday season. 🎄


