
Crochet Angel Keychain Pattern is a delightful project for anyone who enjoys creating meaningful handmade accessories with crochet. This charming miniature design combines beauty, creativity, and practicality in a small project that can be completed in just a few hours. Whether you want to make a thoughtful handmade gift, decorate your keys, personalize a backpack, or create small items to sell at craft fairs, the Crochet Angel Keychain Pattern is a wonderful choice. Throughout this tutorial, you will learn how to crochet each part of the angel using standard US crochet terminology, making it easy for beginners while remaining enjoyable for experienced crocheters.
One of the reasons miniature crochet projects are so popular is that they require only a small amount of yarn while offering endless customization possibilities. You can experiment with different yarn colors, embroidery techniques, decorative beads, tiny ribbons, and keychain hardware to create unique angels that reflect your own personal style. Since the project is compact, it is perfect for practicing stitch consistency, learning amigurumi techniques, and improving shaping skills without committing to a large crochet project. Every completed angel becomes a meaningful handmade keepsake that can be treasured for years.
Before starting the Crochet Angel Keychain Pattern, it helps to understand the overall construction. The angel is generally crocheted in several small sections, including the head, body, wings, halo, and optional decorative details. These individual pieces are then assembled securely before attaching the keychain ring. Working carefully through each step while maintaining even stitch tension allows you to create a beautiful finished angel with a professional appearance. The result is a lightweight, durable, and charming accessory suitable for everyday use or special occasions.
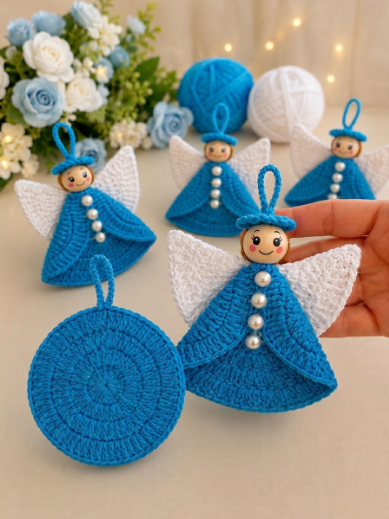
Choosing Materials for the Crochet Angel Keychain Pattern
Selecting quality materials is the first step toward creating a beautiful Crochet Angel Keychain Pattern. Cotton yarn is highly recommended because it provides excellent stitch definition, durability, and a neat appearance. Mercerized cotton works especially well for miniature crochet because it produces crisp stitches and resists fuzzing.
Choose a crochet hook slightly smaller than the yarn recommendation to create tight stitches. Firm stitches are especially important in amigurumi projects because they prevent stuffing from showing through the fabric while helping the angel maintain its shape.
Prepare your crochet tools before beginning the project. You will need scissors, stitch markers, a yarn needle, polyester fiberfill stuffing, embroidery thread, and a metal keychain ring with a jump ring for finishing.
Color selection offers many creative opportunities. Soft white, cream, beige, and pastel shades create traditional angel designs, while gold, silver, light blue, pink, or lavender add decorative elegance. Skin-tone yarn may be used for the head, while white or ivory works beautifully for the wings.
Decorative details such as tiny satin bows, miniature pearls, embroidered stars, or metallic thread can enhance the finished angel without making the project overly complicated. Small handmade embellishments often make every angel unique.
Before starting, organize all materials in a comfortable workspace with good lighting. Having everything within reach allows you to focus on your stitching and enjoy the creative process from beginning to end.
Step-by-Step Instructions for the Crochet Angel Keychain Pattern
Begin your Crochet Angel Keychain Pattern by creating a magic ring for the head. Crochet several single crochet (sc) stitches into the ring and continue working in continuous rounds while increasing evenly until the desired head size is reached.
After completing the increases, crochet several rounds evenly before beginning the decrease rounds. Add a small amount of polyester fiberfill stuffing before closing the opening completely. Secure the yarn carefully and weave in the tail.
Next, crochet the body beginning with another magic ring. Continue working upward using single crochet stitches while shaping the dress with gradual increases if desired. Decorative rounds using half double crochet (hdc) or double crochet (dc) can create a flowing skirt effect.
Crochet two identical wings separately using foundation chains combined with single crochet, half double crochet, and double crochet stitches. The wings should remain lightweight while maintaining enough structure to hold their shape once attached.
Create a small halo by crocheting a tiny ring of chains joined with a slip stitch (sl st). Alternatively, metallic embroidery thread or gold-colored yarn may be used to produce a delicate halo above the angel’s head.
Assemble all pieces carefully by sewing the head, wings, and halo securely onto the body. Finally, attach the keychain ring through a reinforced loop at the top of the head, ensuring the angel is ready for everyday use.
Creative Ways to Personalize Your Angel Keychain
One of the greatest advantages of the Crochet Angel Keychain Pattern is the ability to customize every detail. Small design changes allow each angel to become completely unique while maintaining the same basic construction.
Experiment with different dress colors to celebrate various holidays or special occasions. White creates a classic angel, while red, green, gold, pastel shades, or even rainbow colors add personality and seasonal charm.
Embroidery can be used to create delicate facial features. Small stitched eyes, a gentle smile, and rosy cheeks give the angel a warm and friendly appearance while preserving the simplicity of the design.
Tiny flowers, stars, snowflakes, or hearts may be crocheted separately and sewn onto the dress or wings as decorative accents. These additions require very little extra yarn but greatly enhance the finished project.
You can also add miniature bows, pearl beads, or sparkling thread around the halo to create elegant gift items suitable for baptisms, weddings, Christmas decorations, or memorial keepsakes.
Creating several angels in coordinating colors allows you to make matching gift sets for family members, friends, teachers, or holiday craft fairs while enjoying the flexibility of this versatile crochet project.
Helpful Crochet Tips for Beautiful Results
Maintain even stitch tension throughout the entire Crochet Angel Keychain Pattern. Consistent stitches help every piece fit together correctly while giving the finished angel a polished, professional appearance.
Count your stitches at the end of every round. Accurate stitch counts ensure the head, body, and wings remain symmetrical and properly proportioned during assembly.
Stuff the head firmly but not excessively. Balanced stuffing helps the angel maintain its shape without stretching the stitches or creating uneven surfaces.
Secure every yarn end carefully by weaving it through several stitches in different directions. Proper finishing significantly improves durability, especially for a keychain that will receive regular handling.
If your wings curl slightly after crocheting, lightly block them according to your yarn’s recommendations before attaching them to the body. This helps them lie flat and creates a cleaner finished appearance.
Most importantly, enjoy the creative experience. Every handmade angel reflects your patience, craftsmanship, and creativity, making each finished keychain a meaningful keepsake filled with personal value.
FAQ
Is the Crochet Angel Keychain Pattern suitable for beginners?
Yes. Beginners who know basic stitches such as chain, single crochet, half double crochet, double crochet, and slip stitch can complete this project successfully with careful attention to the assembly process.
What yarn is best for crochet angel keychains?
Cotton yarn is generally the preferred choice because it produces firm stitches, excellent stitch definition, durability, and a clean appearance suitable for miniature crochet projects.
Which crochet stitches are commonly used?
Most versions of the pattern include chain (ch), single crochet (sc), half double crochet (hdc), double crochet (dc), slip stitch (sl st), and the magic ring technique for starting circular pieces.
How long does it take to complete one angel?
Most crocheters can finish a crochet angel keychain in approximately two to four hours depending on their experience and the decorative details they choose to include.
Can I customize the angel’s colors?
Absolutely. The design can be made in traditional white or personalized using seasonal colors, favorite shades, metallic yarn, or decorative embroidery.
What stuffing should I use?
Polyester fiberfill is commonly recommended because it is lightweight, washable, and helps the finished angel maintain its shape over time.
Are crochet angel keychains good handmade gifts?
Yes. They are popular gifts for Christmas, baptisms, confirmations, birthdays, weddings, baby showers, memorial keepsakes, and many other meaningful occasions.
Can I sell angels made from this pattern?
Many crocheters sell handmade angel keychains at craft fairs and online marketplaces. If using another designer’s published instructions, always respect any copyright or licensing terms associated with the original pattern.
Conclusion
The Crochet Angel Keychain Pattern is a rewarding crochet project that combines meaningful symbolism with beautiful handmade craftsmanship. Throughout this tutorial, you learned how to choose suitable materials, crochet the head, body, wings, and halo, assemble the individual pieces, personalize the design with decorative details, and apply professional finishing techniques that improve both appearance and durability. These simple methods allow you to create elegant miniature angels that can be used as keychains, backpack charms, ornaments, thoughtful gifts, or cherished keepsakes. With patience, consistent stitching, and a little creativity, every completed angel becomes a unique expression of your crochet skills and artistic style. If you enjoyed this tutorial, please leave your honest opinion in the comments and share your suggestions for future crochet projects. Your feedback is greatly appreciated and helps inspire even more creative ideas for the crochet community.

