A Crochet Baby Hoodie is one of the most adorable and functional handmade items you can create for a newborn or toddler. Not only does it provide warmth and comfort, but it also becomes a treasured keepsake for families. If you’re looking for a heartfelt gift or a stylish addition to your baby’s wardrobe, making a baby hoodie with crochet is a wonderful project.
The beauty of this pattern is that it combines practicality with creativity. With just a few basic crochet patterns, you can design a custom hoodie in any color, size, or style. It’s perfect for both beginners eager to try garment-making and experienced crocheters looking for a quick yet satisfying project.
In this article, you’ll learn everything you need to know to make a Crochet Baby Hoodie, including materials, measurements, and a step-by-step breakdown. Let’s dive into the world of crochet and create something truly special!
Choosing the Right Materials and Sizing
Before picking up your hook, it’s essential to understand the materials and measurements required for making a Crochet Baby Hoodie. The success of your project largely depends on choosing the right yarn, tools, and size specifications for the age group you’re targeting.
Start by selecting a baby-friendly yarn—one that’s soft, washable, and hypoallergenic. Acrylic or cotton yarns in medium (worsted weight 4) are great options. Look for labels that say “baby yarn” for gentle, skin-safe fibers. Avoid scratchy or heavily textured yarns, as comfort is key.
Next, choose the appropriate crochet hook size. A 5.0 mm (H-8) or 5.5 mm (I-9) hook typically works well with worsted weight yarn. The hook size affects not just the texture but also the sizing of the hoodie, so make a small swatch to check your tension before you begin.
For a newborn to 6-month-old baby, aim for these basic measurements:
-
Chest circumference: 16–18 inches (40–45 cm)
-
Body length (shoulder to hem): 10–11 inches (25–28 cm)
-
Sleeve length: 5–6 inches (13–15 cm)
You’ll also need a measuring tape, stitch markers, yarn needle, buttons (optional for front closures), and scissors. Keep your workspace tidy with a tray or basket to hold these supplies as you go.
Don’t forget to wash and block your finished piece! This step ensures that the fibers relax, the stitches settle evenly, and your crochet baby hoodie maintains its shape beautifully over time.
Step-by-Step Pattern for the Crochet Baby Hoodie
Now it’s time to start crocheting! This easy Crochet Baby Hoodie pattern is made in pieces: the back, two front panels, sleeves, and the hood. Then it’s sewn together and finished with trims.
Step 1: Back Panel
Chain 36 (adjust for larger sizes).
Row 1: Single crochet (SC) into the second chain from the hook, and SC across. (35 stitches)
Row 2–28: Chain 1, turn, and SC in each stitch. (Continue until the panel measures approx. 11 inches for newborn size.)
Step 2: Front Panels (Make 2)
Chain 18 for each panel.
Row 1: SC in second chain from hook and across. (17 stitches)
Row 2–28: Repeat SC rows.
Note: On one panel, leave room (about 4–5 stitches unworked) at the top on the final few rows to shape the neckline.
Step 3: Sleeves
Chain 24.
Row 1: SC in second chain from hook and across. (23 stitches)
Row 2–16: Chain 1, turn, SC across. (Continue until the sleeve measures 6 inches.)
Optional: Add increases at the edges to slightly flare the sleeve.
Step 4: Hoodie (Hood Section)
Chain 32.
Row 1: SC in second chain from hook and across.
Row 2–22: Continue working SC rows to build the rectangular hood shape.
Fold in half and seam the top together with a slip stitch or whip stitch to form the hood.
Step 5: Assembly
Lay out all pieces flat. Attach the front panels to the back panel by whip-stitching the shoulder seams.
Attach sleeves by aligning the sleeve center with the shoulder seam, then stitch along the sleeve caps.
Sew side seams and underarms in one continuous line.
Attach the hood to the neckline using whip stitch. Weave in all loose ends.
You now have a complete Crochet Baby Hoodie! You can customize the front with buttons, a zipper, or simply leave it open-fronted for layering.
Customizing and Styling Your Baby Hoodie
One of the best parts of creating a Crochet Baby Hoodie is the opportunity to make it truly one-of-a-kind. With the basic structure complete, it’s time to explore your creative options.
Start by playing with color combinations. Classic pastels are perfect for newborns, while bolder colors and stripes suit toddlers. You can alternate colors between rows, create blocks, or even make rainbow hoodies.
Add textures using different crochet patterns. For example, switch from single crochet to half-double crochet or try a ribbed pattern for the sleeve cuffs and bottom edge using front post and back post stitches.
For an elegant finish, consider a decorative border. A scalloped or shell edging gives the hoodie a more polished, vintage look. These details add charm and showcase your skill in crochet.
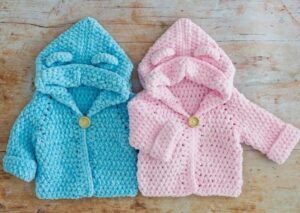
Another popular customization is adding ears to the hood. Little bear or bunny ears are adorable additions that make the hoodie even more precious. Use two small half circles and attach them securely to the top of the hood.
Think about closures too. Wooden buttons, toggles, or snap fasteners can be functional and decorative. Just be sure that any embellishments are safely secured and baby-friendly to avoid choking hazards.
Finally, don’t forget labels or tags! If you’re gifting or selling the hoodie, adding a personalized tag with washing instructions and your handmade logo makes your crochet pattern feel even more professional and heartfelt.
Benefits of Making a Crochet Baby Hoodie
Crafting a Crochet Baby Hoodie is rewarding for many reasons. Beyond the satisfaction of completing a garment, you’re also creating something meaningful and functional for someone special.
First, the hoodie is highly practical. Babies can wear it indoors or outdoors, over onesies or sweaters, depending on the season. It offers warmth without the bulk of a jacket and moves easily with the child’s body.
Second, it makes a wonderful gift. Whether it’s for a baby shower, birthday, or holiday, handmade items like a crochet hoodie show time, effort, and love. They’re always appreciated and often become heirlooms.
Third, it’s a fantastic crochet pattern for skill-building. You’ll gain experience with shaping, seaming, and garment construction—all essential techniques that help grow your confidence as a crafter.
Moreover, you can use leftover yarn from previous projects to make matching accessories like hats, booties, or mittens. Creating sets not only reduces waste but also increases the value and appeal of your work.
You also gain a sense of personal fulfillment. In today’s fast-paced world, taking the time to create something by hand is both grounding and satisfying. Each stitch becomes part of a story that’s woven into a wearable piece of art.
Lastly, a crochet baby hoodie is a stepping stone. Once you’ve completed one, you’ll likely be inspired to try more complex garments like cardigans, dresses, or adult-sized hoodies. The possibilities in crochet are endless.
Final Thoughts: Cozy Comfort From Your Hands to Theirs
Making a Crochet Baby Hoodie is one of the most fulfilling and useful projects for both beginners and advanced crafters. It’s a small, manageable garment that allows you to practice essential skills while producing something incredibly cute and functional.
With basic tools, a good pattern, and your personal touch, you can create a handmade item that brings joy and warmth to little ones. The process is as rewarding as the result—and every stitch is a hug made from yarn.
So gather your supplies, follow the step-by-step guide, and start stitching today. Whether for a gift, a boutique, or your own child, your crochet patterns can wrap love and warmth into every thread.


