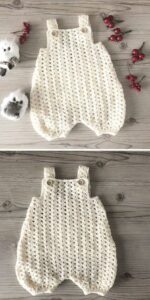
Creating a crochet baby romper is a delightful project that combines creativity, functionality, and a touch of love. If you’re passionate about crochet and enjoy working with crochet patterns, this is a perfect item to add to your handmade collection. A crochet baby romper is not just adorable but also a thoughtful gift for baby showers or a special addition to your own baby’s wardrobe.
One of the best things about making a crochet baby romper is that it allows for endless customization. From color choices to intricate stitch details, you can design a romper that perfectly suits the little one you are making it for. Whether you are a beginner or an experienced crocheter, following a step-by-step guide will ensure your project is a success.
In this tutorial, we will walk you through the entire process of crafting a crochet baby romper using easy-to-follow crochet patterns. You will learn all about the materials you need, the stitch types, and the precise measurements required to create a perfect fit. Let’s begin this creative journey!
Materials and Preparation
Before you start your crochet baby romper, it is essential to gather all the necessary materials to make the process smooth and enjoyable.
First, choose soft, baby-friendly yarn. Cotton yarn is highly recommended because it is gentle on sensitive skin and is easy to wash. Select a yarn weight of DK (double knitting) or light worsted for a comfortable, breathable garment.
Next, you will need an appropriate crochet hook size, typically 3.5mm to 4mm, depending on your yarn choice. Always remember to check the yarn label for recommended hook sizes to achieve the right tension.
Don’t forget other essential supplies like stitch markers, measuring tape, scissors, and buttons for fastening the romper. Stitch markers are especially helpful in keeping track of rounds and pattern sections.
Another important preparation step is to take note of baby sizing. A standard newborn size typically measures around 14 inches (35.5 cm) chest circumference and 12 inches (30.5 cm) in length from shoulder to bottom. Adjust measurements based on the baby’s age and size.
Finally, familiarize yourself with the basic crochet patterns used in this project, such as single crochet, double crochet, and slip stitch. Mastering these stitches will make following the instructions much easier.
Crocheting the Bodice
The bodice is the upper part of the crochet baby romper and sets the foundation for the rest of the garment.
Start by creating a foundation chain that matches the chest circumference measurement. For a newborn size, you can chain around 60 stitches, adjusting as needed.
Join the chain in the round with a slip stitch, making sure the chain is not twisted. Begin working rounds of double crochet stitches to form the main part of the bodice. Continue crocheting until you reach about 4 inches (10 cm) in height.
At this point, create armholes by skipping 10 stitches on each side and chaining 10 stitches over the gaps. This will create the arm openings while continuing the circular pattern.
Continue working in rounds above the armholes to build the chest area until the total bodice height measures approximately 6 inches (15 cm).
To finish the bodice, make a final round of single crochet stitches to create a neat edge. Fasten off the yarn and weave in any loose ends securely to keep the project tidy.
Shaping the Bottom and Leg Openings
The bottom of the crochet baby romper is where you will start to form the shape that covers the diaper area and create leg openings.
From the bottom edge of the bodice, work evenly spaced double crochet stitches in rounds, gradually decreasing every few stitches to start tapering the romper towards the crotch.
Measure the length from the waist to the crotch, typically about 4 inches (10 cm) for a newborn size. Continue crocheting until you reach this measurement.
Split the round into two equal parts to form the leg openings. Work in rows back and forth to build each leg separately, creating a snug but comfortable fit for the baby’s legs.
For each leg opening, crochet about 3 inches (7.5 cm) in length, finishing with a round of single crochet stitches to form a clean edge.
Fasten off the yarn and securely weave in all ends. Check that both leg openings are symmetrical and that the shape is balanced.
Adding Straps and Finishing Touches
Straps are essential for holding the crochet baby romper securely in place and adding a charming detail to the overall look.
Attach yarn to the top edge of the bodice at the back. Chain enough stitches to create a strap that can comfortably reach over the baby’s shoulder to the front. A good starting length is about 6 inches (15 cm).
Work single crochet stitches along the chain to create a sturdy strap. Attach the end of the strap to the front of the bodice using slip stitches or by sewing securely with a yarn needle.
Repeat the same process to create the second strap, ensuring both straps are the same length and positioned symmetrically.
Add buttons to the front of the romper where the straps meet the bodice. You can either make buttonholes by skipping stitches in the strap or use the natural gaps in the crochet pattern as button loops.
Finally, check all parts of the romper for loose ends, secure stitching, and even shaping. Blocking the finished romper can help even out stitches and give the piece a polished look.
Optional Customizations and Final Thoughts
One of the joys of making a crochet baby romper is the opportunity to personalize it with creative touches.
Consider adding decorative edges, such as picot or scallop stitches, around the leg openings, armholes, or neckline to give the romper a unique flair.
You can also incorporate color changes or stripes into the crochet pattern to make the romper more vibrant and playful. Soft pastel colors often work well for baby garments.
If you enjoy more advanced techniques, try integrating textured stitches like bobbles or shells to add visual interest to the body of the romper.
Adding small appliques, like crocheted hearts, stars, or flowers, can further personalize your project and make it a cherished keepsake.
In conclusion, creating a crochet baby romper is a fulfilling project that beautifully combines functionality and creativity. With this easy-to-follow guide and step-by-step instructions, you can craft a unique piece that is both practical and adorable. Dive into your next crochet pattern and enjoy the process of bringing this precious garment to life!


