If you’re a beginner looking to start your crochet journey, creating a crochet bookmark is the perfect first project. With minimal materials, a simple crochet pattern, and no need for complex shaping, this fun and functional craft allows you to practice essential stitches while making something beautiful and useful.
Not only does a crochet bookmark help you build confidence with your hook, but it’s also a thoughtful handmade gift. Book lovers adore personalized bookmarks, and you can customize them with different yarn colors, decorative tassels, or even embroidered initials.
In this post, you’ll find everything you need to make your first crochet bookmark as a beginner. From a materials checklist and measurements to step-by-step instructions, we’ll guide you through this relaxing and beginner-friendly project that’s ideal for all ages.
Materials and Measurements for Your First Crochet Bookmark
Before diving into the stitches, it’s important to gather the right materials and understand the size of your project. A bookmark is typically flat, rectangular, and lightweight, which makes it great for practicing crochet techniques without a steep learning curve.
1. Yarn Selection
Choose a lightweight yarn such as cotton DK (light worsted weight). Cotton yarn is smooth and doesn’t stretch, making it perfect for flat pieces like bookmarks. Opt for colors that contrast well if you want to add decorative details later.
2. Hook Size
Use a 3.0 mm to 3.5 mm crochet hook to ensure your stitches are neat and tight. This helps your crochet bookmark lay flat without curling.
3. Optional Fabric or Felt Backing
To add structure or decoration, you can cut a piece of light interfacing or felt. A rectangle measuring 6.5 inches by 1.5 inches (16.5 cm by 3.8 cm) works well for most bookmarks. You can sew or glue the crocheted piece onto this backing once it’s complete.
4. Additional Tools
You’ll need a yarn needle for weaving in ends, sharp scissors, and optional embellishments like tassels, buttons, or embroidery thread if you want to personalize your bookmark.
5. Bookmark Size
Most crochet bookmarks measure 6–7 inches long and 1.5–2 inches wide (approx. 16–18 cm by 4–5 cm). This fits comfortably in standard books without sticking out too much or causing the book to bulge.
6. General Tips
Keep your tension even and check that your edges are straight. Blocking the finished piece helps even out the stitches and gives your bookmark a professional finish.
Step-by-Step Crochet Pattern for Beginners
This crochet bookmark pattern is created using only basic stitches. It’s worked flat in rows, making it ideal for those who are new to reading crochet patterns. You’ll need to know how to chain (ch), single crochet (sc), and optionally slip stitch (sl st) to finish.
1. Start with a Foundation Chain
-
Chain 13 (this forms the width of the bookmark).
-
You can adjust the width by chaining more or fewer stitches, depending on your preference.
2. Row 1 – First Row of Single Crochet
-
Starting in the second chain from your hook, make 1 sc in each chain across. You should have 12 stitches at the end of the row.
-
Turn your work.
3. Rows 2–40 – Continue in Single Crochet
-
Chain 1 at the start of each row (this does not count as a stitch).
-
Make 1 sc in each stitch across the row. Repeat for a total of 40 rows or until the bookmark reaches your desired length.
4. Finishing the Edges
-
To create a clean edge, work a round of single crochet around the entire piece.
-
Place 1 sc in each stitch on the sides, and 2–3 sc in each corner to keep the edges smooth.
-
Slip stitch to the first stitch to join and fasten off.
5. Weaving in Ends
-
Use a yarn needle to weave in all loose yarn tails neatly on the back of the bookmark.
-
Trim any excess and make sure nothing is poking out.
6. Blocking the Bookmark
-
Wet-block or steam your finished bookmark by pinning it flat on a towel and lightly spraying with water. Allow it to dry completely. This gives a polished and professional look to your work.
Personalizing and Decorating Your Crochet Bookmark
Once you’ve completed your basic crochet bookmark, it’s time to make it your own! Customizing is a fun way to add personality and turn your simple piece into a memorable gift or keepsake.
1. Add a Tassel or Charm
Create a small tassel using leftover yarn and attach it to one end of the bookmark using a loop or jump ring. You can also use metal charms for a more elegant look.
2. Embroider Initials or Words
Use embroidery thread to stitch initials, a name, or a short phrase like “Read On” or “Bee Kind” onto the front of the bookmark. Light-colored yarn works best as a base for embroidery.
3. Use Color Blocking or Stripes
Instead of one solid color, switch yarn shades every 5–10 rows for a striped effect. You can also work in color blocks, such as half yellow and half gray, for a modern touch.
4. Add Edging Designs
Once you’ve completed the main rectangle, try a decorative edge like a scallop border or picot edging. These are made with chains and slip stitches and add a delicate detail.
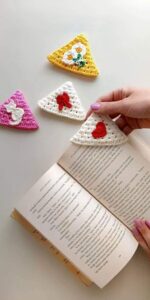
5. Sew on Felt Shapes or Buttons
Cut tiny hearts, stars, or flowers from felt and sew or glue them onto the bookmark. Small buttons in matching or contrasting colors also add a cute and personalized touch.
6. Make Seasonal or Themed Bookmarks
Use themed colors like red and green for Christmas, pastels for spring, or school colors for a back-to-school gift. These make thoughtful handmade presents for teachers, classmates, or friends.
Common Beginner Questions and Tips for Success
If you’re new to crochet, working on your first crochet bookmark might come with a few questions. Below are helpful answers and tips to make your project smooth and stress-free.
1. Why Is My Bookmark Curling?
This is usually caused by uneven tension or skipping chains at the start of the row. Always chain one at the start and crochet into the first stitch. Blocking also helps flatten your piece.
2. What Yarn Is Best for Beginners?
Cotton yarn is a favorite for crochet bookmarks because it doesn’t stretch and gives a smooth finish. Avoid fluffy or textured yarns until you’re more comfortable with stitch visibility.
3. Can I Use Other Stitches?
Absolutely! Once you’re confident with single crochet, experiment with half double crochet (hdc), double crochet (dc), or even simple stitch patterns like moss stitch or granny stripes.
4. How Do I Keep My Edges Straight?
Count your stitches after each row to ensure you haven’t added or missed any. You can also place a stitch marker in the first and last stitch to help guide your edges.
5. How Long Does It Take to Make One Bookmark?
A basic crochet bookmark for beginners can take anywhere from 30 minutes to 1 hour. The more experienced you become, the quicker you’ll finish!
6. What’s a Good Project to Try After This?
Once you’ve completed a bookmark, consider trying a coaster, small pouch, or keychain. These are all flat or minimal-shaping projects that continue to build your confidence and skill.
Final Thoughts – Your First Crochet Bookmark Is Just the Beginning
Making a crochet bookmark as a beginner is more than just a crafting exercise—it’s your entry into a world of creativity, calm, and endless possibilities. This simple yet practical project is a confidence booster and a wonderful way to share handmade joy with others.
The beauty of this pattern lies in its flexibility. You can stick with the basics or branch out into decorative edges, embroidery, or color experiments. As your skills grow, so will your ability to customize and create unique pieces that reflect your personal style.
So pick up your yarn and hook, and get started today. Whether you keep your crochet bookmark for yourself or give it away, you’re building a foundation for a fulfilling and relaxing hobby. One stitch at a time, you’re creating something beautiful—and that’s just the beginning.


