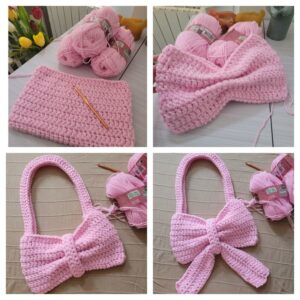
If you’re searching for a creative and elegant way to accessorize your outfits, the crochet bow bag is a delightful project to consider. Whether you’re heading to brunch with friends or just love carrying handmade items, this small yet fashionable bag adds a special touch to any look. Not only is it fun to make, but it’s also a great way to practice shaping and structure in crochet patterns.
This project is beginner-friendly and doesn’t require advanced techniques. The design revolves around basic stitches, thoughtful shaping, and a whimsical oversized bow attached to the front, which makes the bag stand out. You can customize it with different colors, sizes, or even add a zipper or lining if you want extra structure.
In this tutorial, you’ll learn how to make a crochet bow bag from start to finish, including the bag body, handles, and bow. We’ll walk you through stitch counts, measurements, finishing, and styling tips—all while using important keywords like crochet and crochet pattern to help fellow crafters find this project online!
Materials and Measurements for the Crochet Bow Bag
Before diving into your crochet pattern, it’s important to gather all the right tools and materials. This ensures a smooth crafting process from start to finish and gives your project a polished, long-lasting look.
-
Yarn Selection
For best results, use worsted weight cotton yarn. Cotton gives the bag structure and durability, which is especially important for accessories like bags. Choose a main color for the bag and a contrasting or matching color for the bow. Approximately 200g of yarn is enough for a small to medium-sized bow bag. -
Crochet Hook
A 4.5mm or 5mm crochet hook is ideal for this project. A slightly smaller hook can be used if your tension is loose, to help maintain shape. -
Bag Dimensions
The finished bag should measure approximately 10 inches wide by 8 inches tall, with a 2-inch gusset (depth). The bow adds an extra 3 inches in width visually, making it look fuller and more decorative. -
Additional Tools
You’ll need a yarn needle for weaving in ends, scissors, stitch markers, and optionally, a magnetic snap or zipper for closure. You can also add a fabric lining (10 x 8 inches) for more durability. -
Stitch Abbreviations (US Terms)
-
ch = chain
-
sc = single crochet
-
hdc = half double crochet
-
sl st = slip stitch
-
inc = increase
-
dec = decrease
-
-
Cutting Fabric (Optional Lining)
If you’re adding a fabric lining, cut two rectangles of fabric measuring 10 x 8 inches, and one strip 10 x 2 inches for the gusset. You may also cut a small piece for the bow lining (5 x 2 inches). Iron all fabric pieces before sewing them inside the bag.
How to Crochet the Bag Body
The bag body is worked in one piece from the bottom up. The sides are built onto the base using basic crochet stitches, forming a sturdy rectangle with a gusset for depth.
-
Creating the Base
Start with your main color yarn.
Ch 31.
Row 1: Sc in 2nd ch from hook and across. (30 sc)
Row 2–6: Sc across to build a rectangle base. Turn after each row. -
Building the Sides
After completing the base, turn your work to begin crocheting in the round around all four sides.
Rnd 1: Sc evenly around the base, placing 2 sc in each corner to turn. Join with sl st.
Rnds 2–15: Hdc in each stitch around, joining with sl st at the end of each round. This forms the walls of the bag. -
Adding the Gusset (Optional)
If you’d like a deeper bag, you can work 1–2 additional rounds, or crochet the bottom and sides separately and seam them together for a structured gusset. -
Creating a Neat Edge
On the final round, sc evenly around the top of the bag. This helps reinforce the edge and prepares it for handle attachment. -
Weaving in the Ends
Use your yarn needle to weave in all loose ends neatly. Tug slightly to smooth out the bag’s shape. -
Optional Lining and Closure
If using fabric, hand-sew or machine-stitch the lining into the bag using a matching thread. Add a snap or zipper if desired for extra security.
Making the Bow for Your Crochet Bow Bag
The signature feature of this bag is the large, bold crochet bow that sits on the front. This decorative element is easy to make and adds a touch of cuteness and style.
-
Crocheting the Bow Base
With your contrasting color yarn:
Ch 41
Row 1: Hdc in 2nd ch from hook and across (40 hdc)
Rows 2–10: Hdc in each stitch across. Fasten off, leaving a long tail. -
Shaping the Bow
Fold the rectangle in half width-wise and cinch the center by wrapping the yarn tail tightly around it several times. This creates the classic bow shape. -
Crocheting the Bow Center Band
Ch 10
Row 1–3: Sc across to make a small band
Wrap it around the center of the bow and stitch the ends together neatly at the back. -
Attaching the Bow
Sew the bow to the front center of the bag using the yarn tail or additional yarn. Position it slightly above the midpoint for a balanced look. -
Reinforcing the Bow
If needed, add a small dab of fabric glue behind the bow corners to keep them flat against the bag surface. -
Bow Styling Variations
You can make the bow smaller or larger, double-layer it with tulle or lace, or add a button or charm in the center for extra flair.
Adding Handles and Final Touches
The last step in completing your crochet bow bag is attaching handles. These can be crocheted directly onto the bag or made separately and sewn in place.
-
Crochet Handles (Basic Strap Style)
Ch 80 (or your preferred length)
Row 1: Sc in 2nd ch from hook and across
Row 2–4: Sc rows for strength
Make 2 handles. Attach one on each side of the bag opening, leaving 3 inches between the ends for comfortable spacing. -
Optional Crossbody Strap
You can create a longer strap (ch 120) and sew it diagonally across the bag sides to wear it crossbody. Reinforce attachment points for security. -
Add Decorative Stitching
Use contrast yarn and a yarn needle to embroider small hearts, flowers, or initials on the bag to personalize it. -
Button or Zipper Closure
If you didn’t add a lining, consider sewing a magnetic button or zipper directly into the crochet fabric. Use a strong thread and backstitch for durability. -
Steam Blocking
Lightly steam the finished bag (avoid the bow) to help even out the stitches and give the bag a professional look. -
Final Assembly
Check all seams, ends, and stitches. Make sure nothing is loose and everything feels balanced and symmetrical.
Why the Crochet Bow Bag is a Must-Make Pattern
This crochet pattern combines beauty, functionality, and simplicity. It’s ideal for beginners who want to level up their skills, and also fun for advanced crocheters who want a quick and satisfying project.
-
Beginner-Friendly
The entire bag uses basic stitches and simple construction. If you can chain and single crochet, you can make this bag. -
Versatile and Customizable
Adjust the size, shape, strap length, and bow style to suit your needs. Use bright colors for a summer look or neutral tones for everyday wear. -
Great as a Handmade Gift
This bag makes a wonderful gift for birthdays, holidays, or even bridesmaids. Add a tag and some small accessories inside for a lovely surprise. -
Teaches Key Crochet Skills
You’ll practice working in the round, adding attachments, shaping accessories, and optional lining techniques—all valuable skills for any crocheter. -
Stylish and Practical
The crochet bow bag is roomy enough for essentials but compact enough to carry anywhere. The bow gives it a chic, boutique-like appearance. -
Perfect for Craft Fairs or Etsy Shops
If you sell handmade items, this bag is a fantastic addition to your shop. It’s cute, functional, and totally unique.
Final Thoughts
The Crochet Bow Bag is more than just a project—it’s a blend of fashion, function, and fun. Whether you’re making it for yourself or someone else, it’s guaranteed to become a beloved accessory. With basic crochet stitches, thoughtful design, and a splash of creativity, you can bring this beautiful crochet pattern to life in just a few sittings.
Try it in different colors, add embellishments, and most importantly—enjoy the process of creating something with your own hands. Happy crocheting!


