
Crochet Bunny Tutorial is the perfect starting point for anyone who wants to create an adorable handmade bunny using simple crochet techniques. Whether you are a beginner picking up a hook for the first time or an experienced crafterڍ looking for a quick and charming project, this step-by-step guide will help you achieve beautiful results. In this comprehensive tutorial, you will learn essential stitches, shaping methods, and finishing touches that bring your bunny to life.
Creating your own crochet bunny is not only relaxing but also incredibly rewarding. Handmade toys carry a special warmth that store-bought items simply cannot match. With the right yarn, hook size, and a bit of patience, you can craft a soft bunny that becomes a lovely gift, nursery decoration, or seasonal keepsake. This Crochet Bunny Tutorial focuses on clarity and practical tips so you can follow along with confidence.
Throughout this guide, we will break down the entire crochet bunny pattern into manageable steps. You will discover how to choose materials, shape each body part, assemble the bunny neatly, and add personality with simple details. By the end of this easy crochet bunny tutorial, you will have the skills needed to customize your project and create many cute variations.
Materials and Tools for Your Crochet Bunny Tutorial
Before starting your Crochet Bunny Tutorial, gathering the correct materials will make the process smoother and more enjoyable. The right supplies ensure your stitches look clean and your bunny keeps its shape over time. Beginners often overlook this step, but preparation is key to success.
First, choose a soft medium-weight yarn. Cotton or acrylic yarn works wonderfully for most crochet bunny patterns because they provide good stitch definition and durability. If you want a plush toy look, you may also experiment with velvet or chenille yarn, but beginners may find standard yarn easier to handle.
Next, select the appropriate crochet hook size recommended on your yarn label. Most easy crochet bunny tutorial projects use hooks between 2.5 mm and 4 mm. Using the correct hook helps maintain consistent tension and prevents gaps in the fabric.
You will also need polyester fiberfill stuffing to give your bunny a soft and cuddly form. Stuffing quality matters more than many crafters realize. Good fiberfill keeps the bunny evenly shaped without lumps or sagging over time.
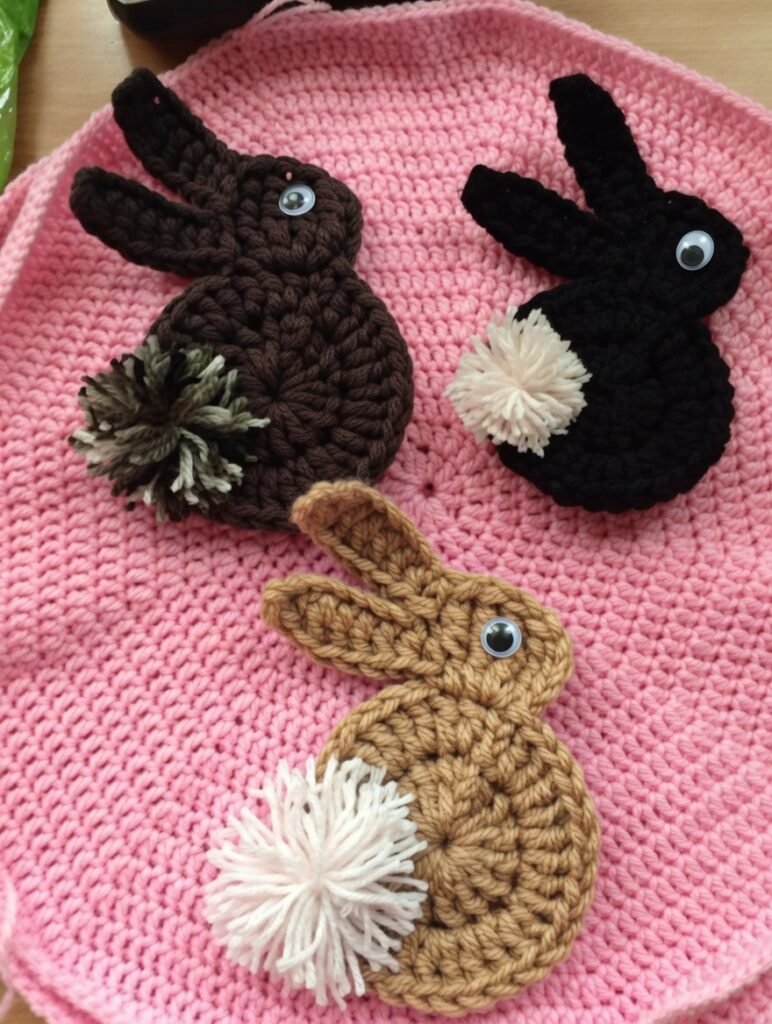
Additional tools include a yarn needle for sewing parts together, stitch markers to track your rounds, and small scissors for trimming ends. Safety eyes or embroidery thread can be used to create the bunny’s face, depending on whether the toy is intended for small children.
Having all materials ready before beginning your Crochet Bunny Tutorial helps you stay focused and enjoy the creative process without interruptions. Once your tools are prepared, you are ready to start crocheting the bunny step by step.
Step-by-Step Crochet Bunny Pattern Instructions
This Crochet Bunny Tutorial is designed to be beginner-friendly while still producing a polished final result. Most parts of the bunny are worked in continuous rounds using basic amigurumi techniques. Take your time and keep your stitches tight and even.
Start by crocheting the bunny’s head. Typically, this begins with a magic ring followed by gradual increases to form a round shape. Maintaining consistent stitch count is essential in any crochet bunny pattern, so always count your stitches at the end of each round.
After completing the head, continue with the body. Many easy crochet bunny tutorial designs work the body separately and then sew it to the head. Focus on smooth increases and decreases to create a gentle oval shape that looks natural and balanced.
The ears are one of the cutest parts of the crochet bunny. They are usually made in elongated oval rounds or rows. Keep your tension slightly firm so the ears hold their shape. You can lightly stuff them or leave them flat depending on your preferred style.
Next, crochet the arms and legs. These small pieces require attention to detail because uneven stuffing can make the bunny look asymmetrical. Add small amounts of fiberfill gradually and shape with your fingers as you go.
Once all pieces are complete, sew them carefully using a yarn needle. Proper placement is what truly brings the Crochet Bunny Tutorial to life. Take a moment to pin parts in place before sewing permanently to ensure the proportions look right.
Following these structured steps will help you create a neat and professional-looking crochet bunny, even if this is your first amigurumi project.
Tips to Make Your Crochet Bunny Look Professional
Even when following a good Crochet Bunny Tutorial, small details make a big difference in the final appearance. Professional-looking amigurumi is all about consistency, shaping, and finishing techniques. Fortunately, these skills improve quickly with practice.
One important tip is to keep your stitches tight and uniform. Loose stitches can create visible gaps where stuffing shows through. If you notice holes, try using a smaller hook size in your crochet bunny pattern for a denser fabric.
Another key factor is proper stuffing technique. Instead of inserting large chunks of fiberfill, add small amounts gradually. This method helps maintain smooth curves and prevents lumps in your easy crochet bunny tutorial project.
Pay close attention to placement when attaching the ears and limbs. Slight differences in positioning can change the bunny’s expression and posture. Many experienced crafters step back and view the toy from multiple angles before final sewing.
Facial details also play a major role. Whether you use safety eyes or embroidery, make sure both sides are symmetrical. Taking extra time during this stage of the Crochet Bunny Tutorial greatly enhances the finished look.
Finally, weave in yarn ends securely and invisibly. Clean finishing separates handmade items that look homemade from those that look professionally crafted. These small refinements elevate your crochet bunny significantly.
By applying these tips consistently, your bunny will look polished, balanced, and gift-ready every time.
Creative Variations for Your Easy Crochet Bunny Tutorial
One of the best parts of any Crochet Bunny Tutorial is the ability to customize your project. Once you understand the basic structure, you can experiment with colors, textures, and accessories to create unique designs.
Try using pastel yarns for a classic baby-friendly bunny, or choose bold colors for a playful modern look. Color changes alone can completely transform the personality of your crochet bunny pattern without altering the structure.
You can also modify the ears. Longer floppy ears create a sweet sleepy look, while shorter upright ears give a more energetic appearance. This simple adjustment is very popular in many easy crochet bunny tutorial variations.
Adding clothing or accessories is another fun option. Small scarves, bows, or tiny overalls can turn your bunny into a themed character. These details are perfect for seasonal gifts or holiday decorations.
Texture experimentation can also elevate your project. Mixing standard yarn with plush yarn for certain parts creates interesting contrast. Just remember that fuzzy yarn may be harder to work with if you are still mastering the Crochet Bunny Tutorial basics.
Finally, consider scaling your pattern. Using thicker yarn and a larger hook creates a bigger bunny, while thinner yarn produces a miniature version. This flexibility makes the crochet bunny one of the most versatile amigurumi projects available.
With creativity and practice, you can build an entire collection of unique handmade bunnies that reflect your personal style.
FAQ About Crochet Bunny Tutorial
Is this Crochet Bunny Tutorial suitable for beginners?
Yes. This easy crochet bunny tutorial uses basic stitches like single crochet, increases, and decreases. Beginners who know fundamental techniques can complete it successfully with patience.
What is the best yarn for a crochet bunny?
Medium-weight cotton or acrylic yarn works best for most crochet bunny patterns because it provides good stitch definition and durability. Plush yarn can be used for a softer look once you gain experience.
How long does it take to finish a crochet bunny?
For beginners, the Crochet Bunny Tutorial may take 3 to 6 hours depending on speed and experience. More advanced crocheters can often finish in a shorter time.
Do I need safety eyes for my crochet bunny?
No. While safety eyes are popular, you can embroider the face using yarn or thread. This is often recommended if the crochet bunny is intended for very young children.
Why does my crochet bunny look uneven?
Uneven appearance usually comes from inconsistent tension or stuffing. Following the shaping tips in this easy crochet bunny tutorial and counting stitches carefully will help fix this issue.
Can I sell finished bunnies made from this tutorial?
In most cases, yes, handmade items from a general Crochet Bunny Tutorial can be sold. However, always ensure your final product is well-finished and check any specific pattern licensing if applicable.
Conclusion
In this complete Crochet Bunny Tutorial, you learned how to choose the right materials, follow a structured crochet bunny pattern, apply professional finishing techniques, and explore creative variations. By practicing consistent tension, careful stuffing, and precise assembly, you can transform simple yarn into an adorable handmade bunny that looks polished and charming.
The beauty of this easy crochet bunny tutorial is its flexibility. Once you master the basics, you can experiment with colors, sizes, and accessories to create truly unique pieces. Crochet is a skill that improves with every project, so do not worry if your first bunny is not perfect.

