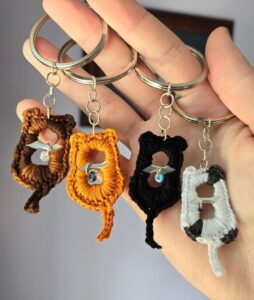
Are you ready to combine sustainability with creativity? This crochet cat keychain using a recyclable can is the perfect eco-friendly craft project that’s fun, functional, and adorable. Whether you’re a crochet enthusiast or just exploring creative ways to reuse everyday materials, this crochet pattern offers a beginner-friendly approach that results in a one-of-a-kind handmade keychain.
In this tutorial, we’ll walk you through step-by-step instructions on how to create your very own crochet cat keychain, reusing a small aluminum can (like a soda or energy drink can) as the base. Not only is it a great way to practice your crochet skills, but it’s also a creative way to upcycle something that would normally be discarded.
With just a bit of yarn, a recycled can, and a few basic tools, you’ll be on your way to crafting a super cute cat-shaped keychain that’s both decorative and practical. This is a great project for gifting, selling at craft fairs, or keeping for yourself as a daily dose of cuteness clipped to your bag or keys.
🧶 Materials, Fabric Cuts & Recyclable Can Preparation
Before we begin crocheting, let’s make sure you have all your supplies ready. This section will walk you through the tools, yarn, cuts, and how to safely prepare the recyclable can.
-
Yarn and Hook Recommendations
For this crochet pattern, worsted weight cotton yarn works best. Choose:-
Main color (e.g., grey, black, orange) for the cat’s body
-
Accent color (e.g., pink or white) for ears, cheeks, or accessories
-
A 3.5mm (E) crochet hook is ideal for a tight stitch that covers the can evenly.
-
-
Recyclable Can Prep
You’ll need one mini soda can (approx. 150ml) or half of a standard 330ml can.-
Cut the can cleanly in half using heavy-duty scissors or a can cutter
-
Sand down sharp edges using a metal file or cover with fabric tape
-
Final height should be around 5–6 cm
Optional: paint or wrap the outside in felt for extra safety and smoothness
-
-
Fabric Cut Sizes (Optional)
If using felt for interior or exterior lining:-
One felt rectangle: 10 cm x 15 cm (for wrapping)
-
Two small circles: 5.5 cm diameter for base padding
Attach with fabric glue for secure placement.
-
-
Stuffing & Notions
-
Polyester fiberfill for ears and head
-
Yarn needle for sewing parts
-
Stitch marker to keep track of rounds
-
Keychain ring or lobster clasp
-
Safety eyes or black embroidery thread for facial details
-
-
Safety Precautions
Always wear gloves when cutting metal
Children should only handle the final plush (not the metal prep part)
Make sure all sharp edges are covered before crocheting -
Finished Dimensions
The finished crochet cat keychain will measure about:-
Height: 7 cm
-
Width: 5 cm
-
Depth: 5 cm (around the can base)
-
🐱 Crochet the Cat’s Body Around the Can
The body of your crochet cat keychain using a recyclable can is worked in the round, starting from the base and going up around the can. This provides a snug and cute cover.
-
Base Circle
-
Rnd 1: Make a magic ring, 6 sc into ring (6)
-
Rnd 2: Inc in each st around (12)
-
Rnd 3: (1 sc, inc) repeat around (18)
-
Rnd 4: (2 sc, inc) repeat around (24)
Continue until the circle matches the can’s base diameter (5–6 cm)
-
-
Start the Sides
-
Work one round in the back loops only to create an edge
-
Rnds 6–15: sc in each st around without increasing
-
Check fit by sliding it over the can. It should be snug.
-
-
Color Changes for Design
-
Change yarn colors mid-round for belly patches or stripes
-
Use surface slip stitch for whiskers or a name tag look
-
Optional: add a pink or white oval to simulate a belly patch
-
-
Top Closure
-
If making an open holder: end after desired height and fasten off
-
For full cover: decrease to close the top
-
(2 sc, dec) around
-
Stuff lightly before closing entirely
-
-
-
Add the Keyring Loop
-
Ch 10 with main yarn, sl st to form a loop
-
Sew securely to top center or back of the cat’s head
-
Reinforce with extra stitching for durability
-
-
Secure on the Can
-
If removable: insert can afterward
-
If permanent: glue or tape can inside before closing body
-
You may also line the inside with felt to cushion the can
-
😺 Crochet Cat Head, Ears, and Facial Features
Now let’s move on to the cute part—giving your crochet cat keychain a personality with a crocheted head, ears, and facial expression. These are worked separately and sewn onto the body.
-
Cat Head (Worked Separately)
-
Rnd 1: Magic ring, 6 sc
-
Rnd 2: Inc around (12)
-
Rnd 3: (1 sc, inc) around (18)
-
Rnd 4–6: sc in each st
-
Rnd 7: (1 sc, dec) around
-
Stuff and close the top
-
Fasten off, leaving a long tail for sewing
-
-
Ears (Make 2)
-
Rnd 1: Magic ring, 4 sc
-
Rnd 2: (1 sc, inc) twice (6)
-
Rnd 3: sc in each st (6)
-
Pinch ear flat and sew on top sides of head
-
Optional: add pink felt inside ears
-
-
Eyes and Nose
-
Safety eyes: insert before stuffing the head (around Rnd 4)
-
Felt: cut two small black circles (0.5 cm) and glue on
-
Embroider nose with pink yarn in an upside-down triangle
-
-
Mouth and Whiskers
-
Use black embroidery thread to make a small “w” shape for the mouth
-
Add three short whiskers on each side with surface stitches or thread
-
Optional: use pink blush for cheeks with yarn or powder
-
-
Cheeks and Accessories
-
Crochet small pink circles (Magic ring, 6 sc) and sew as cheeks
-
Add a bow or bell under chin for extra cuteness
-
-
Attach the Head
-
Sew the cat’s head to the top of the can-covered body
-
Angle slightly forward to make the expression pop
-
Ensure it is securely attached for daily use as a keychain
-
🎨 Decoration, Customization & Gift Ideas
Now that your basic crochet cat keychain using a recyclable can is complete, let’s explore some fun ways to customize and personalize your creation.
-
Add a Mini Tail
-
Chain 6, turn, sc back, fasten off
-
Sew to the back of the base as a curled tail
-
You can also add stripes or different color tips
-
-
Make a Set of Cats
-
Create different colored cats (black, tabby, calico)
-
Use embroidery to indicate whisker spots or fur texture
-
These make great sets for gifting or selling
-
-
Turn into a Mini Storage Container
-
Leave the top open for coins, earbuds, or tiny treats
-
Add a felt or crocheted lining for a soft interior
-
Makes a great desk or bag accessory
-
-
Seasonal Themes
-
Halloween Cat: use black yarn and add a witch hat
-
Holiday Cat: red and white yarn with tiny Santa hat
-
Spring Cat: add floral embroidery and pastel colors
-
-
Use Different Base Materials
-
Try it with a plastic bottle bottom or tea can
-
Ensure edges are safe and rounded
-
Adjust the crochet circle size accordingly
-
-
Eco-Friendly Message
-
Add a small tag: “Made from Recycled Materials”
-
Share the story on social media to inspire sustainable crafting
-
Great talking point at craft fairs or in gift notes
-
Final Thoughts: Crafting a Cute and Sustainable Crochet Keychain
This crochet cat keychain using a recyclable can is more than just a cute DIY project—it’s a thoughtful blend of creativity, sustainability, and practical design. You’ve transformed an ordinary can into an adorable, reusable piece of art while honing your crochet skills and trying a unique crochet pattern.
By following the steps in this guide, from preparing your materials to adding those charming finishing touches, you now have a stylish keychain that’s sure to make others smile. Whether it’s for personal use, a handmade gift, or a market item, your eco-friendly crochet cat will stand out.
Don’t forget to share your finished work online and tag fellow crafters who love upcycled yarn projects. If you’re looking for more unique and creative crochet patterns, stay tuned for our next tutorials!


