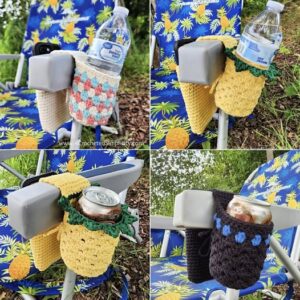
If you’re someone who loves both functionality and handmade charm, then a Crochet Chair Caddy is the perfect project for you. This versatile and decorative item not only brings aesthetic appeal to your space but also serves as a handy organizer for remote controls, books, glasses, or crafting tools. Designed using popular crochet patterns, this project is ideal for both beginners and advanced crocheters looking to add a cozy, practical touch to their home.
Using a few basic materials and your favorite yarn, you can craft a crochet chair caddy that suits any decor. Whether it’s for your living room armchair, office chair, or even a child’s study seat, this handmade accessory is highly customizable. With various color options and the ability to add as many pockets as you need, it’s a brilliant way to marry creativity and utility.
In this article, we’ll walk through everything you need to know about creating a crochet chair caddy pattern. From materials and measurements to stitch techniques and assembly, this guide covers it all using tried-and-true crochet methods and crochet patterns. Let’s dive in!
Materials and Measurements
To start your crochet chair caddy, gathering the right materials is key. Choosing the right yarn type and hook size ensures your project has the right structure and durability. For a sturdy result, medium to bulky weight yarn is recommended.
You will need the following:
- Worsted or bulky weight cotton or acrylic yarn (around 400-500 yards)
- Crochet hook size H/8 (5 mm) or suitable for your yarn
- Yarn needle for weaving in ends
- Scissors
- Stitch markers (optional)
- Button or Velcro (optional closure feature)
Measurements:
- Main panel: 10 inches wide by 30 inches long (adjustable depending on chair size)
- Pocket sections: Vary based on your needs, but standard pockets are 6-8 inches deep
- Straps: 2-3 inches wide, long enough to loop over the chair arm and secure the caddy
These measurements are flexible. You can modify the length and width of your crochet chair caddy depending on the dimensions of the chair it will be draped over.
Stitch Techniques and Foundation Row
Creating a strong base is crucial when working with crochet patterns. We’ll begin by making the main panel using simple yet structured stitches that hold shape well, such as half double crochet (hdc) or single crochet (sc).
- Start by chaining a foundation chain of 35 stitches (or adjust according to desired width).
- Row 1: Turn and work 1 hdc in the second chain from the hook and across. (34 stitches)
- Continue working rows of hdc until your panel reaches 30 inches in length.
- For extra texture and thickness, you can alternate hdc rows with back loop only hdc every few rows.
- Once the base panel is complete, fasten off and weave in the ends using the yarn needle.
- Block the piece if needed to straighten edges and make sewing easier.
This foundational piece forms the back of your crochet chair caddy, so make sure it’s sturdy and uniform.
Adding Pockets to the Caddy
Pockets are what make the crochet chair caddy pattern truly functional. These can be made separately and then sewn onto the main panel or crocheted directly onto it.
- To crochet pockets separately, chain 25 (or width of choice).
- Work hdc rows until the pocket reaches a height of 6-8 inches.
- Fasten off and leave a long tail for sewing.
- Arrange pockets on the panel: evenly space them or stack them depending on how many you want.
- Sew the pockets onto the base panel using the yarn needle and the long tail. Be sure to only stitch the sides and bottom to keep the top open.
- Add embellishments like buttons or edging with contrasting yarn for style.
For deeper or tiered pockets, repeat the steps and layer them strategically for convenience.
Attaching and Securing the Chair Caddy
The final step involves attaching your crochet chair caddy securely so it doesn’t slip off. This can be done using built-in straps, ties, or Velcro patches.
- To create straps, chain 8 and work hdc rows until you reach 10 inches.
- Make two of these straps and sew them to the top corners of the panel.
- Loop them around the chair arm or back and sew buttons or Velcro to secure.
- For a no-slip option, add a small patch of non-slip shelf liner to the underside of the top edge.
- If your chair has unique dimensions, you might need to crochet a longer flap to tuck into the cushion gap.
- Test the placement before finalizing, and adjust any seams for symmetry and snug fit.
A well-secured crochet chair caddy will stay in place even with frequent use.
Creative Variations and Tips
One of the joys of working with crochet is the endless room for personalization. The crochet chair caddy pattern can be modified to suit your taste or home decor.
- Use striped yarn or color blocking techniques to create visual interest.
- Incorporate shell or bobble stitches on the pocket edges for a decorative finish.
- Add labels or tags to each pocket for quick organization.
- Line the pockets with fabric for added strength if you plan to store heavier items.
- Experiment with granny squares for the pocket fronts to mix texture and design.
- Make a matching set with a pillow cover or small rug to bring cohesion to the space.
The possibilities are endless, and each variation brings a fresh twist to your crochet patterns portfolio.
Final Thoughts
A Crochet Chair Caddy is more than just a stylish accessory; it’s a practical solution that makes life easier and tidier. Whether you’re storing your latest crochet project or organizing your daily essentials, this handmade item is both useful and beautiful.
With a little time, some yarn, and the right crochet patterns, you can create a personalized storage piece that adds warmth to your space. Plus, it makes a thoughtful gift for crafters, book lovers, or anyone who appreciates homey comfort.
Remember to follow all Google AdSense content policies when publishing your blog post. This includes providing original content, avoiding copyright infringement, and ensuring all language is family-friendly.
Get your hook ready and let the creativity flow—your perfect crochet chair caddy pattern is just a few stitches away!


