The holidays are the perfect time to bring out your yarn and create something festive, and nothing captures the spirit of the season better than a crochet Christmas flower – step by step tutorial. Whether you’re decorating your home, embellishing gifts, or making handmade ornaments, these flowers are timeless symbols of holiday cheer. With just a bit of yarn and creativity, you can make beautiful crochet flowers that resemble poinsettias or your own whimsical winter blooms.
Learning how to crochet a Christmas flower adds a personal and warm touch to your seasonal décor. These handmade pieces are not only eye-catching but also incredibly versatile. You can attach them to wreaths, hang them on your Christmas tree, or use them as part of your holiday table setting. The crochet Christmas flower is both a delightful craft and a memorable gift that expresses love and attention to detail.
In this step by step tutorial, we’ll guide you through the entire process—from choosing your materials to finishing touches. You’ll discover how to crochet petal by petal, assemble the flower layers, and add decorative accents. This project is suitable for confident beginners and experienced crocheters alike. So, grab your favorite red and green yarn, and let’s get started!

Materials and Measurements for a Crochet Christmas Flower
Before diving into your crochet Christmas flower – step by step tutorial, it’s essential to gather all the necessary supplies. Having the right materials not only makes the process smoother but also ensures your final flower turns out structured and festive. Luckily, you only need a few simple tools and yarn types to get started.
The most common yarn for this project is DK or worsted weight yarn. It offers the right balance between flexibility and structure, allowing your petals to hold their shape. Choose traditional holiday colors such as red for the petals, green for the leaves, and yellow or gold for the center. Cotton yarn is a good choice because of its crisp stitch definition.
You will need a crochet hook suitable for your chosen yarn. Typically, a 4.0mm (G-6) or 4.5mm (7) hook works perfectly with DK or worsted yarn. The slightly smaller hook helps maintain tighter stitches, which is ideal for decorative pieces.
Here’s a list of the materials:
- Red, green, and yellow DK or worsted weight yarn
- Crochet hook: 4.0mm to 4.5mm
- Scissors
- Yarn needle for weaving ends
- Stitch markers (optional but helpful)
- Hot glue (optional for attaching to accessories)
Your finished crochet Christmas flower will be approximately 4 to 6 inches wide, depending on the number of petals and rounds. If you want smaller flowers, use thinner yarn and a smaller hook. For larger blooms, bulkier yarn will give a bolder result.
It’s also possible to crochet more than one layer of petals for a fuller flower. This will affect the overall size but make it even more striking. You can adjust the size to suit your needs—whether it’s for a brooch, ornament, or tree topper.
Step-by-Step: How to Crochet the Christmas Flower Petals
Now it’s time to start crafting your crochet Christmas flower – step by step tutorial. We’ll begin with the most important part: the petals. Each petal is crocheted separately and then joined together to form a circular flower. These red petals will bring the festive flair you’re aiming for.
Begin with a magic ring and chain 1. Into the ring, make 5 single crochets and join with a slip stitch. This will be your base. For each petal, chain 5 and work back down the chain using single, half double, double, and triple crochets.
After creating your petal base, join it back to the starting circle with a slip stitch. Repeat the process for a total of 5 to 7 petals, depending on how full you want your flower to be. Consistency in stitch size will help the petals look symmetrical and neat.
To make the petals pop, consider doing a second round around the edges with surface slip stitches or use metallic yarn to outline the petals. This extra step adds depth and sparkle to your holiday design.
If you’re making a layered flower, repeat the process above and create a second round of petals with slightly larger chains (e.g., chain 6 instead of 5). You’ll then stack the larger layer under the smaller one and stitch them together.
Once the petals are complete, weave in all ends using a yarn needle. At this stage, your flower should already start to resemble a traditional Christmas bloom, rich with color and texture.
Crocheting the Leaves and Assembling the Flower
The next stage in our crochet Christmas flower – step by step tutorial focuses on crafting the leaves and assembling all the components into one stunning floral piece. The leaves provide contrast and complete the traditional red and green Christmas look.
To crochet the leaves, start with a chain of 10 stitches. In the second chain from the hook, crochet in this order: 1 single crochet, 1 half double, 1 double, 1 treble, 1 double, 1 half double, and 1 single crochet. In the final chain, add 3 stitches to create the rounded tip.
Now work your way down the other side of the chain, mirroring the stitches. This symmetry forms a classic leaf shape. You can create 2 or 3 leaves per flower, depending on how much green you want in your decoration.
Once all leaves are completed, block them if necessary by pinning them and lightly steaming or dampening to flatten. This ensures they lay nicely when attached to the flower. Be sure the yarn you use can handle moisture or heat safely.
To assemble, begin by laying your flower petals flat. Add a touch of hot glue or stitch the leaves behind the petals. Position them so they peek out naturally, as if they were real poinsettia leaves.
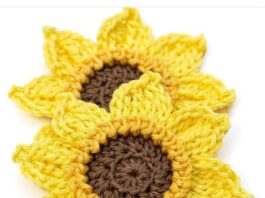
Add a center to your flower by crocheting a small yellow or gold circle. This can be done with a magic ring and 6 to 8 single crochets. Stitch or glue the circle onto the middle of your flower.
With the leaves, petals, and center complete, your crochet Christmas flower is ready to shine. It can now be used for a wide range of festive decorations or gifts.
Creative Uses for Your Crochet Christmas Flower
Once your flower is complete, the fun really begins. There are many imaginative ways to use your crochet Christmas flower during the holiday season. Its vibrant design adds festive flair to just about anything.
One of the most popular uses is as a Christmas tree ornament. Simply add a small loop of yarn to the back and hang it on a branch. It’s a safe, shatter-proof option that’s child- and pet-friendly.
You can also attach your flower to gift wrap or gift bags. It turns any ordinary present into a stunning, thoughtful package. Secure it with hot glue or tie it on with ribbon for a reusable touch.
Another lovely idea is turning your flower into a brooch or hair accessory. Attach a pin backing or hair clip and wear your festive flower throughout December. It’s especially fun for holiday parties or photo shoots.
For home décor, stitch a few flowers together into a garland or wreath. Combine flowers and leaves in a repeating pattern for a long string or sew them onto a foam or wire circle to hang on your door.
Crochet Christmas flowers can also be used to enhance holiday table settings. Use them as napkin rings, plate decorations, or centerpieces. They add color and charm to your holiday meals.
Finally, consider selling your creations at craft fairs or online. Handmade crochet Christmas flowers are popular with shoppers looking for unique seasonal items. They’re easy to make in bulk and customize for any taste.
FAQ – Crochet Christmas Flower
Q1: How long does it take to make a crochet Christmas flower?
A: It typically takes 30 to 60 minutes, depending on your experience level and the complexity of the design.
Q2: What is the best yarn to use?
A: Cotton or acrylic yarn in DK or worsted weight is ideal. Choose festive colors like red, green, and gold.
Q3: Can I make the flower larger or smaller?
A: Yes. Use thicker yarn and more stitches for larger flowers or thinner yarn and shorter chains for smaller ones.
Q4: Is this project beginner-friendly?
A: Yes! If you’re familiar with basic stitches like single crochet, double crochet, and chaining, you’ll do just fine.
Q5: How do I attach the flower to gifts or decorations?
A: You can use hot glue, sew it on with a yarn needle, or tie it with ribbon or thread loops.
Q6: Can I machine wash items with crochet flowers?
A: If the yarn is machine washable, yes—but it’s best to hand wash decorative pieces to maintain their shape.
Conclusion
Creating a crochet Christmas flower – step by step tutorial is a joyful and rewarding experience that adds a handmade touch to your holiday season. These festive flowers can brighten up your tree, your gifts, or your home décor while showcasing your creativity and crochet skills.
In this article, we’ve covered everything from selecting materials, crafting petals and leaves, assembling the flower, and exploring creative uses. With just a bit of yarn and time, you can produce something beautiful and memorable.
We’d love to hear from you! Please leave your honest opinion about this tutorial and share any suggestions or ideas for future patterns. Your feedback helps improve the crafting community and keeps the creative spirit alive. Happy crocheting and Merry Christmas! 🎄🧶


