
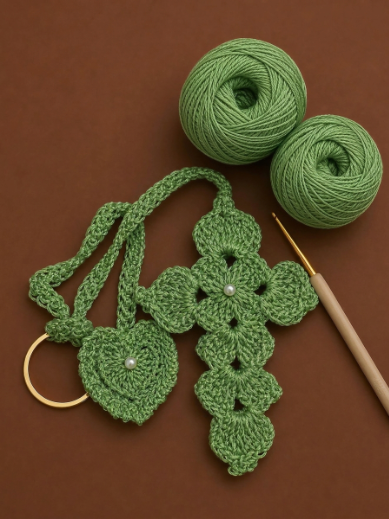
Crochet Cross Pattern is a meaningful and versatile project that transforms simple yarn or crochet thread into a beautiful handmade cross. This type of crochet design can be created in many sizes and styles, from a small delicate motif to a larger decorative piece. A finished crochet cross can be used as a bookmark, appliqué, ornament, wall decoration, gift embellishment, or special handmade keepsake. Because the design requires only a small amount of material, it is also an excellent project for using leftover yarn while practicing useful crochet techniques.
One of the most appealing features of a Crochet Cross Pattern is its flexibility. A simple version can be made with basic stitches and a clean, solid shape, while a more decorative cross can include open spaces, textured stitches, picot edging, or contrasting colors. White and cream create a classic appearance, but soft pastels, deep colors, bright shades, and variegated yarn can completely change the personality of the finished piece. The size can also be adjusted by changing the yarn weight, hook size, stitch count, or number of rows.
Making a Crochet Cross Pattern is also a useful way to develop essential crochet skills. Depending on the chosen construction, the project may include chains, slip stitches, single crochet, half double crochet, double crochet, turning rows, joining yarn, shaping side arms, working around edges, and blocking. Since the project is relatively small, beginners can focus on accuracy without committing to a large amount of yarn. This guide explains the materials, US crochet terminology, basic construction, shaping, borders, creative uses, finishing methods, common questions, and practical tips for making a beautiful crochet cross.
Materials, US Crochet Terms, and Preparation for the Crochet Cross
The first step in making a Crochet Cross Pattern is selecting the right yarn or crochet thread. Smooth yarn with clear stitch definition is an excellent choice because it makes the shape and texture easy to see. Cotton yarn is especially useful when you want the finished cross to have a firm structure, while acrylic yarn can create a softer and more flexible result.
The yarn weight should match the intended use of the finished project. Lightweight cotton yarn or crochet thread works well for a delicate crochet cross motif, bookmark, or appliqué. Medium-weight yarn can create a larger decorative piece that is easier for beginners to handle. Thicker yarn can be used for oversized projects, although the finished cross will naturally become more substantial.
Choose a crochet hook that works comfortably with the selected yarn. A slightly smaller hook can create tighter stitches and a firmer shape, while a larger hook creates softer fabric. The stitches should be even and easy to work without leaving excessive gaps unless an open lace appearance is intentionally part of the design.
The main US crochet terms used for a basic cross may include chain (ch), slip stitch (sl st), single crochet (sc), half double crochet (hdc), and double crochet (dc). A solid cross can be made almost entirely with single crochet, while double crochet can create a lighter and faster-growing fabric.
Additional supplies include scissors and a yarn needle for weaving in the ends. Optional materials may include contrasting yarn for a border, thread for a tassel, and stitch markers. If the cross will be attached to another project, keep additional matching yarn available for sewing it securely in place.
Before beginning, decide on the approximate size and proportions. A balanced crochet cross design generally has a long lower section, two matching horizontal arms, and a shorter upper section. Planning these proportions before crocheting can help the finished shape look symmetrical.
How to Crochet and Shape the Main Cross Step by Step
Begin the Crochet Cross Pattern by making a foundation chain for the lower vertical section. The exact number of chains depends on the yarn, hook, and desired width. Keep the foundation chain relaxed and even because a tight starting edge can cause the project to curve.
Work the first row in your selected stitch. Single crochet is a good choice for a dense and structured cross. Insert the hook into the appropriate chain, complete the stitch, and continue across. Make the required turning chain at the end and turn the work carefully.
Continue working even rows until the lower vertical section reaches the desired length. Count the stitches regularly to keep the sides straight. Missing the first or last stitch of a row can make the section gradually narrower, while accidental extra stitches can make it wider.
When the lower section is complete, begin creating the horizontal arms. One method is to work additional chains extending from one side, crochet across the central section, and create a matching extension on the opposite side. Another method is to join the yarn separately and make each arm individually.
The two arms should contain matching numbers of stitches and rows. Compare them frequently during construction. The central section should remain aligned with the lower portion of the handmade crochet cross. Correct any noticeable difference before moving on to the upper section.
Finish the top by continuing to crochet only across the central stitches. Work enough rows to create a balanced upper section. Fasten off securely and weave in the yarn ends. Lay the cross flat and inspect the proportions before adding any border or decorative details.
Adding Borders, Texture, and Creative Uses for the Crochet Cross
A simple border can give the Crochet Cross Pattern a polished appearance. Join yarn at an inconspicuous point and work evenly around the outer edge. Single crochet is a practical choice because it defines the shape without adding excessive bulk.
At the outer corners, additional stitches may be needed to help the border turn smoothly. At the inner corners where the arms meet the central section, fewer stitches may be necessary. Check the cross frequently on a flat surface to prevent the border from becoming wavy or tight.
For a decorative finish, add small picot crochet edging. A picot is usually created with a short chain that is joined back to the base. These small points can give the cross a delicate lace-inspired appearance. Keep them evenly spaced for a balanced result.
Color changes can also transform the design. Make the main cross in one color and add a contrasting border. A cream center with a gold-colored edge can create an elegant appearance, while pastel combinations feel soft and cheerful. A multicolored crochet cross motif can use small amounts of leftover yarn.
The finished cross can be used in many creative ways. A small version can become a bookmark or appliqué, while a larger piece can be used as a decorative wall hanging or ornament. It can also be sewn onto a handmade bag, fabric project, or other suitable craft.
Blocking can improve the final shape. Arrange the cross carefully on a suitable surface, straighten the arms, and define the corners. Follow the care instructions for the yarn and allow the project to dry completely. Proper blocking can make the Crochet Cross Pattern look more symmetrical and polished.
Helpful Tips, Frequently Asked Questions, and Final Finishing
Consistent tension is important when making a Crochet Cross Pattern. Uneven stitches can cause one section to become wider or shorter than another. Try to maintain the same comfortable grip on the yarn and hook throughout the project.
Count stitches after every important section. This is especially helpful when creating the horizontal arms. Both sides should match unless the design intentionally uses an asymmetrical style. Writing down the number of rows and stitches can prevent mistakes.
If the cross curls, the tension may be too tight or the border may contain too few stitches. Gentle blocking can correct minor curling. If the problem is significant, consider using a slightly larger hook or adjusting the edge stitch placement.
Straight edges make the finished crochet cross look more polished. Identify the first and last stitch of every row carefully. Stitch markers can be useful if you have difficulty seeing the edge stitches.
When attaching the cross to another project, sew through stable areas rather than pulling heavily on decorative edges. Use matching yarn and small stitches. The attachment should be secure without distorting the shape.
Most importantly, enjoy experimenting with the design. Different yarns, stitches, colors, borders, and sizes can create many unique versions of the same Crochet Cross Pattern.
Conclusion
The Crochet Cross Pattern is a versatile project that combines simple crochet techniques with a meaningful and recognizable shape. By creating the lower vertical section, forming balanced horizontal arms, finishing the upper section, and adding a neat border, crocheters can make a beautiful handmade piece with only a small amount of yarn.
If you make this Crochet Cross Pattern, leave your sincere opinion and share your suggestions. Tell us which colors, yarns, stitches, and creative details you would choose. Your ideas and experiences can inspire other crochet lovers to create their own beautiful handmade crochet crosses.

