The crochet cup-shaped coasters – step by step tutorial is the perfect guide for anyone who loves making functional and decorative crochet projects. These coasters are not only useful for protecting tables but also add a cozy, handmade touch to any home décor. They are shaped like tiny cups, which makes them both practical and adorable, making them a great gift idea as well.
Learning how to make crochet cup-shaped coasters is an enjoyable way to practice basic crochet stitches while creating something unique. Whether you are a beginner or an experienced crocheter, this project is simple enough to follow yet offers room for creativity. You can customize colors, yarn textures, and even add little details to make each coaster special.
This step by step tutorial will guide you through the entire process, including the materials needed, stitches used, and detailed instructions to create perfect cup-shaped coasters. By the end of this tutorial, you will be able to make sets of these coasters for your own use or as handmade gifts for friends and family.
Materials and Preparation
To start this crochet cup-shaped coasters – step by step tutorial, gather the necessary materials. You will need cotton yarn in your preferred colors, as cotton is absorbent and durable for coasters. You will also need a crochet hook size that matches your yarn, scissors, and a yarn needle for finishing.
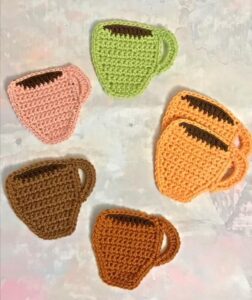
Choose contrasting colors for the cup base and the cup’s rim if you want a more detailed look. Soft pastel colors look great for a cozy kitchen style, while bright colors create a fun and cheerful appearance.
Before starting, make sure you are familiar with basic crochet stitches like chain (ch), slip stitch (sl st), single crochet (sc), and double crochet (dc). These are the main stitches used in this project.
It’s also a good idea to have a stitch marker if you prefer keeping track of your rounds, especially when working in a spiral.
Prepare a comfortable workspace with good lighting. Having everything ready before you start will make the process smoother and more enjoyable.
Finally, measure your cup shape as you go. The coaster should be large enough to hold a cup but small enough to look delicate and decorative.
Making the Cup Base
Start the crochet cup-shaped coasters – step by step tutorial by creating the round base of the coaster. This will be the flat bottom part that sits on the table.
Begin with a magic ring and make 6 single crochet stitches inside the ring. Pull tight to close the ring.
In the next round, make 2 single crochets in each stitch, increasing to 12 stitches. Continue increasing evenly in each round until the base reaches around 4 inches in diameter.
Remember to keep the base flat by evenly spacing your increases. If the base starts curling or waving, adjust your increases slightly.
Once the base is complete, finish the round with a slip stitch and chain one. This will prepare you for the next step, which is building the cup shape.
The flat base is now ready, and you can start working upward to give the coaster its unique cup shape.
Forming the Cup Shape
To form the cup walls of the crochet cup-shaped coasters, work single crochet stitches around the edge without increasing. This will create the vertical sides of the cup.
Continue crocheting in rounds, adding as many rows as you like to make the cup walls higher or lower depending on your preference.
For a more decorative rim, switch to a contrasting color yarn when you reach the final row. This will make the coaster look more like a real cup.
To create the handle, chain around 8 to 10 stitches, then attach it back to the cup with a slip stitch. Adjust the number of chains depending on how big you want the handle to be.
Secure the handle by slip stitching along the chain again for more stability.
Once the handle is complete, fasten off the yarn and weave in all ends neatly with a yarn needle.
Customization and Final Touches
The great thing about this crochet cup-shaped coasters – step by step tutorial is that you can customize it in many ways. You can make different color sets for various seasons or occasions.
For a cozy look, use neutral tones like cream, beige, or brown. For festive events, choose bright colors like red, green, or gold.
You can also add decorative details like tiny embroidered hearts, flowers, or initials on the side of the cup. These personal touches make the coasters great as gifts.
Blocking your coasters is a good idea to give them a professional finish. Simply dampen them lightly and shape them flat to dry.
If you plan to gift them, tie them together with a ribbon or place them in a small box for a lovely presentation.
With a little creativity, each set of coasters you make can be unique and full of personality.
FAQ – Crochet Cup-Shaped Coasters
1. Are crochet cup-shaped coasters beginner-friendly?
Yes! This project mainly uses basic stitches like single crochet and double crochet, making it ideal for beginners.
2. What is the best yarn for coasters?
Cotton yarn is the best choice because it is absorbent, durable, and easy to clean.
3. Can I make the coasters bigger or smaller?
Yes, simply increase or decrease the number of rounds in the base to adjust the size.
4. How do I make the coaster look more like a cup?
Adding a contrasting rim and a handle will give the coaster its cup-like appearance.
5. How do I clean crochet coasters?
Since they are made of cotton, they can be gently hand-washed or machine-washed on a delicate cycle.
6. Can I sell these coasters?
Yes, handmade coasters are popular at craft fairs and online shops, as long as they are your own work.
Conclusion
The crochet cup-shaped coasters – step by step tutorial is a fun and practical project that combines creativity and functionality. With just basic stitches, you can create adorable coasters that look like tiny cups, perfect for everyday use or as thoughtful gifts.
In this tutorial, you learned how to prepare your materials, crochet the base, form the cup shape, and add finishing touches to make your coasters special.
We hope you feel inspired to try this project and create your own unique coaster sets. Share your thoughts in the comments, tell us how your coasters turned out, and feel free to leave suggestions for future tutorials!


