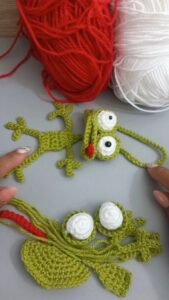
Are you looking for a fun and beginner-friendly crochet project that’s both cute and quick to make? Then this Crochet Cute Frog 🐸 | Simple & Easy tutorial is just what you need. Perfect for gifting, decorating, or keeping as a pocket buddy, this little frog will steal your heart in no time.
Using basic stitches and simple shaping, this crochet pattern is ideal for crafters of all skill levels. Whether you’re making it for a child, a keychain accessory, or as part of your amigurumi collection, the frog’s charming smile and big eyes are guaranteed to delight. Plus, it’s an excellent stash-busting project!
In this blog post, we’ll walk you through each part of the process. We’ll list out all the tools you need, offer exact fabric cuts and measurements, and provide detailed written instructions. If you’ve been looking for a way to improve your amigurumi skills while making something adorable, this crochet cute frog project is your perfect next craft.

Materials and Tools You’ll Need
To begin this simple crochet pattern, you’ll want to gather a few essential supplies. Using the right materials ensures your frog looks well-shaped and lasts for years to come.
Start with the following materials:
-
Worsted weight yarn in green (main body), white (eyes), and black (pupils).
-
A 3.5 mm or 4.0 mm crochet hook, depending on your yarn weight.
-
Polyester fiberfill stuffing.
-
Stitch markers and a yarn needle for assembling the parts.
-
Scissors and optional fabric glue.
Yarn amounts are minimal for this project:
-
Green: approximately 30g for the body, legs, and arms.
-
White: around 5g for the eye background.
-
Black: around 2g for pupils or embroidery floss if preferred.
If you’re adding optional details:
-
Felt (cut to 1″ x 1″ circles) for backing the eyes.
-
A strip of red felt (0.5″ x 2″) for a tongue.
-
Keychain ring or safety pin if turning it into a bag charm.
With your materials in hand, you’re ready to start crocheting your adorable new friend!
Step-by-Step: Crochet the Frog’s Body
This part of the crochet pattern is the foundation of your frog. We’ll begin by creating a round, slightly oval body that will be later stuffed and stitched closed.
Start with a magic ring:
-
Round 1: Make 6 single crochets (sc) into the magic ring.
-
Round 2: Increase in each stitch (12 sc total).
-
Round 3: (1 sc, inc) repeat around (18 sc).
-
Round 4: (2 sc, inc) repeat (24 sc).
-
Continue increasing until you reach 36 sc, then work even rounds (1 sc in each stitch) for about 8 rows.
Now start shaping the top of the frog:
-
Begin decreasing: (4 sc, dec) around (30 sc).
-
Next round: (3 sc, dec) around (24 sc).
-
Stuff the body firmly with fiberfill at this point.
-
Continue decreasing until 6 stitches remain.
-
Fasten off and use a needle to close the hole tightly.
This gives you a solid and rounded base for the frog. It’s firm enough to stand but soft enough to cuddle or clip onto a backpack or keychain. Don’t forget to use your stitch marker at the beginning of each round!
Crocheting the Eyes, Legs, and Arms
Now that the body is complete, it’s time to give your crochet frog its adorable features. This includes two big eyes, four limbs, and any expressive details you’d like to add.
To make the eyes (make 2):
-
With white yarn, make a magic ring and crochet 6 sc.
-
Round 2: Increase in each stitch (12 sc).
-
Round 3: (1 sc, inc) around (18 sc), fasten off.
-
With black yarn, make a magic ring with 4–6 sc (pupil).
-
Stitch or glue the black circle onto the white.
-
Sew the completed eyes to the top sides of the frog’s body.
To make the legs (make 2):
-
Chain 5.
-
Turn and work 4 sc back across the chain.
-
Work 2 rows even (4 sc).
-
Fasten off, fold in half if desired, and sew to the bottom sides.
To make the arms (make 2):
-
Chain 4.
-
Turn and crochet 3 sc.
-
Add 1–2 rows of even stitches.
-
Sew to the upper body sides or angle slightly forward.
The limb design is flexible—feel free to make them longer, rounder, or more playful. The beauty of amigurumi-style crochet is that you can shape it to fit your own artistic style!
Finishing Touches and Customizing Your Frog
With the base parts attached, you can now start adding those final fun flourishes. This part of the crochet pattern is where your frog truly comes to life.
Add a mouth:
-
Use red or black yarn to embroider a big smile.
-
Stitch a tongue if desired using felt or yarn.
-
You can also use safety eyes if you prefer a glossy look.
Add accessories:
-
Bow tie: Crochet a small rectangle (4 sc x 3 rows), pinch in the middle, and wrap yarn around.
-
Hat or crown: Use yellow yarn to make a mini triangle or circle crown.
-
Backpack or leaf cape: For whimsical or storybook themes.
Make it a keychain or ornament:
-
Attach a split keyring to the top with a chain loop.
-
Add it to a zipper, backpack, or Christmas tree for year-round joy.
Reinforce seams:
-
Use a whip stitch to secure limbs tightly if you plan to gift it to kids.
-
Reinforce the eye attachments with extra thread or glue backing for safety.
Your crochet cute frog can be as simple or detailed as you want. That’s the charm of handmade—every piece is unique, and every project is a reflection of your personality.
Why You’ll Love This Crochet Frog Project
If you’re wondering whether this project is worth your time, let us give you a few great reasons. This crochet cute frog project checks all the boxes: fun, functional, adorable, and creative.
Here’s why you’ll love it:
-
It’s a quick crochet pattern—perfect for busy schedules or weekend crafting.
-
It teaches essential amigurumi techniques like shaping, stuffing, and sewing.
-
It’s ideal for using up leftover yarn scraps in your collection.
-
You can gift it, decorate with it, or even sell it at local markets.
-
It helps build your confidence if you’re new to crochet.
-
The final product is guaranteed to bring a smile to your face!
This project is especially great for beginners because it introduces simple shapes and gradual increases/decreases. At the same time, advanced crafters can add embellishments or turn it into part of a larger scene.
Final Thoughts
Making this Crochet Cute Frog 🐸 | Simple & Easy pattern is not only a relaxing hobby—it’s also a way to connect with the joy of handmade art. Whether you’re crocheting for yourself or creating a gift for someone special, this pattern is sure to brighten any day.
You’ve learned:
-
What materials and tools are needed.
-
How to crochet the frog’s body, eyes, arms, and legs.
-
Customization options to make your frog uniquely yours.
-
Tips for turning it into a functional or decorative item.
So grab your crochet hook, pull out that yarn, and get stitching! This frog may be small, but it will hop right into your heart and remind you how rewarding it is to make something by hand.
Happy crocheting, friends! 🐸🧶


