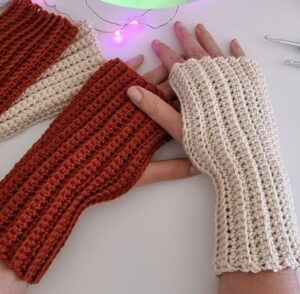
Looking for the perfect handmade accessory to keep your hands warm and stylish? Making your own crochet fingerless mittens is a fun and rewarding project for any crochet enthusiast. These mittens are not only practical for chilly days, but they also make excellent gifts, market items, or quick fashion additions to your winter wardrobe. Whether you’re a beginner or seasoned crafter, this pattern is simple enough to follow while still offering room for creativity and customization.
Crochet fingerless mittens provide warmth without sacrificing dexterity. They’re perfect for using your phone, typing, or working with your hands while staying cozy. Plus, with just a small amount of yarn and a few hours of your time, you can complete a pair in an afternoon. This is why they’ve become one of the most popular crochet patterns in recent years.
In this detailed tutorial, we’ll guide you step by step through making your own pair of crochet fingerless mittens. You’ll learn what materials to use, how to get started, pattern construction, and customization options. Let’s dive into the cozy world of crochet and make something both beautiful and practical!

Materials, Sizing, and Getting Started
Before diving into the stitches, it’s essential to prepare your materials and understand the sizing. Choosing the right yarn, hook, and measurements will ensure a great fit and beautiful finish for your crochet fingerless mittens.
-
Yarn Recommendation: For this project, you’ll need a medium-weight worsted yarn (category 4). A soft wool or acrylic blend works perfectly for warmth and comfort. Around 150 yards (137 meters) should be sufficient for one pair.
-
Hook Size: Use a 5.0 mm (H/8) crochet hook. Always check your gauge before beginning to make sure your mittens won’t be too loose or too tight.
-
Other Notions: You’ll need a yarn needle for weaving in ends, scissors, and stitch markers (optional for keeping track of rows).
-
Finished Size: This pattern fits an average adult hand (7″ palm circumference). To adjust the size, simply add or subtract rows or stitches as you work.
-
Gauge: 14 hdc and 11 rows = 4 inches (10 cm). Adjust your hook size to match this gauge for best results.
-
Choosing Colors: Go with classic neutrals for a timeless look or play with variegated yarns for fun color changes. Crochet allows you to get creative with color and texture.
Step-by-Step Instructions for the Mitt Body
The body of your crochet fingerless mittens is created using simple stitches and a flat rectangle that is later sewn into shape. Let’s break it down into clear steps.
-
Create a Foundation Chain: Chain 26 (or enough to cover the desired wrist-to-knuckle length). This will be the height of your mittens.
-
Work Rows in Half Double Crochet (HDC): Row 1 – Work 1 hdc in the second chain from the hook and across (25 hdc). Ch 1, turn. Continue working in hdc for each row to form a rectangle.
-
Build the Rectangle: Repeat Row 1 until your piece wraps snugly around the palm (typically 20–24 rows for adult size). The texture should be stretchy and soft.
-
Measure for Fit: Check the width of your fabric by wrapping it around your hand. You want a snug, not tight, fit. Adjust by adding or removing rows.
-
Fasten Off: When the rectangle is complete, leave a long tail for sewing. This edge will become the seam of your mittens.
-
Repeat for Second Mitt: Make an identical piece for the second mitten before moving on to seaming.
Assembly and Thumbhole Construction
Once both mittens are crocheted, the next step is to shape them into their final form. This section explains how to seam the fabric and leave an opening for the thumbhole.
-
Fold the Rectangle: Place the rectangle lengthwise so the short ends meet. Use the long tail and yarn needle to whipstitch the edges together from the bottom up.
-
Leave a Thumbhole: Seam until you reach the thumb height (usually 2 inches from the top), then fasten off. Leave an opening of about 1.5–2 inches for the thumb. Rejoin the yarn above the thumbhole and continue seaming to the top.
-
Reinforce Thumbhole Edges: Optionally, you can crochet around the thumbhole opening with a round of single crochet to give a cleaner finish.
-
Weave in Ends: Use a tapestry needle to weave in all loose yarn ends securely. Make sure everything lies flat and smooth.
-
Try It On: Slip your hand into the mitten to check fit. The thumbhole should be comfortable, and the mitt should not be too tight.
-
Repeat for Other Mitt: Assemble the second mitten using the same steps. Ensure symmetry by matching seam and thumbhole placement.
Customization Ideas and Finishing Touches
Your basic crochet fingerless mittens are complete, but you can make them truly unique with a few finishing details and custom features. Here are some ideas to enhance your project.
-
Add Ribbed Edges: For a polished look, add a few rounds of front post/back post double crochet (FPDC/BPDC) at the wrist edge. This adds stretch and shape retention.
-
Decorative Stitch Patterns: Try alternating rows of HDC and slip stitch, or insert puff stitches for added texture.
-
Color Striping: Change yarn colors every few rows for bold stripes. This works well with leftover yarn scraps too!
-
Crochet Appliqués: Sew small motifs like hearts, stars, or flowers onto the top of each mitten using matching yarn.
-
Thumb Gusset Option: If you’re comfortable increasing and shaping, try adding a thumb gusset for a more glove-like fit. Many advanced crochet patterns offer this upgrade.
-
Matching Sets: Use the same yarn to create a matching beanie or scarf for a complete winter set. This is a great idea for gift-giving!
Care Instructions, Gift Ideas & Final Thoughts
Proper care and thoughtful presentation can elevate your crochet fingerless mittens from simple handmade to heartfelt keepsake. Here are the final tips and ideas to wrap up your project.
-
Washing Instructions: If using acrylic or cotton yarn, these mittens are usually machine washable. However, hand washing in cold water is the safest option. Lay flat to dry.
-
Blocking the Mitts: Light steam blocking can help even out the stitches and enhance the shape, especially if the yarn curled during work.
-
Packaging for Gifts: Wrap your mittens in tissue paper, tie with ribbon, and attach a handmade tag. Include fiber content and care instructions.
-
Selling at Markets: These mittens are ideal items for craft fairs and Etsy shops. They’re quick to make, affordable, and always in demand during cooler months.
-
Try Different Yarn Types: Experiment with wool blends for added warmth or bamboo yarns for a lighter, softer option. The beauty of crochet lies in its flexibility.
-
Free Crochet Pattern Recap: Chain 26 → work 25 hdc rows → fold and seam → leave thumbhole → embellish as desired.
Conclusion
Making your own crochet fingerless mittens is a rewarding, cozy, and stylish adventure into the world of crochet patterns. Whether you’re crafting for yourself, making thoughtful gifts, or preparing items to sell, these mittens are quick to stitch up and easy to personalize.
By following this tutorial step by step, you’ll not only improve your crochet skills but also enjoy the satisfaction of completing a wearable piece that offers warmth and flair. Don’t be afraid to play with color, texture, and embellishments—the best part of crochet is making it your own.
So grab your yarn, hook, and cozy up with this easy and beautiful project. Happy crocheting!


