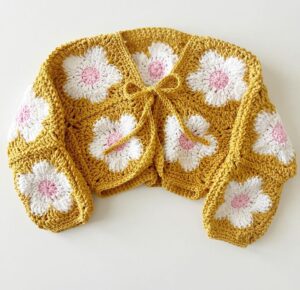
The Crochet Flower Coat Pattern is a delightful fusion of artistry and functionality, offering a unique way to showcase your crochet skills. This pattern allows you to create a vibrant, floral-themed coat that’s both stylish and cozy. Whether you’re aiming to make a statement piece or a thoughtful gift, this project is sure to impress.
Embracing the world of crochet patterns, this coat design incorporates intricate flower motifs that add a touch of elegance and charm. The versatility of the pattern means you can customize colors, sizes, and styles to suit your personal taste or the preferences of your loved ones.
In this guide, we’ll walk you through the necessary materials, provide detailed measurements, and offer a step-by-step tutorial to help you craft your very own crochet flower coat. Let’s embark on this creative journey together!
Materials and Measurements
Before diving into the crochet flower coat pattern, it’s essential to gather all the necessary materials. Having everything on hand will streamline the process and enhance your crafting experience.
-
Yarn: Opt for a medium-weight (worsted) yarn in various colors to create vibrant flower motifs. Cotton or acrylic yarns are recommended for their durability and comfort.
-
Crochet Hook: A 5.0 mm (H-8) hook is suitable for this project, but always refer to your yarn’s label for the recommended hook size.
-
Notions: You’ll need stitch markers, a yarn needle for weaving in ends, and scissors.
-
Buttons: Choose buttons that complement your yarn colors for the coat’s closure.
-
Fabric (Optional): If you prefer a lined coat, select a lightweight fabric for the lining. Ensure it’s breathable and matches your yarn’s color scheme.
-
Measurements: The coat’s dimensions can be adjusted based on the desired size. For a medium-sized coat, aim for a bust measurement of 38 inches (96.5 cm) and a length of 30 inches (76 cm). Adjust accordingly for other sizes.
Crafting the Flower Motifs
The heart of the crochet flower coat pattern lies in its intricate flower motifs. These motifs not only add aesthetic appeal but also provide structural integrity to the coat.
-
Foundation Ring: Begin by creating a magic ring. Chain 4 (counts as the first double crochet and chain 1), then alternate between double crochets and chain 1 until you have eight double crochets. Join with a slip stitch to the third chain of the initial chain 4.
-
Petal Formation: In each chain-1 space, work the following: single crochet, half double crochet, 3 double crochets, half double crochet, and single crochet. This sequence forms a petal. Repeat in each chain-1 space around.
-
Motif Completion: After completing all petals, fasten off and weave in the ends. Create multiple motifs in various colors to achieve a vibrant floral pattern.
-
Joining Motifs: Arrange the motifs according to your desired coat layout. Use slip stitches or single crochets to join motifs together, ensuring a seamless connection.
-
Shaping the Coat: As you join motifs, shape them to form the front panels, back panel, and sleeves of the coat. Adjust the number of motifs to achieve the desired size and fit.
-
Edging: Once all motifs are joined and the coat is assembled, add a border using single or double crochet stitches around the edges for a polished finish.
Assembling the Coat
With all motifs crafted and joined, it’s time to assemble the coat. This phase transforms your collection of motifs into a wearable masterpiece.
-
Layout: Lay out the joined motifs on a flat surface, arranging them to form the front panels, back panel, and sleeves. Ensure symmetry and balance in your design.
-
Seaming: Use a whip stitch or mattress stitch to seam the shoulders and sides of the coat. For the sleeves, join the motifs in a circular pattern and attach them to the armholes.
-
Collar and Cuffs: Add a collar by working rows of single or double crochet stitches along the neckline. For cuffs, crochet ribbing or a simple border at the sleeve ends.
-
Button Band: On the front panels, create a button band by working rows of single crochet stitches. Space buttonholes evenly on one side and sew buttons on the opposite side.
-
Lining (Optional): If you opted for a fabric lining, cut the fabric according to the coat’s dimensions, sew the pieces together, and attach the lining to the inside of the coat using a whip stitch.
-
Finishing Touches: Weave in all loose ends, block the coat to shape it properly, and ensure all seams are secure.
Styling and Care Tips
Your handcrafted crochet flower coat is not only a testament to your skills but also a versatile addition to your wardrobe. Here are some tips to style and care for your creation.
-
Styling: Pair your coat with neutral-toned outfits to let the floral motifs stand out. It’s perfect for spring and autumn outings.
-
Accessories: Complement the coat with matching crochet accessories like hats or scarves using the same flower motifs.
-
Storage: Store the coat folded in a cool, dry place. Avoid hanging it for extended periods to prevent stretching.
-
Washing: Hand wash the coat in cold water with mild detergent. Lay flat to dry, reshaping it as necessary.
-
Repairs: Keep leftover yarn from the project for future repairs or touch-ups.
-
Gifting: This coat makes a thoughtful handmade gift. Customize the colors and size to suit the recipient’s preferences.
Creating a crochet flower coat is a rewarding project that combines creativity, skill, and functionality. By following this comprehensive guide, you’ll craft a beautiful, personalized garment that showcases the timeless art of crochet.
Embrace the journey, and let each stitch bring you closer to a masterpiece you can wear with pride.


