
The crochet granny square tutorial for beginners is one of the best starting points for anyone new to the world of crochet. This classic technique has been loved for generations because it is simple, versatile, and incredibly satisfying to make. If you’ve ever admired colorful crochet blankets or patchwork bags, chances are they were made using granny squares.
Learning the crochet granny square tutorial for beginners opens the door to countless creative projects. From cozy afghans to stylish accessories, mastering this foundational skill gives you the confidence to explore more advanced patterns later. The repetitive structure makes it easy to memorize, which is why many beginners fall in love with it quickly.
In this complete guide, you will discover everything you need to confidently create your first crochet granny square tutorial for beginners project. We’ll walk through materials, basic stitches, step-by-step instructions, and helpful tips to ensure your squares come out neat and beautiful every time.
Why the Crochet Granny Square Tutorial for Beginners Is Perfect to Start
The crochet granny square tutorial for beginners is widely recommended because it uses basic stitches that are easy to learn. Even if you have never held a crochet hook before, you can follow along with patience and practice.
Another major advantage is the repetitive pattern structure. Once you complete the first round, the remaining rounds follow a similar rhythm, which helps build muscle memory quickly.
This technique is also very forgiving. Small tension mistakes or uneven stitches often blend into the design, making it less stressful for beginners who are still developing their skills.
The crochet granny square tutorial for beginners is also extremely flexible in size. You can stop after a few rounds for small squares or continue growing the piece into a large blanket.
Portability is another benefit. Granny squares are small and easy to carry, making them perfect for crocheting while traveling or relaxing.
Finally, finishing a granny square gives beginners a strong sense of accomplishment, which is essential for staying motivated in crochet.
Materials You Need for a Crochet Granny Square Tutorial for Beginners
Before starting your crochet granny square tutorial for beginners, gathering the right supplies will make the process smoother and more enjoyable.
First, choose a medium-weight yarn (worsted weight is ideal for beginners). Acrylic yarn is affordable and easy to work with, while cotton offers a cleaner stitch definition.
Next, select the appropriate crochet hook. Most beginners do well with a 4.5 mm to 5.5 mm hook when using worsted-weight yarn.
You will also need a yarn needle to weave in the ends once your square is finished. This step helps secure your work and improves durability.
A pair of sharp scissors is essential for clean yarn cuts. Dull scissors can fray yarn and make finishing more difficult.
Stitch markers are optional but helpful, especially when you are learning to identify corners and stitch spaces.
Having these tools ready will make your crochet granny square tutorial for beginners experience much more relaxing and enjoyable.
Step-by-Step Crochet Granny Square Tutorial for Beginners
Starting your crochet granny square tutorial for beginners is easier when you break it into clear, manageable steps.
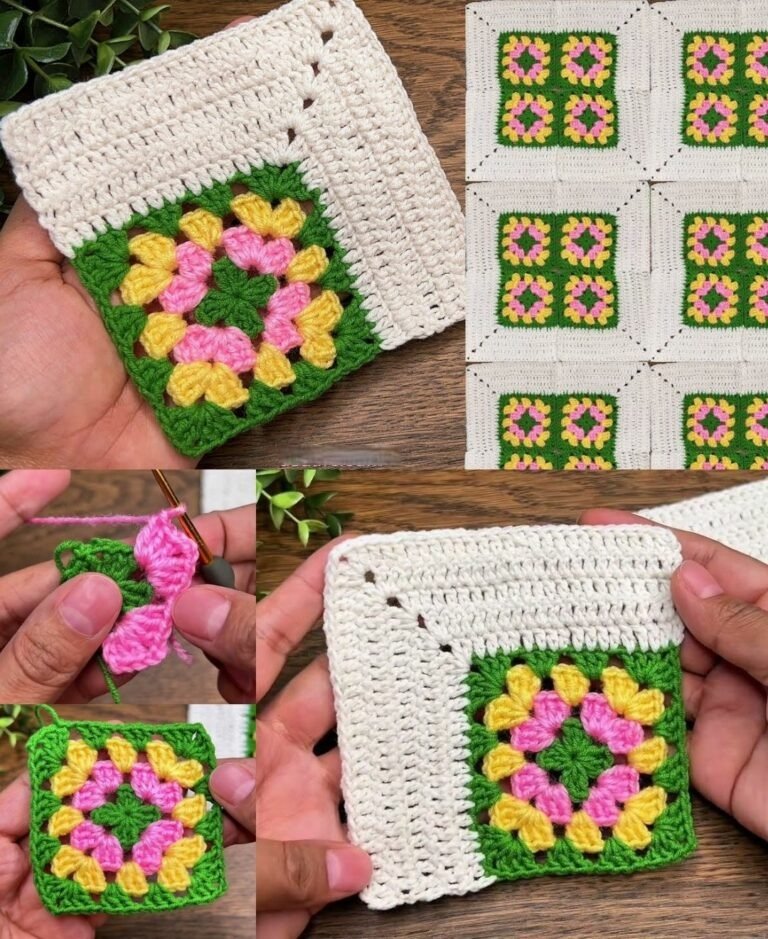
Begin by making a slip knot and chaining four stitches. Join with a slip stitch to form a small ring, which will be the center of your granny square.
Next, chain three stitches (this counts as your first double crochet). Work two more double crochets into the ring, then chain two to form your first corner.
Repeat the pattern of three double crochets followed by chain two three more times. This creates the classic four-corner granny square foundation.
Join the round with a slip stitch at the top of the beginning chain. You should now clearly see the square shape forming.
For the next rounds, slip stitch into the corner space, chain three, and repeat the cluster pattern in each corner and space across.
Continue adding rounds until your square reaches the desired size. Finish by fastening off and weaving in the ends neatly.
With practice, the crochet granny square tutorial for beginners process will become second nature.
Common Mistakes Beginners Should Avoid
When following a crochet granny square tutorial for beginners, a few common mistakes can affect the final result, but they are easy to fix once you know what to watch for.
One frequent issue is tight tension. If your stitches are too tight, the square may curl or become stiff. Try relaxing your grip on the yarn and hook.
Another mistake is missing corner spaces. Always remember that corners typically include chain-two spaces that allow the square to grow properly.
Beginners sometimes miscount double crochet clusters. Taking a moment to count your stitches at the end of each round can save time later.
Using the wrong hook size can also affect the outcome. If your square looks too tight or too loose, adjust your hook accordingly.
Forgetting to weave in ends securely may cause unraveling over time. Always finish your work carefully.
Avoiding these pitfalls will help your crochet granny square tutorial for beginners results look clean and professional.
Creative Ways to Use Your Granny Squares
After mastering the crochet granny square tutorial for beginners, you’ll have endless possibilities for using your finished squares.
The most popular project is the classic granny square blanket. By joining multiple squares, you can create a cozy and colorful afghan.
Granny squares also work beautifully for bags and totes. They add a handmade, vintage charm that many people love.
You can create pillow covers by joining several squares into a larger panel. This is a quick way to refresh your home decor.
Another fun idea is making wearable items like cardigans, vests, or scarves using granny square panels.
Small squares can even become coasters or mug rugs, making great handmade gifts.
The crochet granny square tutorial for beginners truly is a gateway to countless creative crochet projects.
FAQ About Crochet Granny Square Tutorial for Beginners
Is the crochet granny square tutorial for beginners really easy?
Yes. The crochet granny square tutorial for beginners uses basic stitches and repetitive steps, making it one of the easiest crochet projects to learn.
What is the best yarn for granny squares?
Worsted-weight acrylic or cotton yarn is ideal because it is easy to handle and shows stitches clearly.
Why is my granny square not square?
This usually happens due to uneven tension or missed corner chains. Blocking your square can also help improve the shape.
How many granny squares do I need for a blanket?
It depends on the blanket size and square size. A typical throw blanket may require 48–80 squares.
Do I have to change colors every round?
No. While traditional granny squares are colorful, you can absolutely make solid-color squares.
Should beginners block granny squares?
Blocking is optional but recommended. It helps even out stitches and makes joining easier.
Conclusion
The crochet granny square tutorial for beginners is a timeless and rewarding way to start your crochet journey. In this guide, you learned why granny squares are perfect for beginners, what materials to use, how to follow the step-by-step process, and how to avoid common mistakes. You also discovered creative ways to transform simple squares into beautiful finished projects.
Now it’s your turn to practice the crochet granny square tutorial for beginners and start building your own collection of handmade squares. If this tutorial helped you, leave your honest opinion and share your suggestions—your feedback is always welcome and helps inspire future crochet guides. Happy crocheting! 🧶✨

