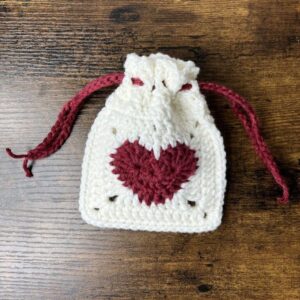
The Crochet Heart Drawstring Pouch Free Pattern is a delightful and functional project that combines beauty and practicality. It’s perfect for beginners and experienced crocheters alike who want to make something small, sweet, and meaningful. This charming pouch can be used as a gift bag, jewelry holder, Valentine’s Day surprise, or even as a decorative keepsake.
What makes this crochet project especially appealing is how simple it is to create using basic stitches, a small amount of yarn, and a hook. If you love crochet patterns that bring a heartfelt theme to life, this pouch will quickly become one of your favorites. With a cute heart design incorporated into the body of the bag, it makes a great stash-busting project too.
In this blog post, we’ll explore how to make this adorable pouch from start to finish. We’ll cover the materials needed, provide a step-by-step guide to creating the heart and bag structure, and offer finishing tips to help you add the drawstring. Plus, we’ll make sure it’s easy to follow and fully optimized for both readers and search engines.
Materials and Measurements for the Heart Drawstring Pouch
To create the Crochet Heart Drawstring Pouch Free Pattern, you’ll only need a few basic materials. This pattern is beginner-friendly and great for using up yarn scraps from your stash. Below is everything you need to get started.
First, choose your yarn. You can use worsted weight or cotton yarn depending on your desired texture. Cotton provides more structure, while acrylic yarns offer a softer finish. Choose colors that complement each other—one for the pouch and another for the heart.
You’ll need a 4.0 mm (G-6) crochet hook or a size appropriate for your yarn. The pouch is worked in rounds, and the heart motif is usually crocheted separately and then sewn or joined as you build the pouch.
Other materials include scissors, a yarn needle for weaving in ends, and a length of ribbon or twisted yarn to use as the drawstring. If you want your pouch to be more secure, you can even line it with fabric (optional).
As for fabric cuts and measurements, if you’re lining the pouch, cut a piece of lightweight fabric 10 inches by 4 inches. Fold it and sew it to match the pouch size. For the yarn version, the final pouch size is approximately 4 inches wide by 5 inches tall, perfect for holding small gifts or jewelry.
Remember that this crochet pattern is flexible—you can adjust the number of stitches or rounds to customize your pouch size. If you want to make a larger version, simply increase the number of rounds in the base and height sections.
Step-by-Step Instructions: Creating the Base and Sides
Now that you have all your materials, it’s time to dive into the steps to make the Crochet Heart Drawstring Pouch Free Pattern. We’ll begin with the base and build our way up through the pouch structure.
Start by creating a magic ring. Into the ring, crochet 6 single crochets (SC). Pull tight and join to the first stitch with a slip stitch (SL ST). This forms the center of the base. You’ll now begin working in rounds to form a flat circle.
Round 2: Chain 1, make 2 SC in each stitch around (12 stitches). Join with SL ST. Continue increasing by 6 stitches per round until your base is approximately 4 inches in diameter. Typically, this takes about 5 to 6 rounds, depending on your yarn and tension.
Once the base is complete, stop increasing and begin working up the sides. From this point, SC in each stitch around for several rounds. The height of the pouch should be around 5 inches. This part forms the cylinder of the pouch.
At this point, insert your heart crochet motif if you’re attaching it by joining directly. Otherwise, sew it on later. If you’re adding a fabric lining, now is a good time to fit it inside your crochet base.
To create the drawstring row, alternate between SC and chain-1 (ch-1) stitches all the way around. This will leave small holes that your ribbon or cord can go through. Make sure your stitch count is even so that the holes are aligned.
Once that round is finished, make one more round of SC to reinforce the top. Fasten off your yarn and weave in all ends securely using a yarn needle. Now the main body of your heart pouch is complete.
Crocheting the Heart and Attaching It
The heart is the focal point of the Crochet Heart Drawstring Pouch Free Pattern, and it’s surprisingly simple to make. You’ll crochet it separately and then attach it to the pouch.
To crochet the heart, begin with a magic ring. Into the ring, work the following: ch 3, 3 treble crochets (TR), 3 double crochets (DC), ch 1, 1 treble crochet, ch 1, 3 DC, 3 TR, ch 3, and slip stitch into the center. Pull the magic ring tight to form a heart shape.
You can use a contrasting color for the heart to make it stand out against the pouch. Bright reds, pinks, or even pastel tones make the heart visually appealing and suitable for different occasions.
After the heart is finished, block it slightly using a damp cloth and pins to make it lay flat. Then, position it on the center of the pouch, either front or back. Pin it in place before sewing to ensure it is aligned correctly.
Use a yarn needle and matching thread or yarn to sew the heart securely onto the pouch. Make small stitches around the edge so that it is firmly attached and won’t catch on anything.
For a 3D effect, you can add a layer of felt or fabric under the heart. This creates a padded look, giving your pouch more texture and visual interest—ideal for gift giving.
Once attached, the heart becomes the centerpiece of the pouch, elevating the entire crochet pattern from simple to sentimental and beautiful.
Finishing Touches and Customization Ideas
Now that your pouch is complete, let’s talk about drawstrings and creative ways to customize your Crochet Heart Drawstring Pouch Free Pattern. These small details can make a big difference.
To create the drawstring, you can use a store-bought satin ribbon or crochet a chain using your yarn. To crochet a drawstring, simply chain 80–100 stitches and fasten off. Weave it through the holes created in the drawstring row using a yarn needle.
For added charm, you can attach beads or tassels to the ends of the drawstring. This makes your pouch look more polished and festive. Use wooden or plastic beads depending on your style preference.
If you’re making these pouches as gifts, consider personalizing each one. You can embroider initials, add small tags, or even include tiny lavender sachets inside for fragrance. The possibilities are endless.
Want a pouch for a holiday? Use red and green yarn for Christmas, orange and black for Halloween, or blue and silver for Hanukkah. Change the heart to a star or other symbol to suit different seasons.
These pouches can be used in many ways: store jewelry, hold wedding favors, give as birthday presents, or use them for party décor. Their versatility and handmade quality make them extra special.
As a final step, take photos of your finished pouch and share them on social media or crafting communities. The crochet world loves seeing how different crafters interpret the same crochet patterns, and you might inspire others with your creation!
Final Thoughts
The Crochet Heart Drawstring Pouch Free Pattern is a fun, fast, and rewarding project that blends artistry and functionality. It’s a great addition to your collection of handmade items or as a small gift that says “made with love.” Whether you’re crafting for Valentine’s Day or just because, this pouch adds a heartfelt touch to your crochet journey.
Thanks to its simplicity and flexibility, even beginner crocheters can follow this crochet pattern successfully. With just a bit of yarn, time, and creativity, you’ll create a lovely pouch that’s both useful and beautiful.


