If you’re looking to add a touch of whimsy and texture to your next project, the crochet Ice Cream Stitch is the perfect choice. Inspired by the swirled beauty of ice cream scoops, this stitch combines soft curves and bumpy texture to create an eye-catching and delightful pattern. Ideal for baby blankets, scarves, and decorative items, this stitch blends fun with function effortlessly.
Whether you’re new to crochet or a seasoned pro exploring creative crochet patterns, the Ice Cream Stitch is easy enough to learn but impressive enough to showcase in your handmade creations. It only requires a few basic stitches and a bit of practice to master the gentle wave and bobble-like detail that makes this stitch so unique.
In this blog post, you’ll discover how to make the crochet Ice Cream Stitch step by step, the best yarns and hooks to use, and creative ideas to incorporate it into various projects. Read on for an in-depth guide on one of the sweetest stitches in the crochet world.
What Is the Ice Cream Stitch in Crochet?
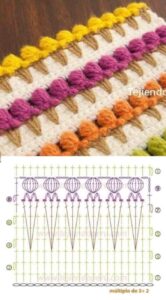
The Ice Cream Stitch is a textured stitch that mimics the look of layered scoops of ice cream. It combines clusters and bobbles to form a 3D pattern that looks complex but is surprisingly simple once broken down. This stitch gets its name from its bubbly and swirled appearance, which resembles melting ice cream.
One of the best features of the Ice Cream Stitch is its versatility. It works beautifully with different color combinations, allowing you to create a vibrant or subtle look depending on your yarn choices. Whether using pastels for a baby blanket or bold colors for a throw pillow, this stitch makes your project stand out.
To achieve the crochet Ice Cream Stitch, you’ll be using a combination of chain stitches, single crochets, and bobble stitches. The bobbles give it that delightful puffiness, while the chains and singles keep the base structure smooth and even.
This stitch is great for projects that need some texture but not too much bulk. You can use lighter weight yarns for baby accessories or medium yarns for home decor like cushions or throws. The stitch adds dimension while still being soft and cozy.
Unlike many textured stitches, the Ice Cream Stitch maintains a nice drape, which makes it perfect for wearable items. Scarves and cowls made with this stitch not only look fun but feel incredibly comfortable around the neck.
Many crafters love this stitch for its playful appearance. It’s especially popular in seasonal projects like summer-themed baby sets or ice-cream-inspired bags and accessories. It’s a stitch that brings a smile to both the maker and the recipient.
Materials and Measurements
Before getting started with the crochet Ice Cream Stitch, it’s important to gather the right materials. Choosing the proper tools and yarn makes a huge difference in the outcome of your project. Below is a list of what you’ll need.
You’ll need worsted-weight yarn or DK yarn depending on your project. For something like a baby blanket, a soft acrylic or cotton yarn works best. Aim for pastel shades if you want the classic ice cream look.
A 4.0 mm (G-6) or 5.0 mm (H-8) crochet hook is ideal for most yarn weights used with this stitch. Make sure your hook size complements your yarn for the best stitch definition.
You’ll also need scissors, a yarn needle for weaving in ends, and a stitch marker if you’re working in rounds or large rows. Keeping your tools organized helps avoid frustration during the process.
Your foundation chain should be in multiples of 4 + 1. This ensures your stitch pattern repeats evenly across the row. Always double-check your stitch count before beginning.
If you’re making a baby blanket, a common cut would be around 120 stitches wide (for approx. 30 inches) and continue in rows until the desired length is reached. For a scarf, 40 stitches wide and 150 rows long can be a good start.
Make a swatch before starting your final project. This helps check gauge, see how the stitch looks with your yarn, and lets you get comfortable with the pattern before committing to a larger piece.
Step-by-Step: How to Crochet the Ice Cream Stitch
Let’s get into the detailed steps to crochet the Ice Cream Stitch. This breakdown will help you understand how to build the pattern row by row.
Start with a foundation chain in multiples of 4 + 1. For a practice swatch, try chaining 21. This will give you a manageable width to work with while learning the stitch.
Row 1: Start by making a single crochet into the second chain from the hook. Chain 1, skip 1 chain, single crochet into the next chain. Repeat from * to * until the end of the row. Turn your work.
Row 2: Chain 1. Make a single crochet in the first stitch. In the next chain-1 space, make a bobble stitch (yarn over, insert hook, pull up loop, yarn over, pull through two loops—repeat 5 times in the same space, then yarn over and pull through all loops on hook). Single crochet in next sc, bobble in next ch-1 space. Repeat across.
Row 3: Chain 1. Single crochet in each stitch across. This flattens the row and provides a base for the next layer of bobbles. You’ll notice the texture starting to appear here.
Row 4: Repeat Row 2, but offset your bobbles by starting with a bobble in the second space instead of the first. This creates the alternating “scoops” that mimic stacked ice cream.
Repeat Rows 3 and 4 to continue the stitch pattern. You’ll see the textured, wavy rows begin to build up into a charming, bubbly fabric perfect for many crochet patterns.
Tips for Perfecting the Ice Cream Stitch
Getting the crochet Ice Cream Stitch just right can take a bit of trial and error. Here are some pro tips to help you succeed on your first try.
Maintain a loose tension when making your bobble stitches. If your stitches are too tight, pulling through all loops at the end of the bobble can become difficult and distort the fabric.
Use a stitch marker at the start of each row if you’re working on a larger piece. This helps you keep track of where you are and ensures you don’t accidentally add or skip a stitch.
For a clean look, always crochet into the top of the bobble and not into the space next to it. This keeps your rows aligned and the texture even throughout your project.
Experiment with color changes between rows of bobbles to create a striped ice cream effect. This adds visual interest and really emphasizes the “ice cream” aesthetic.
Block your finished project to even out any puckering caused by the bobble stitches. This gives a polished and professional look to your final piece.
Practice on small swatches before committing to larger projects. It’s a great way to test yarn choices and get a feel for the stitch’s rhythm.
Creative Project Ideas Using the Ice Cream Stitch
Once you’ve mastered the crochet Ice Cream Stitch, the possibilities for projects are endless. It’s such a fun and textured stitch that works in many creative ways.
Try making a baby blanket with alternating pastel colors in the bobble rows. The texture is perfect for babies to touch and feel, and the design is both cute and comforting.
Use the stitch in a cowl or scarf with bright colors to create a cheerful and cozy winter accessory. The texture gives extra warmth and flair.
Add the stitch as a decorative panel in a crochet bag. It offers a unique texture that stands out, especially when paired with a solid single crochet base.
Make matching potholders or hot pads with cotton yarn. The bobble texture adds thickness and insulation while also being aesthetically fun.
Design a fun wall hanging using multiple color changes to create an “ice cream parlor” theme. This is a great idea for a child’s room or a summer-themed decor piece.
Finally, consider incorporating this stitch into amigurumi accessories or toys. The textured detail can simulate scoops of ice cream or add dimension to your characters.
The crochet Ice Cream Stitch is a sweet addition to your repertoire of crochet patterns. Whether you’re crafting cozy wearables or delightful home accessories, this stitch offers texture, charm, and endless possibilities.
Try it out in your next project and see how much fun you can scoop up with your crochet hook!


