
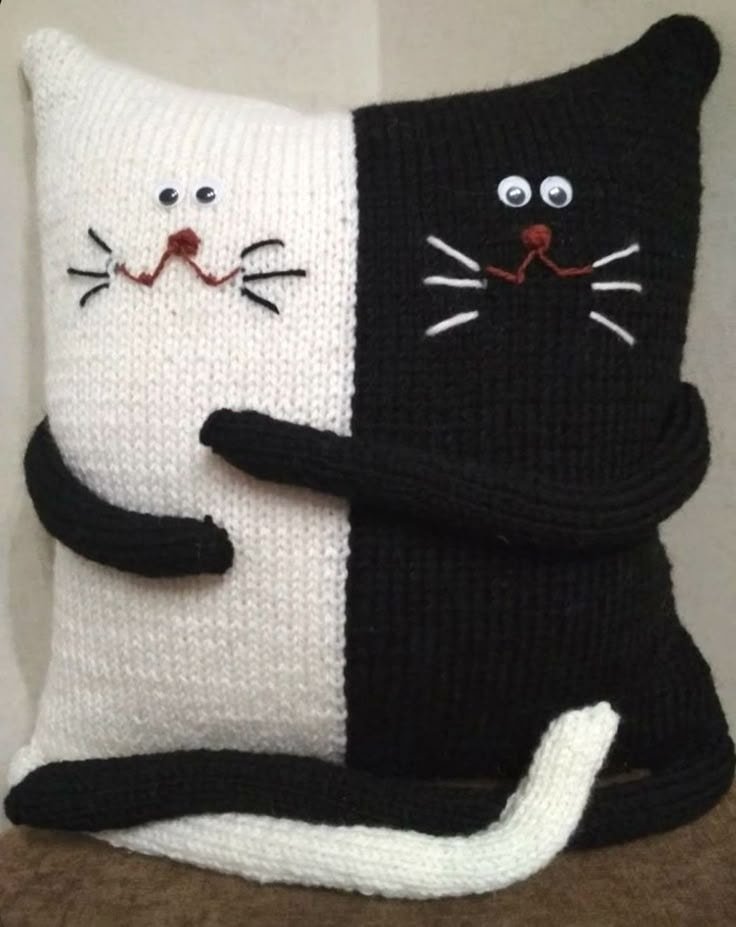
The crochet kitten pillow – tutorial is the perfect project for anyone who loves cute handmade décor and cozy crochet creations. This adorable pillow combines softness, charm, and functionality, making it a favorite among beginners and experienced crocheters alike. Whether you want to decorate a nursery, brighten up your living room, or create a heartfelt handmade gift, this project is a wonderful choice.
One of the reasons the crochet kitten pillow – tutorial is so popular is because it uses simple stitches while delivering an impressive final result. Even if you are still building confidence with your crochet skills, you can successfully complete this project with patience and practice. Plus, the playful kitten design makes the process even more enjoyable.
In this complete guide, you will learn everything you need to follow the crochet kitten pillow – tutorial from start to finish. We will cover the best materials, detailed step-by-step instructions, customization ideas, and expert tips to help your pillow look polished and professional. By the end, you’ll be ready to create a soft and adorable kitten pillow you can proudly display.
Why the Crochet Kitten Pillow – Tutorial Is Perfect for Beginners
The crochet kitten pillow – tutorial is especially suitable for beginners because it relies mostly on basic stitches such as single crochet and simple shaping techniques. You don’t need advanced skills to achieve a beautiful result.
Another advantage is that the project is worked in manageable sections. Most kitten pillows are made from two panels that are later joined, which makes the construction easier to understand.
This pattern is also forgiving. Minor tension differences usually blend into the plush texture, helping beginners feel more confident as they work.
The crochet kitten pillow – tutorial is highly customizable as well. You can easily change colors, facial expressions, or ear shapes to create a unique kitten personality.
Additionally, the finished pillow is both decorative and functional. Unlike small amigurumi pieces, this project creates something you can actually use every day.
Most importantly, it is a fun and relaxing project that keeps motivation high, especially for crocheters who enjoy cute animal designs.
Materials Needed for Your Crochet Kitten Pillow – Tutorial
Before starting your crochet kitten pillow – tutorial, gathering the right materials will make the process smoother and more enjoyable.
First, choose a soft, medium-weight yarn. Acrylic yarn is beginner-friendly and affordable, while cotton yarn offers excellent stitch definition. For extra coziness, plush or velvet yarn can also be used.
Next, select the appropriate crochet hook. Most patterns work well with a 4 mm to 5.5 mm hook, depending on your yarn choice and desired firmness.
You will need fiberfill stuffing or a pillow insert. A removable insert is often preferred because it gives the pillow a cleaner shape and allows for washing.
A yarn needle is essential for sewing pieces together and weaving in ends neatly. This step significantly improves the final appearance.
Safety eyes or embroidery thread can be used to create the kitten’s face. Embroidery is recommended if the pillow is intended for young children.
Finally, keep sharp scissors nearby for clean finishing. Having all supplies ready ensures your crochet kitten pillow – tutorial experience is stress-free.
Step-by-Step Crochet Kitten Pillow – Tutorial
Following the crochet kitten pillow – tutorial becomes simple when you break the process into clear steps and work patiently.
Begin by crocheting the front panel of the pillow. Most designs start with a foundation chain followed by rows of single crochet or half double crochet to create a square or rectangular base.
Next, shape the kitten ears. These can be crocheted separately as small triangles or formed directly into the top corners of the panel, depending on the style you prefer.
Once the front panel is complete, create the back panel using the same stitch pattern and size. Consistency between panels is important for a neat final shape.
Before joining the panels, add the kitten’s facial features. Embroider the eyes, nose, and whiskers, or attach safety eyes if appropriate. It is much easier to do this step before assembly.
Now join the front and back panels together using single crochet or slip stitch around the edges. Leave a small opening for stuffing or inserting the pillow form.
Insert the fiberfill or pillow insert evenly, then close the remaining opening securely. Your crochet kitten pillow – tutorial project is now complete and ready to display.
Creative Customization Ideas for Your Kitten Pillow
One of the most exciting parts of the crochet kitten pillow – tutorial is the ability to personalize your design in countless ways.
Try experimenting with different color combinations. Classic gray, cream, or orange kittens are always popular, but pastel or rainbow versions can look adorable too.
You can change the facial expression to give your kitten personality. Sleepy eyes, smiling faces, or playful whiskers all create different moods.
Consider using textured yarn for a fluffy effect. Velvet or chenille yarn can make your kitten pillow extra soft and huggable.
Adding accessories is another fun option. Small bows, flowers, or even a tiny crochet fish applique can make your pillow stand out.
You might also vary the size by using thicker yarn and a larger hook for oversized pillows or finer yarn for smaller decorative cushions.
The crochet kitten pillow – tutorial is wonderfully flexible, so feel free to experiment and develop your own creative style.
Pro Tips for a Professional-Looking Crochet Kitten Pillow
To make your crochet kitten pillow – tutorial look polished and high quality, a few expert tips can make a big difference.
Keep your tension consistent throughout both panels. Uneven stitches can cause the pillow to look misshapen.
Use stitch markers if needed to maintain straight edges, especially when working long rows.
When embroidering the face, lightly sketch the placement first using removable markers or pins. This helps ensure symmetry.
Stuff the pillow evenly, paying special attention to the corners and ear areas so they hold their shape.
Take your time when joining the panels. Clean, even edging gives the pillow a professional finish.
Finally, always weave in ends securely. With practice, your crochet kitten pillow – tutorial projects will look increasingly refined and gift-ready.
FAQ About Crochet Kitten Pillow – Tutorial
Is the crochet kitten pillow – tutorial suitable for beginners?
Yes. Most versions use basic stitches and simple construction, making them very beginner-friendly.
What yarn is best for a kitten pillow?
Medium-weight acrylic or cotton yarn works well. Plush yarn is great if you want an extra soft, cuddly pillow.
Can I wash a crochet kitten pillow?
Yes, especially if you use washable yarn and a removable pillow insert. Always check your yarn label for care instructions.
Why are my pillow edges uneven?
This usually happens due to inconsistent stitch counts or tension. Counting stitches each row helps prevent this.
Do I have to use a pillow insert?
No. You can stuff the pillow with fiberfill, but inserts often create a more structured and professional look.
How long does this project usually take?
For most crocheters, the crochet kitten pillow – tutorial takes between 3 and 6 hours, depending on size and experience.
Conclusion
The crochet kitten pillow – tutorial is a fun, cozy, and beginner-friendly project that brings together creativity and functionality. In this guide, you learned why this pattern is so popular, what materials to use, how to follow the step-by-step process, and how to customize your kitten pillow for a unique final result.

