If you’re a fan of both reading and crafting, a crochet owl bookmark is the perfect project to combine your passions. This fun and charming design adds personality to your books while being easy and quick to make. Whether you’re a beginner looking for a small and satisfying project or an experienced crafter adding to your collection of cute crochet patterns, this tutorial is perfect for you.
The crochet owl bookmark is lightweight, colorful, and makes a thoughtful handmade gift. With just a bit of yarn and a few basic stitches, you can create a practical item that brings joy every time a page is turned. This design is especially popular among teachers, book lovers, and kids.
In this blog post, you’ll find a detailed step-by-step tutorial on how to make a crochet owl bookmark, including materials needed, measurements, and finishing techniques. This guide is structured to comply with Google AdSense content policies, optimized with SEO best practices, and filled with creativity.
🧶 Materials and Measurements for Your Crochet Owl Bookmark
To begin your crochet owl bookmark, you’ll need a few basic materials that are often already in a crocheter’s supply stash. The beauty of this project is that it uses very little yarn, making it a great scrap-buster for leftover yarn bits.
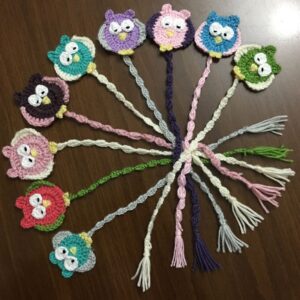
Start with cotton yarn or a lightweight acrylic yarn in 3 or 4 different colors. One color will be the owl’s body, another for the eyes, a third for the beak, and an optional fourth for decorative edging. Use a 2.5 mm or 3.0 mm crochet hook for a tighter stitch that will help your bookmark lie flat.
You’ll also need a yarn needle for weaving in ends, scissors, and two small black beads or safety eyes for the owl’s face. If you prefer, you can embroider the eyes using black yarn or thread.
As for measurements, the owl head should be approximately 2.5 inches (6.5 cm) in diameter, and the bookmark tail can be between 6 to 8 inches long (15–20 cm), depending on your preference. Adjust the length according to the size of the books you use most.
This project doesn’t require fabric cuts, but accuracy in stitch count and gauge helps maintain uniformity, especially if making multiple bookmarks. For gauge: 6 single crochets per inch is ideal for a tight, flat finish.
Choose a color palette that suits the recipient or matches a season or theme—pastels for spring, bright rainbow colors for kids, or earth tones for a more sophisticated look.
🦉 Step-by-Step Pattern: How to Crochet Owl Bookmark
Creating the crochet owl bookmark involves three parts: the head, the eyes/beak, and the bookmark tail. Each piece is worked separately and then assembled for a polished final product.
Step 1: Crochet the Owl’s Head
Start by making a magic ring with your main yarn color. Chain 1, and work 6 single crochets (sc) into the ring. Pull tight to close the loop.
In Round 2, work 2 sc in each stitch around (12 sc).
Round 3: 1 sc in the next stitch, 2 sc in the next—repeat around (18 sc).
Round 4: 1 sc in next 2 stitches, 2 sc in next—repeat (24 sc). Fasten off and weave in ends.
Step 2: Create the Eyes and Beak
For the eyes, use white yarn. Make a magic ring, chain 1, work 6 sc into the ring, and join with a slip stitch. Make two of these.
Use black thread or small safety eyes to create pupils in the center.
For the beak, chain 4 with yellow or orange yarn. Turn and slip stitch in second chain from hook, then single crochet in next, half double crochet in the last. Fasten off, leaving a tail for sewing.
Step 3: Add the Tail
Rejoin yarn to the bottom center of the owl head. Chain 45 (or desired length), then work 1 sc in each chain back to the owl’s head. Slip stitch to fasten and weave in the end.
Optionally, add a small tassel or feather-shaped motif at the end of the tail for decoration.
Step 4: Assemble the Face
Using a yarn needle, sew the eyes onto the upper front of the owl’s head, slightly overlapping them for a cute effect. Sew the beak just beneath the center of the eyes.
Step 5: Finishing Touches
To give the owl “ears,” attach small tufts of yarn at the top sides and trim to shape. You can also edge the owl’s head with a contrasting yarn using a round of single crochet for a clean finish.
Step 6: Block the Bookmark
To ensure your crochet owl bookmark lies flat in your book, lightly steam or press it (using a cloth between the iron and the yarn). This helps prevent curling and keeps it looking neat.
📚 Creative Variations of Crochet Owl Bookmark Patterns
The basic crochet owl bookmark pattern is highly adaptable, and you can experiment with countless variations to suit different tastes and themes. Here are some ideas to spark your creativity.
One fun twist is using variegated yarn for a multi-colored body without changing skeins. This gives your owl a whimsical, rainbow effect that’s perfect for kids or spring-themed gifts.
You can also personalize the bookmark by embroidering initials or tiny hearts on the owl’s body. This turns a simple crochet pattern into a heartfelt, customized keepsake.
For seasonal variations, try using red and green for Christmas-themed bookmarks or black and orange for Halloween. Add festive embellishments like tiny crochet snowflakes or bats.
Another great idea is to turn the bookmark into a set. Pair it with a matching crochet book sleeve or a small drawstring pouch to make a gift set for book lovers.
Try adding texture by using puff stitches or bobbles on the owl’s body. This adds a tactile element that young readers especially enjoy and helps develop different stitch skills.
Lastly, consider making a mini version using fine crochet thread and a 1.5 mm hook for a dainty and delicate bookmark. These work great in small paperback books or as decorative tags.
✨ Final Tips, Stitch Count, and Project Wrap-Up
As you wrap up your crochet owl bookmark, keeping track of your stitch count and finishing methods ensures a polished final result. While this project is forgiving, consistency leads to professional-looking bookmarks.
For reference, the final stitch counts for the owl head should be:
-
Round 1: 6 sc
-
Round 2: 12 sc
-
Round 3: 18 sc
-
Round 4: 24 sc
The eyes should remain small and tight with 6 sc in the round. Avoid increasing, so they stay circular and flat. The beak triangle uses only 3 stitches and is shaped with basic stitches.
If you notice curling or bulging in your owl’s head, block it gently using steam or by pinning it flat and spritzing with water. Let it dry overnight for best results.
When sewing parts together, use a whipstitch or backstitch and match yarn colors to your pieces for invisible seams. Weaving in ends neatly is important to maintain durability and avoid bulk.
This is a great beginner project to practice joining pieces, shaping with increases, and working in the round. It’s small enough to complete in under two hours but impressive enough to give as a gift.
Creating crochet patterns like this also offers you a chance to share your creativity online. Consider writing your own pattern notes or uploading your owl bookmark to crafting communities for inspiration and feedback.
Conclusion
The crochet owl bookmark is an adorable and functional project that’s perfect for any book lover. With just a few basic materials and simple crochet stitches, you can create a handmade item that adds joy to every reading session.
From the charming owl head to the long, page-holding tail, every part of this bookmark is fun to make and easy to personalize. Whether you’re making one for yourself or gifting a set, this pattern is sure to become a favorite.
By following this SEO-optimized guide, not only do you learn how to make a crochet owl bookmark, but you also create a timeless piece that combines craftsmanship and imagination. Happy crocheting!


