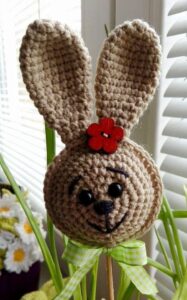
If you’re looking for the perfect seasonal project, a Crochet Pattern Easter Bunny Rabbit Decor is a charming and festive option to bring spring joy into your home. Whether you’re new to crochet or an experienced maker, this project offers the perfect balance of simplicity and creative flair. The result is a sweet bunny rabbit that can serve as decor, a gift, or part of a springtime display.
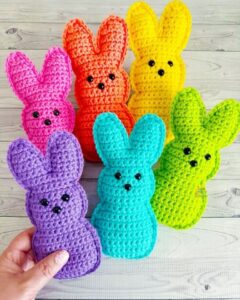
Crafting with crochet patterns gives you the flexibility to personalize your projects, and this one is no different. From yarn colors to facial features, your Easter Bunny can reflect your personality or the theme of your seasonal decor. With minimal materials and easy-to-follow steps, you can have your handmade rabbit ready in no time.
This guide includes a full materials list, precise measurements, a detailed tutorial, and creative tips for finishing and displaying your bunny. So grab your hook and some pastel yarns, and let’s create a delightful Crochet Pattern Easter Bunny Rabbit Decor that will brighten up your Easter celebration.
Materials and Measurements
Before starting your crochet bunny decor, it’s essential to gather all the necessary materials and understand the measurements for each part.
- Yarn Selection: Use worsted weight yarn in soft pastel colors like white, cream, light pink, and baby blue. Cotton yarn works well for structure.
- Hook Size: A 3.5 mm or 4 mm crochet hook is ideal for tight stitches that hold shape well, especially for stuffed figures.
- Stuffing: Polyester fiberfill or recycled yarn scraps make great stuffing materials. You’ll need enough to fill the head and body firmly.
- Safety Eyes and Nose: Use 6mm safety eyes and a small plastic or embroidered pink nose. These can be replaced with embroidery for baby-safe versions.
- Additional Tools: You’ll need scissors, a tapestry needle, stitch markers, and possibly fabric glue if you want to attach felt pieces.
- Fabric Cuts and Measurements: Though no fabric is needed for basic crochet, optional felt additions for the inner ears can be cut to 1.5″ x 0.75″ ovals.
Step-by-Step Bunny Body and Head
Let’s begin crafting the main body and head for your Crochet Pattern Easter Bunny Rabbit Decor. These two components form the core of your decoration.
- Start with the Head:
- Begin with a magic ring and work 6 single crochet (sc).
- Round 2: Increase in each stitch (12 sc).
- Continue increasing evenly until you have 36 sc.
- Work 5-6 rounds evenly.
- Start decreasing evenly until 12 sc remain.
- Stuff the head and close the remaining stitches.
- Crocheting the Body:
- Start with a magic ring, 6 sc.
- Increase evenly to 30 sc.
- Work 6-8 rounds of even sc.
- Begin decreasing and stuff before the opening is too small.
- Finish off when 6 sc remain, close securely.
- Sew the head and body together using a yarn needle.
- Ears (Make 2):
- Chain 10.
- Work single crochet across chain.
- Round 2-5: Work sc around.
- Decrease slightly at the top.
- Fasten off, leaving a tail for sewing.
- Arms and Legs (Make 4):
- Magic ring, 6 sc.
- Increase to 12 sc, work 4 rounds.
- Lightly stuff.
- Decrease to close, leaving tail to attach.
- Tail:
- Pom-pom or mini crochet ball (start with 6 sc magic ring).
- Work 2 rounds even, then decrease and close.
- Attach securely to bunny’s backside.
- Assembly Tips:
- Sew ears at the top of the head.
- Attach arms to the upper sides of the body.
- Place legs at the base for sitting support.
- Add tail at the center back.
- Stitch on face features if not using safety parts.
Decorative Features and Customization
Your crochet bunny rabbit is almost complete! Now it’s time to add those adorable finishing details that make it truly Easter-worthy.
- Adding a Bow or Scarf:
- Crochet a small bow or chain a long piece for a scarf.
- Wrap around the bunny’s neck and sew in place.
- Use contrasting colors to add personality.
- Optional Felt Ears:
- Cut two ovals of pink felt to fit inside each ear.
- Attach with fabric glue or hand-stitch for extra flair.
- Embroidering the Face:
- Use embroidery floss for a handmade touch.
- Add a cute smile, rosy cheeks, and eye lashes.
- Holding Accessories:
- Crochet a mini egg, carrot, or tiny basket.
- Sew between the bunny’s paws for an interactive design.
- Floral Accents:
- Crochet mini flowers and leaves.
- Attach to ears or around the neck for a springtime vibe.
- Pose Your Bunny:
- Slightly tilt the head to the side.
- Curve one ear down for a playful look.
- Use invisible thread if you want to hang it as decor.
Display Ideas and Finishing Touches
Now that your Crochet Pattern Easter Bunny Rabbit Decor is finished, it’s time to decide how to display or gift it.
- Table Centerpiece:
- Place your bunny with crocheted eggs in a basket.
- Add some faux grass or flowers for a festive setup.
- Mantel Display:
- Pair with candles and spring garlands.
- Use small wooden crates for height variation.
- Gift Tags and Cards:
- Attach a mini bunny to an Easter gift or greeting card.
- Add a handmade tag with care instructions.
- Baby Nursery Decor:
- Use embroidery eyes and nose.
- Hang from a mobile or display on a shelf.
- Door Wreath Attachment:
- Secure your bunny to a grapevine wreath with ribbon.
- Add pastel-colored eggs and greenery for a holiday-ready wreath.
- Photo Props:
- Use as a prop for Easter photo sessions.
- Pairs well with crocheted chicks or ducklings.
Creating a Crochet Pattern Easter Bunny Rabbit Decor is more than just a fun seasonal craft—it’s a way to bring warmth, charm, and handmade love into your home. With this detailed guide and your favorite crochet patterns, you can build an entire collection of Easter-themed decor that reflects your unique style. Happy crocheting and Happy Easter!


