
The Crochet pattern for charging cable organizer is one of the most practical and satisfying projects for anyone who loves handmade organization solutions. In a world where we constantly deal with tangled phone chargers, earbud cords, and USB cables, creating a neat and stylish holder with crochet can make everyday life easier.
One of the best things about the Crochet pattern for charging cable organizer is its versatility. You can customize the size, colors, and closure style to match your personal taste or even create thoughtful handmade gifts. Many crafters love this pattern because it uses small amounts of yarn, making it ideal for scrap yarn projects.
In this comprehensive guide, you will learn everything you need to know about creating a beautiful and functional crochet cable organizer. We will explore the materials required, step-by-step instructions, customization ideas, and helpful tips to ensure your finished piece looks polished and professional.
Materials Needed for Your Crochet Cable Organizer
Before starting your Crochet pattern for charging cable organizer, gathering the right materials will make the process smooth and enjoyable. Most of the supplies are basic and easy to find, which is one reason this project is so beginner-friendly. Having everything ready ahead of time helps maintain a steady workflow and prevents interruptions while crocheting.
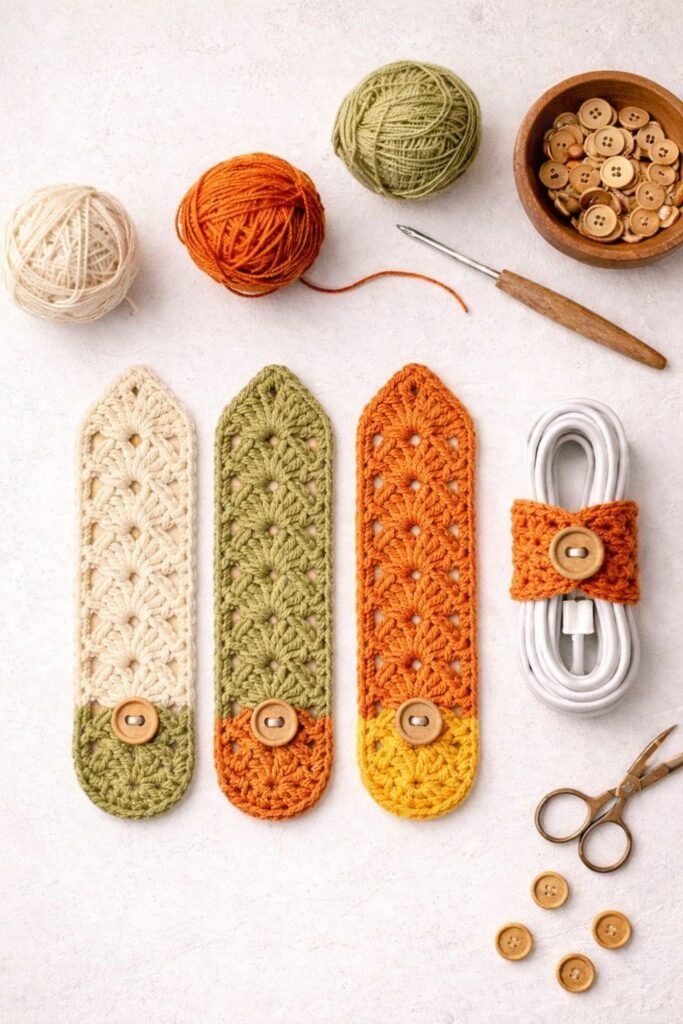
For yarn, cotton yarn is highly recommended for any crochet charging cable holder. Cotton provides durability, structure, and a clean finish that holds its shape well. Lightweight acrylic can also work, but cotton typically gives the most professional result, especially if you plan to sell your finished organizers.
You will also need an appropriately sized crochet hook. Most patterns work well with hooks between 3.5 mm and 4.5 mm, depending on your yarn weight. Using a slightly smaller hook than usual can help create tight stitches, which improves the firmness of your crochet cable organizer.
A button, snap, or small piece of Velcro is essential for the closure. This keeps the cables securely wrapped inside the organizer. Many crafters prefer wooden buttons for a rustic look, while plastic snaps offer a modern and minimal style.
Other helpful tools include scissors, a yarn needle for weaving in ends, and stitch markers if you like to keep precise track of your rounds or rows. While optional, stitch markers can be especially useful for beginners working through their first Crochet pattern for charging cable organizer.
Once your materials are ready, you are fully prepared to begin crocheting your organizer with confidence and ease.
Step-by-Step Instructions for the Crochet Pattern
To begin your Crochet pattern for charging cable organizer, start by making a foundation chain. Most organizers begin with a chain between 10 and 16 stitches, depending on how wide you want the finished piece. Remember, the width of your chain determines how much cable the organizer can hold.
Next, work single crochet stitches across the chain. Single crochet is the most commonly used stitch for a crochet cable organizer because it creates a dense and sturdy fabric. Continue working in rows until the piece is long enough to wrap comfortably around your typical charging cable.
After reaching the desired length, create a small button loop on one end. This is usually done by chaining a few stitches and slip stitching back into the edge. The loop should be snug enough to hold the button securely but not so tight that it becomes difficult to fasten.
Fasten off your yarn and use a yarn needle to weave in all loose ends neatly. Taking time with this step gives your crochet charging cable holder a clean and professional finish. Messy ends can make even the best crochet work look unfinished.
Sew your chosen button onto the opposite end of the organizer. Make sure the placement aligns well with the loop so the closure functions smoothly. Test it by wrapping a cable and fastening the organizer.
At this point, your basic Crochet pattern for charging cable organizer is complete. However, there are many ways to customize and enhance your design, which we will explore next.
Creative Customization Ideas
One of the most enjoyable parts of making a Crochet pattern for charging cable organizer is adding personal touches. Even small design changes can make your organizer stand out and reflect your unique style. Customization also adds value if you plan to sell your handmade items.
Color choices are the easiest way to personalize your crochet cable organizer. You can use solid colors for a minimalist look or experiment with stripes, color blocking, or variegated yarn for something more eye-catching. Neutral tones are great for professional settings, while bright colors appeal to younger audiences.
Texture is another fun element to explore. While single crochet creates a smooth fabric, you can try half double crochet, moss stitch, or even simple ribbing for added visual interest. Just be sure the fabric remains firm enough to hold cables securely.
You can also embellish your crochet charging cable holder with small appliqués such as hearts, stars, or initials. Personalized organizers are especially popular as gifts. Adding embroidered names or monograms can transform a simple project into a meaningful keepsake.
Different closure options can also change the overall look. Instead of a button, consider snaps, elastic loops, or even a small buckle. Each closure style gives your Crochet pattern for charging cable organizer a different personality.
Finally, consider making matching sets in various sizes. Larger versions can hold laptop chargers, while smaller ones work perfectly for earbuds. Offering size variations makes your project more versatile and practical.
Tips for a Professional and Durable Finish
Achieving a polished result with your Crochet pattern for charging cable organizer depends on a few important techniques. Small details often make the difference between a homemade look and a professional-quality item.
First, maintain consistent tension throughout your project. Uneven stitches can cause the organizer to warp or curl. Practicing steady hand movement helps your crochet cable organizer look neat and symmetrical.
Choosing the right yarn weight is also crucial. Lightweight yarn may create a flimsy organizer, while very bulky yarn can make wrapping cables difficult. Medium-weight cotton usually provides the best balance of structure and flexibility.
Blocking your finished piece can greatly improve its appearance. Lightly steam blocking or wet blocking helps even out stitches and gives your crochet charging cable holder a crisp, clean shape. This step is optional but highly recommended for gift or sale items.
Pay close attention when sewing the button. Reinforce it with multiple passes of thread to ensure durability. Since the closure will be used frequently, a secure attachment is essential for long-term use.
If you plan to sell your organizers, consider adding a small fabric or crochet tag. Branding adds a professional touch and helps customers remember your work. Many successful handmade sellers use this simple step to elevate their Crochet pattern for charging cable organizer products.
With these finishing tips, your handmade organizers will look polished, durable, and ready for everyday use.
FAQ About Crochet Pattern for Charging Cable Organizer
Is the Crochet pattern for charging cable organizer beginner-friendly?
Yes, this project is excellent for beginners. It mainly uses basic stitches like chain and single crochet, making it easy to learn while still producing a useful item.
What type of yarn works best for a crochet cable organizer?
Cotton yarn is the top choice because it is sturdy, holds shape well, and provides a clean finish. However, acrylic yarn can work if cotton is not available.
How long does it take to complete one organizer?
Most people can finish a Crochet pattern for charging cable organizer in 30 to 60 minutes, depending on experience level and customization.
Can I sell items made from this crochet pattern?
In most cases, yes. As long as you created the item yourself and are not copying a copyrighted written pattern, handmade organizers are popular items for craft fairs and online shops.
What size should I make my cable organizer?
A typical size is about 15–20 cm long, but you can easily adjust the starting chain to create larger or smaller versions depending on the cables you use most.
How do I make my organizer more durable?
Use tight stitches, high-quality cotton yarn, and securely sew the button. Blocking the finished piece also helps maintain shape and longevity.
Conclusion
In this complete guide to the Crochet pattern for charging cable organizer, you learned how to create a practical, stylish, and beginner-friendly project that solves a common everyday problem. We covered essential materials, step-by-step instructions, creative customization ideas, and professional finishing tips to help you produce beautiful results every time. This small project is perfect for using scrap yarn, making thoughtful handmade gifts, or even building inventory for a craft business.

