If you’re looking for a playful yet practical kitchen accessory, this Crochet Pattern Tutorial: Sunny Side Up Egg Pot Holder is the perfect project. Combining whimsical charm with everyday usefulness, this pot holder will brighten up your kitchen and serve as a conversation piece. Whether you’re a beginner or an experienced maker, this delightful pattern will bring joy to your hook and your home.
The crochet process is simple and enjoyable, and the finished item makes a great gift for foodies, home chefs, or brunch lovers. Pot holders are a great way to practice essential crochet patterns, and this sunny-side-up design adds a touch of humor to your handmade collection. Plus, it’s quick to make and doesn’t require a lot of yarn.
In this article, we’ll walk you through everything you need to know to make your own Sunny Side Up Egg Pot Holder. From materials and measurements to the full step-by-step pattern, you’ll get clear instructions designed to help you succeed. And most importantly, this blog post follows best practices for SEO and Google AdSense compliance.
🍳 Materials, Yarn Selection, and Prep Work
Before starting your crochet pot holder, gather all your materials and review the suggested yarn types and measurements. This ensures you begin with everything you need and helps you achieve a sturdy, heat-resistant finish.
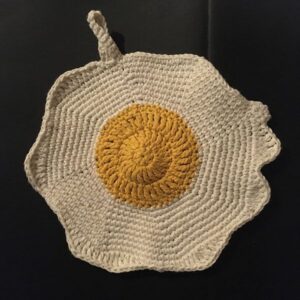
You’ll need 100% cotton yarn in white and yellow for the egg. Cotton is crucial for pot holders because it resists heat and won’t melt like synthetic fibers. You’ll use white for the egg white and yellow for the yolk. About 60 yards of white and 15–20 yards of yellow will be enough.
Choose a 4.0 mm (G-6) crochet hook for a tight stitch, which adds structure and protection from heat. A smaller hook can also be used if you tend to crochet loosely. Tighter stitches mean fewer holes and a safer pot holder.
Other supplies include scissors, a yarn needle for weaving in ends, and a stitch marker (optional). You may also want to have a steam iron for light blocking to help shape your finished egg.
This pattern includes a circular yolk in the center, with the white shaped organically to mimic a fried egg. You’ll start from the center and work outward, so having your yellow and white yarns easily accessible will save time.
Keep in mind: no fabric cutting is necessary for this crochet pattern, but measuring your gauge and testing a swatch is recommended for uniform sizing. The finished pot holder should measure approximately 8–9 inches in diameter.
🧶 Step-by-Step Crochet Pattern for the Egg Yolk and White
Let’s begin crocheting the Sunny Side Up Egg Pot Holder by first working on the yolk. Then, we’ll build the egg white around it. This section provides a full breakdown of the steps involved in creating this playful kitchen piece.
Step 1: Making the Egg Yolk (Yellow Center)
Begin with the yellow yarn. Make a magic ring.
Round 1: 6 single crochets (sc) into the ring. Join with slip stitch. (6 sts)
Round 2: 2 sc in each stitch around. (12 sts)
Round 3: 1 sc in next stitch, 2 sc in next — repeat around. (18 sts)
Round 4: 1 sc in next 2 stitches, 2 sc in next — repeat around. (24 sts)
Fasten off and weave in the yellow yarn tail. Set aside the yolk.
Step 2: Starting the Egg White (With White Yarn)
Attach white yarn to any stitch on the edge of the yolk.
Round 1: Work 1 sc in each stitch around the yolk. (24 sts)
Round 2: Begin shaping the organic edge. Work random increases and decreases using single crochets, half-double crochets (hdc), and double crochets (dc) to create a wavy, uneven look.
Step 3: Creating the Organic Egg Shape
Work 2 rounds adding irregular height stitches. Example: sc, hdc, dc, dc, hdc, sc.
This randomness mimics how a real egg white spreads. You can use 3 dc in one stitch occasionally to form a “bubble” or ripple effect.
Repeat this organic edge shaping until the piece measures around 8–9 inches in diameter.
Step 4: Adding a Border (Optional)
If you want a firmer shape, add a final round using reverse single crochet (crab stitch) all the way around. This gives a decorative, corded finish and reinforces the edge.
Step 5: Add Hanging Loop
Chain 10 from the final stitch and slip stitch to the starting point to form a loop. This makes it easy to hang the pot holder on a hook or kitchen rack.
Step 6: Weave In Ends and Block
Weave in all ends securely. Use a steam iron to lightly block your pot holder flat. Avoid pressing the yolk too hard so it keeps a slight raised appearance.
☀️ Customization, Styling Ideas, and Gifting
One of the best things about this crochet pattern is how customizable it is. You can tweak the design to add your personal touch or tailor it for a specific person or occasion.
Try making a double-thick pot holder for extra protection. After finishing one sunny side up egg, make a second egg white and stitch the two pieces together with a slip stitch border, placing the yolk only on one side.
You can also crochet the yolk using a puff stitch or bobble stitch to give it more 3D texture. This adds realism and makes the yolk look “juicy” and round.
For gifting, tie a ribbon around a pair of handmade pot holders and attach a tag that reads: “You’re egg-cellent!” These make perfect housewarming or bridal shower gifts.
Add facial features to your yolk with embroidery—eyes and a smile make it a “kawaii” character-style egg, ideal for kids or playful kitchen decor.
Use variegated or ombré yarn for the egg white to simulate different textures, or crochet a breakfast-themed set including a bacon strip and toast to accompany your egg.
If you sell your crochet at craft fairs, this quirky pattern is a standout. It draws attention, offers utility, and fits nicely in kitchen-themed booths.
🧵 Safety, Care Instructions, and Final Tips
Since crochet pot holders come into contact with heat, safety is a top priority. Following a few simple guidelines ensures your item is safe for everyday kitchen use.
Only use 100% cotton yarn. Acrylic and polyester will melt when exposed to high temperatures, which can cause burns or damage surfaces. Cotton is heat-resistant and durable.
Reinforce your stitches tightly. Loose stitching may create holes that allow heat to pass through. If your tension is naturally loose, use a smaller hook to firm it up.
Avoid using these for direct exposure to open flames or extremely hot cast iron cookware. These pot holders are best for brief contact—like moving a pan or holding a hot plate.
To clean, hand wash or machine wash in cold water. Lay flat to dry to maintain shape. Avoid bleach or fabric softeners that can degrade the yarn over time.
Store your crochet egg pot holder flat or hanging. Don’t fold the yolk too much or press it with heavy items—it could flatten permanently.
Finally, keep a few made ahead of time for gifts or emergencies. It’s such a quick pattern that making a batch is easy, and they’re always well-received!
Conclusion
The Crochet Pattern Tutorial: Sunny Side Up Egg Pot Holder is a joyful and simple way to add creativity to your kitchen. With just two yarn colors and some basic stitches, you can create something functional and delightful. Whether you’re giving it as a gift, selling it at markets, or simply decorating your home, this pattern offers a lot of value for minimal effort.
From choosing cotton yarn to creating that signature wavy white edge, every step of this pattern is designed to be beginner-friendly and satisfying. And best of all, it introduces playful fun into the world of crochet while still being highly practical.
So pick up your crochet hook, grab that yellow and white yarn, and bring a little sunshine into your kitchen—sunny side up!


