If you’re a fan of farmhouse kitchen decor or just love adorable animal-themed crafts, the Crochet Pig Potholder Free Pattern is a must-try project. This charming and functional piece adds a playful touch to your kitchen while protecting your hands and surfaces from heat. Whether you’re new to crochet or a seasoned hook artist, this pattern is easy to follow, fun to personalize, and incredibly satisfying to complete.
The best part about this crochet pig potholder is that it’s both practical and decorative. It’s thick enough to protect your hands from hot pots and pans, yet cute enough to hang on display as part of your kitchen decor. This is the kind of project that works up quickly and makes for delightful handmade gifts for friends, family, or even as products in your craft fair booth.
In this post, you’ll find everything you need to know to create your very own pig potholder—from materials and measurements to a full step-by-step guide. We’ll also cover creative variations, tips for success, and how this fits into broader crochet patterns trends. Let’s bring some farmhouse charm into your kitchen one stitch at a time.
Materials, Yarn Choices & Finished Size
Before diving into your Crochet Pig Potholder Free Pattern, it’s essential to gather the right materials and choose the best yarn for both safety and appearance. Potholders must be heat-resistant, so material choice matters just as much as style.

Cotton yarn is the best option for potholders because it doesn’t melt when exposed to heat. Acrylic yarn, while often popular in other crochet patterns, is not safe for high temperatures. Look for worsted weight 100% cotton yarn in pink, black, and optional white.
For tools, you’ll need a 5.0 mm crochet hook (size H), a tapestry needle, and a pair of scissors. Stitch markers are optional but helpful for keeping track of your rounds, especially if you’re still learning the pattern.
Yarn Colors Suggested:
-
Pink for the body
-
Black or dark brown for the eyes and nostrils
-
White (optional) for eye detailing
Finished Size:
-
Approximately 7 inches in diameter. You can increase the size by using a larger hook or adding more rows to the base circle.
You’ll also need some stuffing or a double layer of cotton if you want to make the potholder thicker. You can sew two pig faces back-to-back for a more insulated potholder or even add a layer of heat-resistant batting in between.
Lastly, keep in mind that you can make this design reversible or turn it into a hanging kitchen decoration by simply attaching a loop to the top. This small addition transforms your potholder into a dual-purpose decorative item.
How to Crochet a Pig Potholder: Step-by-Step Instructions
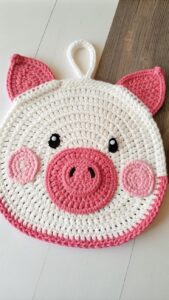
The Crochet Pig Potholder Free Pattern is typically made in the round, beginning with a flat circle that serves as the pig’s face. From there, you’ll add simple embellishments like ears, snout, and facial features to bring the pig to life.
Step 1: Create the Face Base Start with a magic ring or chain 4 and slip stitch to form a ring. Into this ring, crochet 12 double crochets (dc). Join with a slip stitch to the first dc. In the next round, double the stitches: 2 dc in each stitch around (24 dc). Continue increasing evenly each round (e.g., 1 dc, 2 dc; 2 dc, 1 dc, 1 dc, etc.) until you have a flat circle measuring about 7 inches.
Step 2: Add the Pig Snout To make the snout, chain 6 and work in rows. Row 1: dc in the third chain from the hook and across. Ch 2, turn. Row 2: Repeat dc across. Fasten off, leaving a long tail for sewing. Use black yarn or embroidery thread to stitch two nostrils onto the snout, then attach it to the center of the face.
Step 3: Crochet the Ears Each ear is made with a small triangle. Chain 5. In the second chain from hook, sc, hdc in next, dc, and tr in last chain. Fasten off and leave a tail. Make two ears and sew them to the top edges of the circle, angled slightly outward for a cute expression.
Step 4: Add the Eyes There are a few ways to do this: You can sew on safety eyes, crochet small circles, or embroider them. For crocheted eyes, use black yarn and chain 2. In the second chain, make 6 sc. Join and fasten off. Sew eyes onto the face just above the snout.
Step 5: Add a Hanging Loop (Optional) If you’d like to hang your potholder, simply attach yarn to the top center, chain 10, and slip stitch back into the same stitch. Fasten off and weave in the ends. This makes storage easier and adds a farmhouse kitchen touch.
Step 6: Reinforce with a Backing To make your potholder functional and thick, crochet a second circle identical to the first, then sew the two together. Optionally insert heat-resistant batting between layers. This gives your potholder extra durability and usability.
Creative Variations and Customization Ideas
Once you’ve completed your first crochet pig potholder, you might be inspired to make more with fun variations. This pattern is highly customizable, allowing for creative freedom with color, size, and finishing details.
You can play with colors to match your kitchen decor or the season. For example, use light pink for spring, darker rose tones for a rustic look, or even go whimsical with rainbow pigs for a children’s play kitchen.
Add floral embellishments, bows, or ruffles around the edge to make your pig potholder extra cute. Crocheted flowers, heart-shaped eyes, or even tiny accessories like hats or bandanas give each potholder its own personality.
If you’re making a set for gifts or craft fairs, consider creating matching pig-themed items. Pair the potholder with a pig coaster, dishcloth, or hand towel holder. This builds a coordinated kitchen gift set that’s bound to impress.
You can also adapt the base circle pattern to make other animals by changing colors and facial features—try a cow, sheep, or bunny using the same base. This shows the versatility of crochet patterns and how small changes can create completely different results.
Kids especially love animal-themed items, so these make excellent teacher gifts, birthday presents, or stocking stuffers. Always ensure any parts (like eyes or buttons) are securely fastened for child-safe use.
Lastly, you can create a wall hanging by attaching several pig faces to a crochet chain and stringing it across a window or wall. This brings a whimsical barnyard theme to your kitchen or craft room.
Tips for Success with Crochet Patterns
Creating a successful Crochet Pig Potholder Free Pattern depends not only on following instructions but also understanding a few key crochet fundamentals. These tips will help you make the most of your project.
Always check your gauge before starting. While this isn’t critical for size-specific garments, for functional items like potholders, a tighter stitch can provide better insulation and durability.
If your circle starts curling or ruffling, it may be due to incorrect stitch count or tension. Lay your piece flat after each round to check the shape. Adjust stitch increases as needed to keep it smooth.
Keep your stitches consistent by using a yarn that’s easy to handle and not too slippery. Cotton yarn tends to have less stretch, so it’s easier to maintain even tension than softer yarns.
Use stitch markers, especially when working in the round. It’s easy to lose track of your starting stitch, which can lead to an uneven or lopsided potholder. Marking the first stitch of each round will keep you on track.
Always weave in your ends securely. Since potholders are used often and may be washed frequently, loose ends can unravel. Use a tapestry needle to weave ends into several stitches and even add a drop of fabric glue for extra hold.
Don’t be afraid to experiment! The great thing about crochet patterns is how adaptable they are. Try new techniques, color combos, or stitch textures—you might invent your own twist on the classic pig potholder.
Wrapping Up: A Cozy Addition to Any Kitchen
The Crochet Pig Potholder Free Pattern is a delightful blend of fun, functionality, and creativity. It’s a fantastic project whether you’re crafting for your own kitchen, preparing gifts, or building your product inventory for craft fairs or online shops.
Thanks to its simple construction and charming design, this pattern is suitable for all skill levels. Beginners get to practice basic shapes and embellishments, while experienced crocheters can enjoy adding custom flair to each piece.
With just a few supplies and a bit of time, you can bring a smile to anyone’s face—after all, who can resist an adorable pink pig in their kitchen?
So grab your yarn, follow the steps, and enjoy bringing this cheerful little creature to life. The crochet pig potholder is sure to be a hit, adding a warm handmade touch to any home.


