
Creating a Crochet Santa Claus pattern is also a satisfying way to practice basic crochet techniques while producing something beautiful and practical. Unlike larger amigurumi projects that require extensive shaping and stuffing, this Santa design is primarily flat, making it relatively quick to complete. The central opening creates a distinctive circular feature beneath Santa’s nose, while the surrounding white crochet stitches form a textured beard with a soft, scalloped edge. The red hat sits across the upper portion of the face and finishes with a small white pom-pom. These details give the ornament a playful appearance without requiring complicated construction. With patience and careful stitch placement, even crocheters with limited experience can create a festive decoration inspired by the design shown in the photograph.
Another reason to love this easy crochet Santa Claus pattern is the opportunity to customize each ornament according to your personal style. You can use traditional red and white yarn for a classic Christmas look or experiment with cream, burgundy, and soft gray shades for a more rustic holiday aesthetic. Small variations in the eyes, nose, hat shape, and beard texture can make every Santa unique. This tutorial explains how to select suitable materials, create the circular foundation, build the textured beard, crochet the red Santa hat, and add the final decorative details. The instructions are an original interpretation of the photographed ornament rather than an exact transcription of its construction, allowing you to recreate the same overall style with an approachable DIY crochet Christmas ornament pattern.
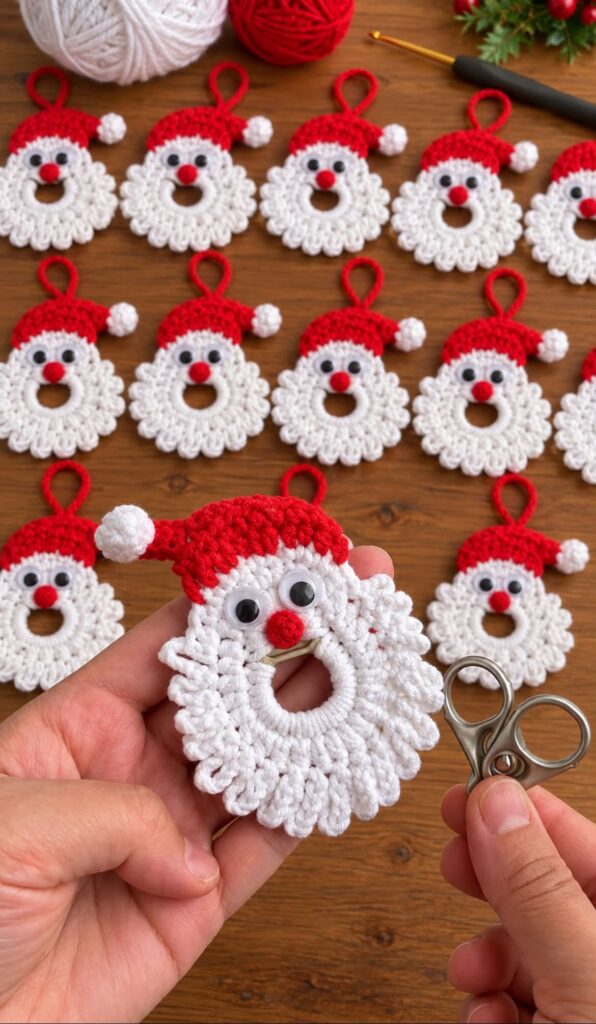
1. Materials and Basic Crochet Techniques for the Santa Claus Ornament
Before starting your Crochet Santa Claus pattern, gather the essential materials and choose a comfortable place to work. The photographed ornaments feature bright red yarn for the hats, white yarn for the beards, and small contrasting details for the faces. Cotton yarn is an excellent choice for this type of decoration because it offers clear stitch definition and helps the finished ornament maintain its shape. Acrylic yarn can also work beautifully, particularly if you prefer a softer texture or want to use leftover yarn from other Christmas projects. For a neat, balanced result, select yarns of similar thickness for the hat and beard.
You will need red and white worsted-weight yarn, a 3.5 mm crochet hook, a yarn needle, scissors, stitch markers, and a small amount of fiberfill for the nose and pom-pom. A lightweight plastic or wooden craft ring measuring approximately 1 to 1.25 inches in diameter can be used to create the circular opening at the center of the beard. You may also use a crocheted foundation ring if you prefer a project made entirely from yarn. Optional googly eyes give the ornament an animated appearance similar to the reference image. However, embroidered eyes are recommended for decorations intended for young children, since small detachable embellishments can present a choking hazard.
The main stitches used in this beginner crochet Santa pattern are chain stitch (ch), slip stitch (sl st), single crochet (sc), half double crochet (hdc), and double crochet (dc). Chain stitches are useful for beginning new sections and creating the hanging loop. Single crochet stitches provide a firm foundation around the central ring and help shape the hat. Half double crochet stitches add gentle height, while double crochet stitches create fuller sections of the beard. Slip stitches are used to join rounds and secure small decorative elements. All stitch abbreviations in this tutorial follow US crochet terminology.
Another useful technique is the crochet puff stitch, which creates a raised, rounded texture. To make a simple puff stitch, yarn over, insert the hook into the designated stitch, yarn over, and pull up a loop. Repeat this process two more times in the same stitch, keeping the loops on your hook. Yarn over and pull through all the loops, then chain one to secure the puff. The resulting raised stitch resembles a small tuft of fluffy yarn. This technique is especially effective for creating Santa’s textured beard and the decorative scallops around its outer edge.
A crochet magic ring is another helpful technique, particularly when making the small red nose and white pom-pom. The magic ring allows you to crochet several stitches into an adjustable loop, which can then be pulled tight to close the center. If you find the magic ring difficult, you can chain two and work the required stitches into the second chain from the hook. Both methods can create small rounded pieces suitable for the facial decorations. Learning these techniques will also help you with many other handmade Christmas ornaments and miniature crochet projects.
Before beginning the actual ornament, check your yarn tension and practice a few stitches. A slightly firm tension is desirable because it helps the handmade crochet Santa ornament hold its shape when hanging. However, stitches that are too tight can make the project difficult to work and may cause the fabric to curl. If necessary, try a slightly larger hook. Since the ornament is decorative rather than fitted, exact gauge is not essential. The finished size will depend on your yarn, hook, central ring, and stitch tension, but a typical ornament made with these materials may measure approximately 4 to 5 inches tall, including the hat but excluding the hanging loop.
2. Step-by-Step Instructions to Crochet Santa’s Beard and Circular Face
Begin the Crochet Santa Claus pattern by preparing the circular foundation. If you are using a craft ring, attach the white yarn with a slip knot and work 24 single crochet stitches evenly around the ring, covering the entire surface. Join with a slip stitch to the first single crochet. Make sure the stitches sit close together so the ring is not visible through the yarn. If you prefer a fully crocheted foundation, chain 24 and join with a slip stitch to form a circle, taking care not to twist the chain. Work one single crochet into each chain and join. The crocheted version will be softer and may have a less rigid opening than the craft-ring version.
For the second round, chain two, which counts as the first half double crochet, and work one additional half double crochet into the same stitch. Continue by making two half double crochet stitches into each stitch around the ring. Join with a slip stitch to the top of the beginning chain-two. You should now have 48 half double crochet stitches. This round expands the white fabric outward and begins forming the broad base of Santa’s beard. Keep the stitches evenly distributed and gently flatten the piece with your fingers as you work.
The third round introduces the decorative texture that gives the crochet Santa beard its fluffy appearance. Chain one and work one single crochet into the first stitch. In the next stitch, make a puff stitch using three yarn-over pull-up repetitions, then chain one to secure it. Work one single crochet into the following stitch and repeat the puff stitch in the next. Continue alternating single crochet stitches and puff stitches around the circle. Join with a slip stitch when you reach the beginning. The raised stitches create small clusters that resemble the soft curls of Santa’s beard.
To create the scalloped outer edge, work another round using a combination of slip stitches and small decorative shells. Chain one, then work a slip stitch into the first available stitch or space. In the next suitable space, make three half double crochet stitches, followed by another slip stitch in the following space. Repeat this sequence around the lower portion of the beard. The small shells form rounded points along the edge, giving the ornament the textured silhouette visible in the reference image. You do not need to force a shell into every stitch; spacing them evenly is more important than maintaining an exact count.
The upper portion of the beard will eventually be covered by Santa’s hat, so you can keep this section relatively simple. If you want the beard to look fuller, add a few extra puff stitches around the lower sides of the face before fastening off. You can also use small picot stitches to create more pronounced curls. Check the shape frequently and make sure the central opening remains visible. This circular space is an important visual feature of the crochet Santa face ornament, distinguishing it from traditional stuffed Santa decorations.
Once the beard is complete, fasten off the white yarn and weave in the loose ends. Gently shape the fabric so that the scalloped edge spreads evenly around the lower portion of the ring. If the beard curls slightly, lightly dampen the piece and pin it flat on a suitable blocking surface. Allow it to dry before attaching the hat. Avoid excessive stretching, which can distort the central opening. At this stage, your crochet Christmas Santa decoration should resemble a fluffy white circle with a neat opening in the middle, ready for the hat and facial details.
3. How to Crochet Santa’s Red Hat, White Pom-Pom, and Facial Details
The red hat is one of the most recognizable elements of the Crochet Santa Claus pattern. To create it, begin with red yarn and chain 19 stitches. Work one single crochet into the second chain from the hook and continue making single crochet stitches across the remaining chains. Chain one and turn your work. For the next row, work one single crochet into each stitch across. Repeat this process for two additional rows to create a small rectangular base. This section will form the lower part of Santa’s hat and should be wide enough to cover the upper portion of the white face.
To create the tapered shape, begin decreasing at one end of the next row. A single crochet decrease is made by inserting the hook into the next stitch, pulling up a loop, inserting the hook into the following stitch, pulling up another loop, and then pulling through all three loops on the hook. Work one decrease at the beginning of each subsequent row, followed by single crochet stitches across the remaining stitches. Continue until approximately five stitches remain. This gradual shaping produces a triangular hat with a pointed end that can be folded toward one side, similar to the crochet Santa hat ornament shown in the photograph.
After completing the tapered section, fasten off the red yarn and gently fold the pointed end toward the right or left. You can secure the folded tip with a few small stitches using a yarn needle. To create the white trim, attach white yarn along the lower edge of the hat and work one row of single crochet stitches. For a thicker, fluffier appearance, add a second row using half double crochet or small puff stitches. The white border should sit just above Santa’s eyes when the hat is attached to the beard. This contrast between the red hat and white trim creates the classic Christmas Santa appearance.
4. Creative Christmas Decorating Ideas and Tips for Perfect Santa Ornaments
One of the most enjoyable aspects of making a Crochet Santa Claus pattern is discovering how many ways the finished ornament can be displayed. The hanging loop makes it ideal for decorating Christmas trees, especially when you want to add a handmade touch to traditional ornaments. You can create several matching Santa faces and distribute them evenly among the branches. Their red and white colors stand out beautifully against green foliage, while the textured beard adds visual interest. These ornaments also work well on smaller tabletop Christmas trees, where lightweight decorations are particularly useful.
Another creative option is to use your handmade Santa crochet ornaments as gift decorations. Instead of attaching a disposable bow to a wrapped present, tie a crocheted Santa to the ribbon or gift tag. This adds a thoughtful handmade detail that the recipient can keep and reuse. You can also attach the ornaments to Christmas stockings, fabric gift bags, or holiday baskets. For a coordinated appearance, make several ornaments using the same yarn colors and facial details. Small variations in the hat angle or beard texture will give each Santa its own character.
If you enjoy decorating your home for the holidays, consider creating a crochet Santa Christmas garland. Make several ornaments and attach them to a long crocheted chain or decorative cord, leaving enough space between each Santa face. Hang the garland across a mantel, along a shelf, or near a doorway. You can alternate Santa ornaments with crocheted stars, snowflakes, or small Christmas trees for a more varied arrangement. When displaying handmade decorations, keep them away from open flames, heaters, and other sources of excessive heat.
Frequently Asked Questions About the Crochet Santa Claus Pattern
Is the Crochet Santa Claus pattern suitable for beginners?
Yes. This beginner-friendly crochet Santa pattern uses basic stitches and simple shaping techniques. Beginners may need extra practice with puff stitches, decreases, and working around a circular foundation, but each step becomes easier with repetition. Starting with smooth cotton yarn can make the stitches easier to see.
How long does it take to make one crochet Santa ornament?
An experienced crocheter may complete a simple Santa ornament in approximately 45 to 90 minutes. Beginners may need two hours or longer, especially when creating the hat and attaching the facial details. Making several ornaments in batches can reduce the time required for each additional piece.
What yarn is best for a crochet Santa Claus ornament?
Cotton and acrylic yarn are both suitable for crochet Christmas decorations. Cotton provides excellent stitch definition and helps the ornament hold its shape, while acrylic is often soft and available in many festive colors. Medium-weight yarn is a practical choice for beginners.
Can I make this Santa ornament without a plastic ring?
Absolutely. You can create a circular foundation using chain stitches and work around it to form the beard. A crocheted foundation will be softer than a rigid craft ring and may require gentle blocking to maintain its shape. Both approaches can produce attractive results.
Why is my crochet Santa beard curling?
Curling can occur when the stitch increases are uneven, the tension is too tight, or the hook is too small. Try using a slightly larger hook or distributing the increases more evenly. Gentle blocking can help the flat crochet Santa ornament maintain a smoother appearance.
How do I make Santa’s beard look fluffier?
Use puff stitches, small shells, or textured yarn to create additional volume. You can also add an extra decorative round along the lower edge. Avoid adding too many stitches in one area, because excessive fullness can cause the beard to ripple unevenly.
Can I use googly eyes on crochet Santa ornaments?
Yes, googly eyes can be used on decorative ornaments intended for adult-supervised display. However, they may detach and are not suitable for toys or decorations accessible to babies and young children. Embroidered eyes are a safer alternative for child-oriented projects.
How can I make the Santa hat bend to one side?
Conclusion
The Crochet Santa Claus pattern is a cheerful and rewarding Christmas project that combines simple crochet stitches with creative decorative details. In this tutorial, you learned how to choose suitable yarn and tools, create a circular foundation, crochet a fluffy white beard, shape Santa’s red hat, make a small pom-pom, and add expressive facial features. You also discovered several ways to personalize the design and incorporate the finished ornaments into your holiday decorations.

