
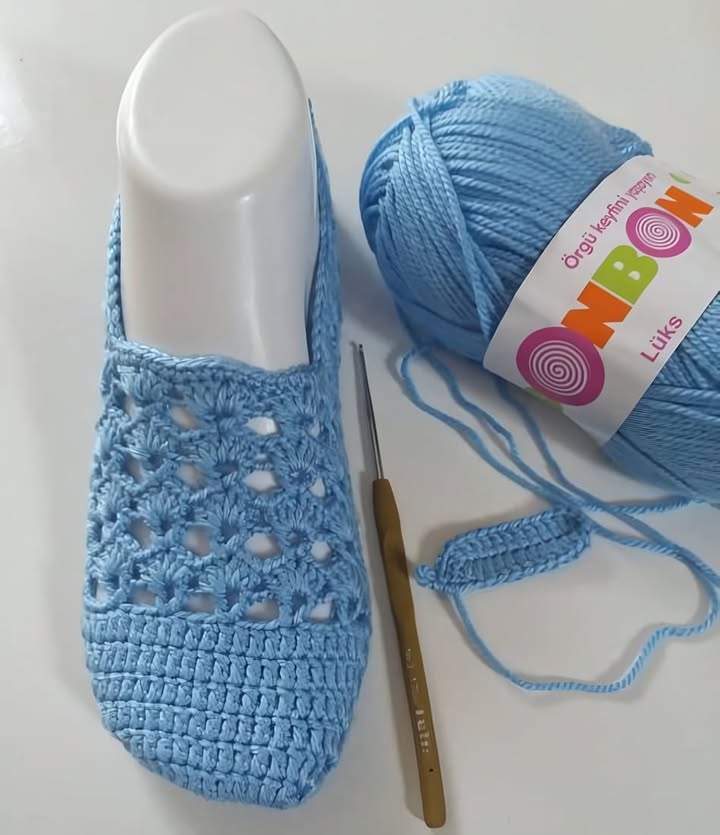
Crochet Shoes Pattern is a creative project that transforms yarn into soft, comfortable handmade footwear with plenty of opportunities for personalization. Crochet shoes can be designed as cozy indoor slippers, lightweight house shoes, or decorative baby booties depending on the yarn, construction, size, and finishing method selected. From neutral shades and simple stitches to colorful stripes, floral decorations, bows, and textured details, the basic concept can be adapted to many different styles. Creating your own crochet shoes also allows you to control the dimensions more carefully, making it possible to adjust the length, width, and shape as the project develops.
One of the most interesting aspects of a Crochet Shoes Pattern is its construction. Instead of creating one flat rectangle, the project is generally divided into sections that gradually form the sole, sides, toe, heel, and opening. In many versions, the sole begins with a foundation chain and is worked in an oval using increases at both ends. Additional rounds build the sides upward, while decreases around the toe help create the recognizable shoe shape. Once you understand how these sections interact, adjusting the pattern becomes much easier and you can use the same fundamental technique to create several different designs.
Making handmade crochet shoes is also an excellent opportunity to practice important crochet techniques. The project can incorporate chain stitch, single crochet, half double crochet, double crochet, slip stitch, increases, decreases, working in rounds, and finishing. Accurate measurements and consistent tension are especially important because footwear needs to fit comfortably rather than simply look attractive. This tutorial explains the complete construction process from choosing materials and measuring the foot to crocheting the sole, shaping the upper section, creating a secure heel, and adding decorative finishing touches.
Materials, Measurements, and Basic Crochet Stitches
Begin your Crochet Shoes Pattern by selecting yarn appropriate for the intended use. For soft indoor slippers, a comfortable medium-weight yarn can provide warmth without becoming excessively bulky. Cotton creates excellent stitch definition, while suitable acrylic blends can provide softness and flexibility.
The crochet hook should complement the yarn while producing a relatively firm fabric. Shoes generally benefit from stitches that are dense enough to maintain their shape. Crochet a small gauge sample before starting and check whether the fabric feels comfortable while still providing sufficient structure.
Prepare scissors, a yarn needle, stitch markers, and a flexible measuring tape. Stitch markers are especially helpful because many portions of the crochet shoe are worked in rounds and the beginning of each round can become difficult to identify.
Take accurate measurements before beginning. Measure from the back of the heel to the longest toe and also note the approximate width at the widest part of the foot. Remember that yarn can stretch, so your gauge and fiber choice will influence the finished fit.
The single crochet (sc) is particularly useful for the sole because it creates compact fabric. Insert the hook into the appropriate stitch, yarn over and pull up a loop, then yarn over and pull through both loops on your hook.
You may also use half double crochet (hdc), double crochet (dc), slip stitch (sl st), increases, and decreases. Taller stitches can help shape selected areas, while increases expand the sole and decreases gradually narrow the toe and upper section.
How to Crochet the Shoe Sole Step by Step
Begin the crochet shoe sole with a foundation chain. The number of chains depends on the intended shoe size, yarn thickness, hook, and gauge. Instead of relying exclusively on a universal stitch count, compare the foundation with your foot measurement.
Starting in the second chain from your hook, work single crochet stitches along the foundation. At the final chain, work several stitches into the same space so the crochet naturally curves around the end rather than forming a sharp corner.
Continue along the opposite side of the foundation chain. This creates the basic oval structure of the sole. When you reach the heel end, work additional stitches as required to round that section as well.
For the next rounds, continue working single crochet while placing increases around the curved toe and heel areas. The central sides generally require fewer increases because they should remain relatively straight.
Lay the sole on a flat surface after each round. It should remain smooth without excessive rippling or curling. If the edges become noticeably wavy, there may be too many increases. If the sole curls strongly upward, additional increases may be necessary.
Continue until the Crochet Shoes Pattern sole reaches the required length and width. Make a second sole using exactly the same stitch counts and round sequence if you are creating a pair. Compare the two pieces carefully before moving to the upper sections.
Building the Sides, Toe, and Heel of the Crochet Shoes
After completing the sole, begin building the sides. Work a round of single crochet around the perimeter without increasing. Depending on the effect you want, working into a particular loop can create a defined edge between the sole and upper portion.
Continue crocheting evenly around for additional rounds. The fabric should now rise vertically rather than continuing to expand outward. This stage creates the lower walls of the crochet slippers and establishes the basic depth.
To shape the toe, identify the center front and place stitch markers on either side of the area that will be decreased. Work evenly around the heel and sides, then distribute decreases gradually across the marked toe section.
Repeat the decrease process over several rounds rather than attempting to close the toe too quickly. Gradual shaping creates a smoother upper and helps the finished shoe follow the natural curve of the foot.
The heel should remain sufficiently high to help keep the shoe in place. Depending on the design, you can continue working around the entire opening or work back and forth across the heel section to add extra height.
Try the unfinished Crochet Shoes on periodically when possible. Check the toe room, heel position, and width. Crochet fabric can stretch with use, so the finished shoe should feel comfortably secure without being painfully tight.
Finishing, Customizing, and Caring for Crochet Shoes
Once the upper section is complete, finish the opening with a neat round of single crochet or slip stitches. This edging can help stabilize the shape and provide a polished transition around the ankle.
Fasten off and leave enough yarn to weave in securely. Use a yarn needle to pass the tail through several stitches, change direction, and continue weaving before trimming. Repeat this process for every remaining yarn end.
Decorative details can completely transform the basic Crochet Shoes Pattern. Add a small crochet flower, bow, contrasting border, stripe, or simple textured stitch. Keep decorations securely attached, especially when the shoes will be worn regularly.
Color combinations offer another easy way to customize the project. Create a neutral single-color pair, use contrasting soles and uppers, alternate colors between rounds, or use leftover yarn to produce a cheerful striped design.
Crocheted footwear can be slippery on smooth flooring. If the shoes are intended for walking indoors, consider a purpose-made non-slip sole solution suitable for handmade footwear and follow its manufacturer’s application and safety instructions. Decorative yarn soles alone should not be assumed to provide reliable traction.
Care depends on the fiber and any additional sole materials used. Follow the yarn manufacturer’s washing recommendations, reshape the shoes while damp if appropriate, and allow them to dry completely before wearing. Inspect the soles periodically for wear.
FAQ About the Crochet Shoes Pattern
Is the Crochet Shoes Pattern suitable for beginners?
A confident beginner can make simple crochet shoes after becoming comfortable with single crochet, working in rounds, increases, and decreases. Creating a test sole is useful before starting the complete pair.
What yarn works best for crochet shoes?
The best yarn depends on the intended use. Soft, durable yarn with good stitch definition works well for indoor footwear. Always consider comfort, care requirements, and expected wear.
What stitches are commonly used for crochet shoes?
Common techniques include chain stitch, single crochet, half double crochet, double crochet, slip stitch, increases, and decreases.
How do I determine the correct size?
Measure the foot from heel to longest toe and compare that measurement with your crochet gauge and sole dimensions. Fit should be checked throughout construction whenever possible.
Why does my crochet sole curl?
Curling may indicate that the curved sections need additional increases or that your tension is too tight. Place the sole flat periodically to identify shaping problems early.
Why is my sole becoming wavy?
Excessive increases can create rippling. Check the increase placement and compare your stitch counts with the construction sequence.
How do I make two shoes the same size?
Keep detailed notes of every round, including stitch counts, increases, decreases, and color changes. Compare the two shoes frequently while crocheting the second one.
Can I make crochet shoes wider?
Yes. Additional increases during sole construction can create more width, while adjustments to the upper can provide extra room. Make changes gradually to maintain a balanced shape.
How do I shape the toe?
Mark the center-front section and work evenly distributed crochet decreases over several rounds. Gradual decreases usually create a smoother shape.
Can I use different colors for the sole and upper?
Absolutely. A contrasting sole can create a defined, modern appearance and is an easy way to personalize the basic pattern.
Can I add flowers or bows?
Yes. Crochet flowers, bows, or other soft decorations can be sewn securely to the upper. Avoid placing bulky embellishments where they could make the footwear uncomfortable.
Are yarn soles non-slip?
Crocheted yarn alone should not be assumed to be slip-resistant on smooth flooring. For wearable indoor shoes, consider an appropriate non-slip solution specifically intended for footwear.
How should I wash crochet shoes?
Follow the care instructions for the yarn and any additional materials used. Some fibers can be gently machine washed, while others require hand washing.
Can I make baby shoes using the same construction?
The general sole-and-upper concept can be adapted to smaller decorative footwear, but sizing, construction, and embellishments should be appropriate for the intended age and use.
Conclusion
The Crochet Shoes Pattern demonstrates how basic stitches and careful shaping can transform yarn into comfortable handmade footwear. By beginning with an oval sole, strategically placing increases, building the sides, and gradually decreasing around the toe, you can create a recognizable shoe shape while adjusting the project to suit your preferred dimensions.
Throughout this tutorial, you learned how to take measurements, select suitable yarn, crochet an oval shoe sole, work single crochet, half double crochet, slip stitches, increases and decreases, shape the toe and heel, finish the opening, weave in yarn ends, and personalize the finished shoes. You also learned why checking fit and considering appropriate traction are important when creating wearable crochet footwear.

