If you’re looking for a quick, adorable, and practical handmade project, this crochet slipper keychain – step by step tutorial is the perfect guide for you. These mini slippers are not only charming but also serve as creative gifts or stylish accessories for your keys or bags. Whether you’re a beginner or a seasoned crocheter, this project brings fun and satisfaction from the very first stitch. You’ll be surprised how quickly one of these cuties comes together.
In this tutorial, we’ll walk you through everything you need to know to complete a crochet slipper keychain from start to finish. We’ll cover yarn selection, hook size, pattern breakdown, and assembly instructions. Along the way, we’ll highlight important techniques and share helpful tips so your mini slipper comes out perfect every time. The entire design is beginner-friendly but offers enough room for creativity if you wish to add embellishments or switch colors.
By following this crochet slipper keychain – step by step tutorial, you’ll not only craft something unique and delightful but also improve your understanding of shaping in small projects. These miniature shoes also make great products to sell at markets or offer as tokens of appreciation. Now, let’s dive into the materials and preparation before getting into the fun part—crocheting!
Materials and Preparations
To begin this crochet slipper keychain – step by step tutorial, you will need a small selection of basic crochet tools and supplies. Fortunately, this project requires very little yarn, making it a great scrap-busting pattern. Choose colors that pop or reflect a theme—like holiday colors or baby pinks and blues.
The best yarn for this crochet slipper keychain is a light worsted or sport weight cotton yarn. Cotton is durable and holds its shape well, which is ideal for accessories that are handled frequently, such as keychains. You’ll only need around 10–15 yards per slipper, so leftover yarn works beautifully.
Use a 2.5 mm or 3.0 mm crochet hook to keep your stitches tight and structured. Loose stitches could make the slipper floppy or distort the shape. If you’re using thicker yarn, adjust the hook size accordingly. A stitch marker is optional but recommended for tracking rounds.
You will also need a tapestry needle to weave in ends and sew parts together. A small keyring or lobster clasp will turn your tiny slipper into a functional keychain. For added flair, you can include a tiny bow, button, or embroidery on top of the slipper.
Finally, set aside about 30–45 minutes to complete one slipper. Once you get the hang of the pattern, your production time will drop significantly. This is what makes the crochet slipper keychain such a great gift or product idea.
Be sure to work in good lighting and keep your hands relaxed. This will help your tension stay consistent and ensure your stitches look neat and uniform. Let’s move on to the first part of the actual crocheting process.
Starting the Sole of the Slipper
Begin your crochet slipper keychain – step by step tutorial by crocheting the base or sole. This part will determine the size and shape of your mini slipper, so pay close attention to stitch counts and increases.
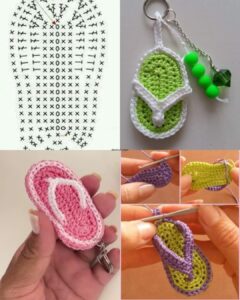
Start with a chain of 9. This forms the foundation chain of the slipper. Single crochet (sc) into the second chain from the hook and across. You’ll have 8 sc. Now, rotate the chain and work along the other side to create an oval. Make 2 sc in the first and last chains to shape the curve.
For Round 2, single crochet in each stitch around the oval. In the stitches at each end, make 2 single crochets to widen the base slightly. You should have around 20 stitches total at the end of this round. Always count your stitches to avoid distorting the shape.
In Round 3, you’ll build a little height. Work a round of single crochet into the back loops only. This technique creates a ridge that helps shape the sole. It’s subtle but makes a noticeable difference in the overall look.
In Round 4, begin forming the walls of the slipper by crocheting evenly around the sole. Single crochet in each stitch around, this time through both loops again. This round forms the base of the upper portion of the mini shoe.
If you want to add a second color or a stripe on the sole, this is a great place to do it. Simply change colors at the start of a new round and continue crocheting as usual. Keep yarn tails inside the work to avoid weaving too many ends later.
Shaping the Top and Heel
Now that your sole is complete, we move to shaping the heel and upper portion of the crochet slipper keychain. This is where your project starts to resemble a shoe and gives the keychain its cozy charm.
Start with about 12 single crochets across the back of the slipper, skipping the front 8 stitches. This forms the heel cap. Continue for 2 more rows, working only into those 12 stitches, building height at the back.
To shape the ankle area, crochet a decrease at each end of the next row. This pulls the heel inward slightly and gives the slipper a snug look. Then chain 1, turn, and sc across once more.
Now switch focus to the front. Attach your yarn to the front-center stitch of the slipper and crochet 4 rows of 8 stitches wide. These rows will create a band over the top of the foot. To form a rounded edge, decrease at each end on the last row.
Fold the top band back and stitch the sides to the heel portion using a tapestry needle. You now have the slipper fully shaped and closed up. Use light stitching to avoid visible seams.
This construction method keeps the slipper in a true shoe shape while allowing flexibility in styling. You can leave the front band plain or decorate it with embroidery, buttons, or bows. The small size makes it ideal for embellishments.
Attaching the Keyring and Finishing Touches
The final steps of this crochet slipper keychain – step by step tutorial are what turn your mini slipper into a practical and adorable keychain. You can customize the look here or keep it minimalist and classic.
First, choose where to attach your keyring or clasp. Most people prefer the heel area. Using a 6–8 inch piece of matching yarn, thread it through the top edge of the heel and tie the keyring securely with several knots. You can also chain 8 stitches directly into the heel and join it to the ring.
To make your crochet slipper keychain extra secure, sew the chain or yarn tail into the inside of the slipper. This ensures it won’t come undone even with daily use. Trim any extra yarn tails and smooth the edges.
Add any decorations at this point. Use a small satin ribbon for a bow or sew on a button with a seasonal theme like hearts, stars, or snowflakes. For added detail, embroider a name or initials on the sole using a fine needle and contrast thread.
Steam blocking is optional but recommended. Place your mini slipper on a soft towel and gently steam it using an iron or garment steamer. This will make the stitches settle and give your keychain a more professional look.
Repeat the process to make a second slipper if you want a matching set. Some people even hang them as ornaments or backpack charms. The design is versatile and can be adapted with different yarn colors and textures.
Now you’ve completed the project portion of the crochet slipper keychain – step by step tutorial! Let’s address some of the most common questions next.
FAQ – Crochet Slipper Keychain
Can beginners make this crochet slipper keychain?
Yes! This project is beginner-friendly and introduces basic skills like single crochet, decreasing, and sewing. Even if it’s your first amigurumi-style item, you’ll manage with patience.
How much yarn do I need?
Less than 15 yards per slipper. It’s a perfect way to use up scrap yarn or leftover skeins from larger projects.
What type of yarn works best?
Cotton yarn is ideal for durability and structure. However, acrylic can be used for a softer finish or to add texture variety.
Can I wash the slipper keychain?
Yes, if you use colorfast yarn. Hand washing is best to preserve the shape and decorations.
Can I sell these keychains?
Absolutely! These mini slippers are excellent items for craft fairs or online shops. Just credit any patterns you follow if required.
What can I add to personalize it?
Small charms, bows, buttons, or initials make great additions. You can also use multicolor yarn for a tie-dye effect.
Conclusion
In this crochet slipper keychain – step by step tutorial, we’ve walked through every detail of crafting your very own mini shoe keychain—from materials and sole construction to the top band, final assembly, and personalization ideas. It’s a satisfying, fast, and creative project that helps reduce yarn waste and spreads handmade joy.
These adorable little slippers are great for personal use, gifting, or selling at local markets. With just a bit of yarn and your crochet hook, you can create something charming, functional, and entirely your own.
We’d love to hear from you! If you enjoyed this tutorial, please leave a sincere comment with your thoughts or suggestions for future guides. Happy crocheting!


