is a delightful way to combine your love for handmade crafts with the joy of gifting or selling beautiful items. Whether you’re preparing for a craft fair, planning party favors, or simply want to organize little keepsakes creatively, a crochet souvenir holder adds charm and functionality to any collection. This tutorial will walk you through everything from materials and stitches to shaping, assembling, and customizing your project.
Creating a crochet souvenir holder is also a perfect project for beginners who want to practice basic stitches while producing something practical and eye-catching. You can make them in bulk, using small scraps of yarn, and customize them with colors or embellishments that reflect your theme. It’s a perfect balance of simplicity and creativity, ideal for those who want to turn a hobby into a small business opportunity or simply enjoy the meditative nature of crochet.
In this detailed Step by Step Tutorial, we’ll use basic crochet techniques to create a neat, structured holder that can contain tiny mementos like buttons, jewelry, or dried flowers. We’ll include stitch instructions, measurements, yarn recommendations, and customization tips. If you’re looking to master a small yet satisfying project, this is the guide for you. Let’s begin this journey into handmade treasures.
Materials and Measurements for Your Crochet Souvenir Holder
To start your crochet souvenir holder – Step by Step Tutorial, gather all your tools and materials before you begin to make the process smoother. For this pattern, you’ll need basic yarn and a few common tools. Cotton yarn is the best choice for structure, but you can also experiment with blends.
Choose a crochet hook size that complements your yarn. For medium weight cotton, a 3.5mm to 4mm hook works great. This creates tight, sturdy stitches perfect for holding small items. You’ll also need scissors, a yarn needle, and optional embellishments like ribbons or buttons.
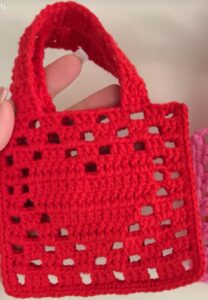
We recommend making a small sample swatch before starting. Your final souvenir holder will be approximately 4 inches by 5 inches when folded. If you’d like a larger version, increase your starting chain in multiples of 2. Each side of the project will require a front and back panel.
Cut two fabric pieces (if lining): each measuring 4 x 5 inches. These will be inserted into the holder for added stiffness and to give the item a polished interior finish. The fabric is optional but recommended if you want a gift-quality result.
When choosing your yarn color, think of the theme or occasion. Earth tones work beautifully for rustic weddings or heritage events. Bright colors suit birthdays or children’s parties. You can even alternate two colors every two rows for a striped effect.
Make sure your workspace has good lighting and all tools within reach. Crocheting in a relaxed, well-lit environment helps you keep your tension consistent and enjoy the meditative process. Now let’s move on to the actual pattern!
How to Crochet the Base Shape and Edges
We begin the crochet souvenir holder – Step by Step Tutorial by working up a simple rectangle, which will later be folded and stitched into a pouch-like shape. Let’s go step-by-step to create the base.
Start with a chain of 24 stitches. This will form the width of your souvenir holder. Add 1 chain for turning. In the second chain from the hook, begin single crochet (sc) all the way across. This will give you 24 sc stitches.
Turn your work and continue with rows of single crochet until your piece measures approximately 10 inches in height. This rectangular panel will be folded in half to form the pouch, creating a 5-inch height when complete.
To ensure the edges are clean and even, you can work a round of single crochet all around the rectangle once the length is done. When you reach the corners, add 2 sc stitches into each corner to keep them from curling.
If you’d like to make the base more decorative, you can alternate a few rows with half-double crochet (hdc) or even double crochet (dc). However, for a sturdy holder, stick with single crochet for most of the piece.
Once the base is ready and bordered, fasten off and weave in your ends. You’ll now have a flat, finished rectangle with neat edges, ready to be folded and shaped into a charming keepsake pouch.
Assembling and Sewing the Holder
To assemble your crochet souvenir holder, fold the rectangle in half with the right sides (the more textured, pretty side) facing out. Use stitch markers to hold the edges in place before sewing.
Using your yarn needle and the same yarn, whipstitch or slip stitch along the two side seams, leaving the top open. This transforms your flat rectangle into a small open pouch with clean side edges.
If you’ve prepared fabric lining, now is the time to insert it. Fold the fabric pieces in half and insert into the crochet pouch. Hand sew or fabric-glue the edges lightly to the inside top edge of the pouch.
Add a button loop closure: chain 10, and attach it to the inside top edge at the back center. Sew a button to the front center of the pouch to secure it closed. This not only gives it a tidy look but also keeps items from falling out.
To reinforce the pouch, you can crochet an additional flap. Chain 12 and work 6 rows of sc. Attach the flap to the back top edge and sew a snap or Velcro under it to serve as a secure cover.
Now your crochet souvenir holder is shaped, functional, and beautiful. All that’s left is to decorate it to match your occasion or personal style. Let’s explore creative finishes next!
Customizing Your Crochet Souvenir Holder
The beauty of this crochet souvenir holder – Step by Step Tutorial is that once the base pattern is complete, you can customize it endlessly. Think flowers, initials, lace, appliqués, or even tassels.
Crochet mini flowers and sew them on the flap or lower corner of the pouch. This adds a charming and delicate detail. Use contrasting colors to make them stand out or blend tones for a subtle look.
For rustic events, consider adding a burlap bow or wooden bead. For weddings, satin ribbons or delicate white lace add elegance. For kids, sew small felt shapes like stars, hearts, or animals on the front.
Add a loop or keychain ring to one corner so the souvenir holder doubles as a key pouch or bag charm. This is especially useful for entrepreneurial purposes if you’re selling at markets.
If you want to make it personal, embroider initials or crochet small alphabet letters. This is great for party favors, where each guest gets a personalized keepsake they’ll cherish.
Another option is to use variegated yarn that changes color as you crochet. This creates beautiful, unique patterns with no extra work. Every piece looks slightly different, perfect for handmade batches.
FAQ – Frequently Asked Questions About Crochet Souvenir Holders
Q: What type of yarn is best for making a crochet souvenir holder?
A: Cotton yarn is ideal due to its durability, structure, and clean finish. It holds shape well and offers a neat appearance for gifting or selling.
Q: Is this project beginner-friendly?
A: Absolutely! If you’re familiar with basic stitches like single crochet and chaining, this is a great small project to build your skills and confidence.
Q: Can I make these in bulk for an event or business?
A: Yes, the pattern is quick and easily repeatable, making it perfect for selling at markets, giving as party favors, or offering as promotional items.
Q: Can I machine-wash the finished souvenir holder?
A: If you use cotton yarn and secure all ends properly, it should be machine washable. However, handwashing is best to maintain shape, especially if decorations are added.
Q: Can I line it with fabric for more structure?
A: Definitely. Lining your pouch adds sturdiness and gives it a polished look, especially for professional or formal uses like wedding souvenirs.
Q: What size should I make the base if I want a larger version?
A: Simply increase the starting chain in multiples of 2, and adjust the height accordingly. Just remember to keep proportions balanced for folding.
Conclusion
In this crochet souvenir holder – Step by Step Tutorial, we’ve explored how to create a charming, functional item that blends creativity with practicality. From choosing materials and making a simple rectangle to assembling and decorating the final piece, you now have all the steps to make a thoughtful handmade item for personal use, events, or even your business.
These little holders are a joy to make, easy to personalize, and a wonderful way to practice your crochet skills while producing something useful and delightful. Whether you gift them at weddings, birthdays, or holidays—or sell them in your handmade shop—they carry love in every stitch.
We hope this tutorial was clear, helpful, and inspiring. If you try this project, please leave a sincere opinion in the comments. What did you enjoy most? Do you have suggestions for different styles or uses? Your feedback helps us create more helpful content for passionate crafters like you!


