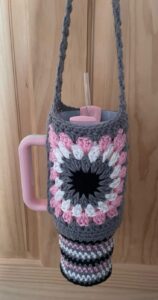
Looking for a practical and stylish way to carry your Stanley tumbler while keeping your hands free? This Crochet “Stanley” Cup Holder is a beginner-friendly project that combines functionality and creativity. Whether you’re heading to the gym, going on a walk, or just running errands, this handy crochet accessory is perfect for keeping your favorite beverage close by.
If you’re new to crochet or exploring new crochet patterns, this tutorial is designed with simplicity and clarity in mind. You’ll learn to create a durable, stretchy, and aesthetically pleasing holder that fits a standard Stanley cup (or similar-sized tumbler) securely. Plus, it’s customizable—you can change colors, add embellishments, or adjust the strap length for a perfect fit.
This step-by-step guide will walk you through everything: materials, measurements, essential stitches, and assembly. Not only will you complete a beautiful cup holder, but you’ll also gain confidence in your crochet skills by finishing a practical project you’ll use daily!

🧶 Materials and Measurements
The first step in creating your crochet Stanley cup holder is gathering the right tools and understanding the measurements needed. A few basic supplies and simple stitches are all it takes to complete this beginner-friendly pattern.
-
Yarn Selection
Choose a durable and washable worsted weight cotton yarn (Category 4). Cotton holds shape well and provides good grip around the cup. Popular brands include Lily Sugar’n Cream or Bernat Handicrafter Cotton. You’ll need around 80-100g for one holder, depending on strap length. -
Hook Size
Use a 5.0 mm (H/8) crochet hook. This size ensures a snug yet flexible texture. If you crochet loosely, drop to a 4.5 mm hook for tighter tension. -
Stanley Cup Dimensions
The pattern is sized for the popular 40 oz Stanley Tumbler, which typically measures around 4 inches in base diameter and 10 inches in height. Adjust stitches to fit smaller/larger cups as needed. -
Strap Measurement
For crossbody straps, measure approximately 36-40 inches (or customize to preference). For a wristlet-style handle, 10-12 inches works best. -
Additional Tools
-
Stitch marker
-
Yarn needle
-
Scissors
-
Measuring tape
-
-
Optional Embellishments
Add flair with appliqués like flowers, initials, or mini tassels. These are great touches for gifting or personalizing your crochet pattern!
🪢 Step-by-Step: Creating the Cup Base and Body
This section guides you through the main structure of the cup holder, starting from the bottom up. The base is created in the round, then the body is built with simple stitches to create height and stretch.
-
Magic Ring Base
Start with a magic ring. Ch 2 (does not count as stitch), work 12 dc into the ring. Pull tight and join with a slip stitch. This forms the base center. -
Increase Rounds
-
Round 2: Ch 2, 2 dc in each stitch around. Join. (24 dc)
-
Round 3: Ch 2, (1 dc, 2 dc in next) repeat. Join. (36 dc)
-
Round 4: Continue increasing until your circle is 4 inches in diameter, matching your Stanley cup base.
-
-
Body Stitches
Once the base is the correct size, stop increasing and begin working even rounds in either half double crochet (hdc) or double crochet (dc) stitches. This creates the height of the holder. -
Body Height
Continue working even rounds until the holder reaches approximately 5.5-6 inches tall. This allows coverage just under the cup handle. -
Creating the Handle Gap (Optional)
If your Stanley cup has a side handle, you can skip stitches in one row and chain across the gap to create a slot. On the next row, crochet into the chain stitches to resume the pattern. -
Finishing the Body
When the height is reached, fasten off and weave in all ends using a yarn needle. Make sure the top is slightly snug to grip the cup securely.
🧵 Crafting the Strap and Attaching It
The strap is an essential part of your crochet cup holder pattern, whether you’re creating a wristlet, shoulder, or crossbody version. It should be comfortable, durable, and match the cup sleeve.
-
Basic Strap Instructions
Ch the desired length (example: 120 chains for a crossbody strap). Turn and hdc across the chain. This creates a flat strap. -
Double Layer Strap (Optional)
For added durability, after completing the first row of hdc, ch 1 and hdc back down the opposite side of the chain, creating a double-thick strap. -
Reinforced Ends
Leave 4-6 inches of yarn on each end of the strap. Use these tails to securely sew the strap to each side of the holder with a yarn needle. Reinforce by sewing through multiple loops. -
Adjusting for Comfort
Try the cup holder on and adjust the strap length before securing both ends. Consider making the strap adjustable by using buttons or knot ties. -
Adding Decorative Touches
Use a contrasting color for the strap or add stripes. You can even use a granny stripe crochet pattern for a fun and textured look. -
Final Strap Fit Test
Insert your Stanley cup into the holder, sling it over your shoulder, and test the fit. The strap should feel secure without pulling on the cup holder stitches.
🌟 Tips for Customization and Creative Additions
One of the joys of working with crochet patterns is how easy they are to customize. Your Stanley cup holder doesn’t need to be plain—let your creativity shine!
-
Add Texture with Stitch Variations
Try using front and back post double crochet for a ribbed texture. You can also alternate rows of sc and dc for visual interest. -
Color Blocking and Stripes
Divide the cup holder into color sections. For example, make the base one color, the body another, and the strap a third. This is especially cute when gifting! -
Appliqué and Embellishments
Crochet a small daisy, heart, or letter to attach to the front. Use slip stitch embroidery for initials or fun phrases. -
Hook Holder Add-On
Add a small side pocket using the same yarn and stitch it onto the outside to hold a reusable straw or crochet hook! -
Matching Set Idea
Use the same yarn and stitch to make a matching water bottle holder, phone pouch, or keychain, and create a whole crochet travel kit. -
Perfect for Gifting
This cup holder makes a thoughtful and trendy handmade gift. Add a tag that says, “Handmade with love—just for your Stanley!”
🧶 Why You’ll Love This Beginner-Friendly Crochet Pattern
The Crochet “Stanley” Cup Holder is not only a fun beginner project, but it’s also a functional and fashionable accessory. With endless color and stitch options, you can make one for every season—or even for every member of the family!
If you’re looking to expand your collection of crochet patterns, this tutorial helps you master skills like crocheting in the round, stitch increases, and strap construction. Plus, it’s quick to make—perfect for craft markets or spontaneous gifts.
The best part is the feeling of accomplishment that comes from making something practical and pretty. Whether you’re sipping iced coffee in the summer or tea in the fall, your handmade cup holder will turn heads and spark conversations.
So grab your yarn, hook, and Stanley cup—and start crocheting today!


