Looking to add a charming touch to your vanity, desk, or bedside table? This Crochet Star Trinket Tray Tutorial is the perfect way to combine style, creativity, and utility. Handmade trays are not only practical for organizing jewelry, coins, keys, or crafting notions, but they also add a cozy, artistic flair to your home decor.
Crocheting a star-shaped tray may sound complicated, but with the right guidance and materials, even beginners can complete this delightful project. Star designs are visually appealing and symbolic—representing light, aspiration, and individuality. When applied to functional crochet patterns, the result is truly magical.
In this article, you’ll find a detailed, step-by-step Crochet Star Trinket Tray Tutorial using easy stitches and affordable materials. We’ll explore everything from materials to measurements, and walk you through the full process to create your very own star-shaped tray. Let’s dive into the craft!
Materials, Measurements, and Preparation
Before you start crocheting, it’s important to gather all the necessary supplies and prepare your workspace. This simple organization step can make your project smoother and more enjoyable.
-
Yarn: Use worsted weight (Category 4) 100% cotton yarn for sturdiness.
-
Main color: approx. 60-80g depending on tray size.
-
Optional contrast color for edging or center star points.
-
-
Crochet Hook: Size 4.0 mm (G-6) or 4.5 mm (7), depending on your yarn.
-
Scissors and Tapestry Needle for finishing.
-
Stitch Markers (optional) for keeping track of rounds.
The finished crochet star trinket tray will measure about 6 to 8 inches (15 to 20 cm) across, depending on the yarn and hook used. For a larger or smaller tray, simply adjust your hook size or add/remove rounds.
Since this project is intended to hold small items, using a stiffer yarn like cotton or even incorporating a second strand will help the tray hold its shape better. You may also stiffen the tray with a solution of water and white glue after crocheting.
Choose a flat surface with good lighting. Keep your yarn tangle-free by placing it in a yarn bowl or basket nearby.
How to Crochet the Star Base
The base of your tray is the foundation of the entire project. In this section of the Crochet Star Trinket Tray Tutorial, we’ll guide you through creating the star-shaped base using basic crochet patterns.
-
Begin with a Magic Ring:
-
Make a magic ring and chain 1.
-
Work 10 single crochets (sc) into the ring.
-
Pull the ring tight and join with a slip stitch to the first sc.
-
-
Increase the Round:
-
Round 2: Chain 1, make 2 sc in each stitch around (20 stitches).
-
Join with a slip stitch and chain 1 for the next round.
-
-
Set Up the Star Points:
-
Round 3: (Sc in next stitch, sc in next, 2 sc in next) repeat around (26–30 stitches).
-
You want a multiple of 5 or 10 to form symmetrical points.
-
-
Shape the Points:
-
Create 5 evenly spaced increases where the star points will begin.
-
Mark these with stitch markers if necessary.
-
Continue working in the round, increasing slightly at each marked point.
-
-
Form the Peaks:
-
At each point, chain 4, skip 1 stitch, sc into next to create the raised effect.
-
Do this five times to outline the star.
-
-
Fasten Off and Block:
-
Once the shape is complete, fasten off and weave in ends.
-
Lightly steam block to define the star points and flatten the base.
-
At this stage, you’ll have a flat star with five points—this is your tray’s bottom. The beauty of this crochet project lies in the symmetry and shaping, so take your time to align everything neatly.
Building the Tray Walls
With the star base complete, the next step in your Crochet Star Trinket Tray Tutorial is to add the side walls. This gives the tray its structure and makes it functional for holding items.
-
Attach Yarn to Star Tip:
-
Join yarn at one of the star tips using a slip stitch.
-
Chain 1 and single crochet around, working only in the back loops to raise the edge.
-
-
First Wall Round:
-
Work 1 sc in each stitch around the perimeter.
-
Increase slightly in the dips between star points for curvature.
-
-
Continue Building Height:
-
Repeat sc rounds, crocheting into both loops for stability.
-
Make 3–5 rounds depending on desired height.
-
-
Optional Color Change:
-
For decorative flair, change yarn color for the top round.
-
Try a contrasting or variegated color for interest.
-
-
Edge Detailing:
-
Use a crab stitch (reverse single crochet) or slip stitch for a neat finish.
-
This helps the tray stay rigid and adds a professional touch.
-
-
Finishing Off:
-
Fasten off and weave in all loose ends.
-
Shape the points and walls with fingers or blocking if necessary.
-
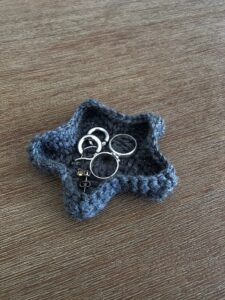
Now your crochet star trinket tray has both a stunning visual design and practical side walls. The structure is sturdy enough for coins, rings, hair clips, or stitch markers.
Stiffening and Customizing the Tray
If you’d like to give your tray more structure, stiffening is an easy option. Here’s how to make your crochet patterns more functional and personalized.
-
Stiffening Solution:
-
Mix equal parts white glue and water.
-
Dip the tray in the mixture or brush it on with a sponge.
-
Shape the tray and let it dry fully for 24 hours.
-
-
Add Embellishments:
-
Sew on beads, sequins, or small appliqués like moons or flowers.
-
Use embroidery to outline the star for extra detail.
-
-
Use Different Yarn Types:
-
Try metallic yarn for a festive look.
-
Cotton blends provide both softness and durability.
-
-
Tray Sets:
-
Make trays in multiple sizes and nest them.
-
Use matching colors for a cohesive décor theme.
-
-
Gift Ideas:
-
Pair a tray with jewelry or candies and wrap it in cellophane.
-
These make wonderful handmade gifts for holidays or birthdays.
-
-
Storage Uses:
-
Great for office desks, nightstands, or craft areas.
-
Use one for pins and needles while sewing or crocheting.
-
Customization is what makes crochet projects so rewarding. Each tray can be unique, tailored to your home or your gift recipient’s personality.
Final Thoughts on the Crochet Star Trinket Tray
This Crochet Star Trinket Tray Tutorial offers a simple yet beautiful way to explore creative crochet projects while making something practical. Whether you’re a beginner or an experienced crafter, the step-by-step guidance in this pattern ensures a rewarding experience from start to finish.
Working with crochet patterns that combine form and function gives you the chance to express your personality through color, shape, and texture. Plus, small projects like this tray are perfect for practicing skills, using scrap yarn, or completing a satisfying project in one sitting.
With just a bit of yarn and imagination, you can transform basic stitches into an eye-catching star that brightens any room. Keep experimenting with yarn colors, tray sizes, and embellishments to make each piece truly your own.
So grab your hook, choose your favorite yarn, and start creating a crochet trinket tray that’s as useful as it is adorable. And don’t forget—every stitch you make is another star you’ve brought to life with your hands.


