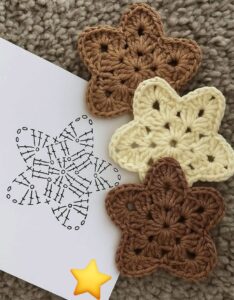
is a delightful and creative project for beginners and experienced crafters alike. These small, decorative items can be used to embellish clothing, keychains, wall hangings, gift tags, garlands, and even festive ornaments. Using just a small amount of yarn, a hook, and your hands, you can craft beautiful stars that bring charm and personality to any space or accessory. Whether you’re decorating for the holidays or simply adding flair to your craft collection, crochet stars are both functional and fun.
When approaching any crochet pattern, especially something as symbolic as stars, it’s important to understand the stitches involved, the shape structure, and the technique for achieving symmetry. The process might seem intricate at first, but this step-by-step tutorial is designed to walk you through the entire journey—clearly and patiently. No matter your skill level, you’ll find this guide both inspiring and achievable.
Not only are crochet stars perfect for personal use, but they’re also ideal for selling at craft fairs or online shops. They’re quick to make, cost-effective, and customizable. In this tutorial, you’ll also get tips on choosing the right materials, understanding yarn tension, and making your crochet pattern stand out. Now let’s dive into the magical world of crochet stars and learn how to make your own, step-by-step.

Materials and Measurements
To get started with your crochet stars – Step by Step Tutorial, you’ll need just a few basic supplies. The beauty of this project lies in its simplicity—no fancy equipment required.
Choose 100% cotton yarn in your desired colors. Cotton gives the stars a clean finish and helps them hold their shape. For a more festive look, metallic or glittery yarns are also a great choice.
You’ll need a crochet hook that matches your yarn weight. For DK or worsted weight yarn, a 3.5mm or 4mm crochet hook is ideal. Check the yarn label for guidance.
For stuffing (optional, if you want puffed stars), use polyester fiberfill. You can also leave the stars flat for a more versatile application.
Keep a yarn needle handy for weaving in ends and scissors for cutting. A stitch marker is optional but useful for marking the beginning of each round.
Each finished crochet star will measure approximately 3–4 inches across, depending on the yarn and tension. If using thinner yarn or a smaller hook, expect smaller results.
You’ll need about 10 grams of yarn per star. For garlands or bulk crafts, prepare your yarn in advance and pre-cut yarn segments for ease and efficiency.
Understanding the Basic Star Pattern
To make your first crochet star, start with a magic ring or a chain circle. This forms the foundation of the shape and helps keep it tight and symmetrical.
Work five single crochets into the center of the ring. Pull it tight to close, then slip stitch to the first single crochet to join the round. This gives you your starting point.
In the next round, each of the five points will be shaped individually. You’ll chain, work multiple stitches into one point, and then skip stitches to keep the star’s shape even.
A common approach is: Chain 5, slip stitch in 2nd chain from hook, single crochet in next, half double crochet in next, double crochet in last, then skip one stitch and slip stitch into the next. Repeat four more times for a five-point star.
This method ensures sharp, clean points while keeping the base circular. It’s also easy to memorize, making it great for bulk crafting.
After the fifth point, fasten off and weave in the ends. Shape the star with your hands or lightly block it if needed to help it hold its structure.
Customizing Your Crochet Stars
One of the best things about crochet stars – Step by Step Tutorial is how easy it is to personalize the design. Start by experimenting with yarn textures—try velvet, glitter thread, or even raffia for a rustic look.
You can also create multi-layered stars by making two identical stars and sewing them together. This technique works great for ornaments or 3D embellishments.
Add embellishments like beads, sequins, or tiny buttons to the center of the stars. These add dimension and sparkle, especially for holiday-themed projects.
Use color strategically: alternate colors for each round, use gradient yarns, or make rainbow sets of stars for vibrant displays. This adds visual interest and makes your projects more engaging.
For functional items like coasters or appliqués, stitch your stars onto fabric backings for durability. Consider using felt or quilted fabric for an extra cozy touch.
Turn your stars into garlands by stringing them onto twine or ribbon. Leave space between each, and secure with knots or glue. This makes for beautiful decorations for walls, mantels, or parties.
Assembly and Usage Ideas
Once your stars are complete, the possibilities are endless. Sew a star onto the corner of a baby blanket, or add one to a crocheted pouch for flair.
Use your stars as keychains by attaching jump rings or split rings. A dab of fabric glue on the back can reinforce the structure for everyday use.
For Christmas, hang your crochet stars on the tree, or use them as gift toppers. This handmade touch turns simple wrapping into something special.
If you’re a seller, bundle sets of stars in different colors. Label them as holiday décor, appliqués, or bookmarks to appeal to different buyers.
Add a loop to one point of the star to create a hanging ornament. Try using gold thread or jute for a rustic farmhouse vibe.
Layer stars on top of one another and stitch in the center for a floral effect. This technique works beautifully for brooches or baby mobile decorations.
Tips for Perfect Stars Every Time
Tension matters. Practice even tension to ensure all points are the same size. Inconsistent tension can cause the star to warp.
Block your stars if they curl. Lightly wet and pin them to shape. Allow them to dry completely for a clean, professional finish.
Use a tapestry needle to weave in ends securely. If your stars are meant to be used regularly (like on keychains), reinforce the center and end stitches.
When making multiple stars, set up a batch process: complete all centers, then do all points. This speeds up production and keeps your hands moving efficiently.
If using your stars in wearables, avoid sharp or rigid yarn. Choose soft and washable yarns, especially for baby items or clothing.
Always count your stitches carefully. A missing or extra stitch can throw off the symmetry and make the star appear uneven.
FAQ about Crochet Stars – Step by Step Tutorial
1. What type of yarn is best for crochet stars?
Cotton yarn is the most recommended due to its firm texture and ability to hold shape. However, acrylic or glitter yarn can add flair.
2. Can I make crochet stars without a magic ring?
Yes, you can begin with a chain loop instead, typically chaining 4 and joining with a slip stitch. A magic ring, however, gives a neater center.
3. How do I make a six-pointed crochet star?
Add one more repeat in your pattern to increase from 5 points to 6. Ensure spacing is even to maintain symmetry.
4. Are crochet stars suitable for beginners?
Absolutely! Once you master basic stitches—chain, single crochet, and double crochet—stars are easy and satisfying to make.
5. Can I use these stars in baby items?
Yes, but ensure all ends are securely woven and avoid using embellishments that could pose a choking hazard.
6. How can I stiffen my crochet stars for ornaments?
You can use fabric stiffener, starch spray, or a sugar-water solution. Lightly dampen and shape your star, then allow it to dry flat.
7. What hook size should I use for a small star?
Use a smaller hook (like 2.5mm or 3mm) for tighter stitches and smaller stars. Adjust according to your yarn weight.
8. Can I sell crochet stars?
Yes, these are perfect for selling in craft fairs or online marketplaces. Just avoid selling copyrighted patterns unless they’re your own.
9. How do I make a star garland?
Make several stars and thread them onto string, leaving space between each. Secure them with a small knot or stitch in place.
10. Is blocking necessary for crochet stars?
Not always, but it helps achieve crisp shapes, especially for display or gifting. Blocking is highly recommended for professional results.
Conclusion
This crochet stars – Step by Step Tutorial has walked you through the entire process of making your own charming stars. From choosing the right materials and mastering the pattern to customizing your designs and using them in creative ways, you now have all the tools needed to bring sparkle and personality to your crochet projects. These versatile stars are a delightful addition to any crafter’s repertoire and can brighten up any space or gift.
We hope this guide has been helpful, inspiring, and fun. If you try this project, please leave a sincere opinion in the comments and let us know how it turned out! We welcome your suggestions and feedback for future tutorials too. Happy crocheting!


