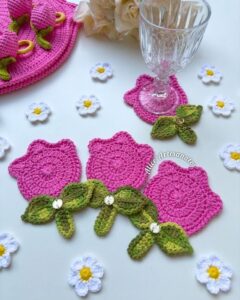
The crochet tulip shaped coaster is a beautiful and elegant way to bring a touch of springtime charm into your kitchen, dining room, or workspace. Whether you’re sipping your morning coffee or hosting a brunch for friends, this delicate yet functional coaster is sure to catch the eye. Plus, it’s the perfect project to practice your stitches while creating something lovely and practical.
This delightful project combines creativity and utility in one blooming design. It’s especially great for beginner to intermediate crocheters who want to challenge themselves slightly with shaping while still following a simple crochet pattern. You can use it for your own home decor or package a few as handmade gifts for birthdays, Mother’s Day, or housewarmings.
The best part? This crochet tulip shaped coaster is quick to complete, and it uses only a small amount of yarn. You can create several in different colors to represent a vibrant tulip bouquet — all while using up those yarn scraps sitting in your stash. Ready to add a floral flourish to your table? Let’s dive into the tools and supplies you’ll need.
Tools, Yarn, and Fabric Cuts for the Crochet Tulip Shaped Coaster
To begin making your crochet tulip shaped coaster, you’ll need to gather some basic supplies. This project is relatively small, which makes it a great stash-buster, and the materials are very accessible for crocheters at any skill level.
Start by selecting a 100% cotton yarn in your choice of tulip colors—pinks, reds, yellows, purples, or even variegated shades for a watercolor effect. Cotton yarn is ideal because it’s absorbent, durable, and holds its shape well, which is perfect for a coaster. You’ll also need green yarn for the leaves if you’d like to add a realistic botanical touch.
The recommended hook size for this crochet pattern is a 3.5 mm (E-4) crochet hook. This size will create tight, clean stitches that help maintain the structure of your tulip. If you crochet loosely, consider going down a half size to keep the coaster firm and flat.
You’ll also need a few accessories: scissors, a yarn needle for weaving in ends, and stitch markers if you want to keep track of shaping sections. Optional: a steam iron and blocking mat to flatten your coaster once completed.
While no fabric cutting is required in the traditional sense for crochet, you can think of your yarn as your “fabric.” For each tulip coaster, estimate needing about 25–30 yards of main color yarn and 10 yards of green for the leaves.
The finished size of your crochet tulip shaped coaster will be approximately 5.5 inches tall and 4.5 inches wide (14 cm x 11 cm), making it ideal for mugs, teacups, or even small pots.
Crochet Pattern Instructions: Making the Tulip Petal Base
This section will guide you through creating the main shape of the crochet tulip shaped coaster. The base is made up of three tulip petals formed in layers, giving it a 3D yet flat design that’s visually pleasing and functional.
Step 1: Start with a Magic Ring
Begin with your main color yarn (the flower color). Create a magic ring and make 6 single crochets (sc) into the ring. Pull the ring tight and join with a slip stitch to the first sc. This is the tip of the tulip.
Step 2: Forming the First Petal
Chain 2 (counts as first half double crochet), then make 2 half double crochets (hdc) into the next stitch, and 1 hdc into each of the next 2 stitches. You’ll now begin shaping by increasing the next two stitches (2 hdc each), then slip stitch to join. You now have one petal shape.
Step 3: Adding More Petals
Repeat the same pattern for two more petals. Use the same stitch count and positioning. The petals should naturally curve into a tulip shape. The slight layering of the outer petals over the center petal gives the illusion of depth.
Step 4: Edging the Petals
After completing the three petals, work a single crochet border around the full flower shape to smooth the edges. You can use the same color yarn or a slightly darker shade for contrast.
Step 5: Finishing the Flower Base
Fasten off the yarn and weave in all loose ends with a yarn needle. Your tulip shape is now defined, and the top of the coaster is complete.
Step 6: Optional Shaping
If you’d like your petals to have more structure, you can lightly block them. Pin the coaster to a foam mat and gently steam it using a damp cloth and iron. Do not press down hard—just enough to set the shape.
Your tulip base is ready! Next, let’s add some leafy details and make it pop.
Adding Green Leaves and Optional Stem
Adding green leaves to your crochet tulip shaped coaster makes it even more recognizable and provides a charming base for the flower to sit on. You can also add a small stem to complete the look.
Step 1: Start the Leaf
Using green yarn, chain 10 stitches. Turn, and make 1 sc in each of the first 3 chains, 1 hdc in the next 3, 1 dc in the next 3, and 3 dc in the final chain.
Step 2: Mirror the Leaf
Now work on the opposite side of the chain. Make 1 dc in each of the next 3 stitches, 1 hdc in the next 3, and 1 sc in the final 3 stitches. Fasten off, leaving a long tail for sewing.
Step 3: Make a Second Leaf
Repeat the above process to make a second leaf. You’ll attach both to the bottom of the tulip flower, spaced slightly apart, or overlapping for a stylized look.
Step 4: Sew Leaves to Base
Use your yarn needle to stitch the leaves securely to the bottom of the coaster. The tail you left during fastening off is perfect for this. Make sure the stitches are tight so the leaves won’t lift during use.
Step 5: Optional Stem
If you want to add a stem, chain 12 with green yarn. Slip stitch back down the chain and fasten off. Attach the stem between the two leaves to mimic a growing tulip.
Step 6: Final Touches
Once all pieces are sewn, check for loose ends and trim them. If needed, lightly steam the coaster again to set the leaves and stem into place.
Your crochet tulip shaped coaster now has its signature greenery and is ready for use or gifting!
Styling Ideas and Creative Variations
One of the best parts about this crochet pattern is how easily you can personalize it. Whether you’re using it as decor or a practical piece, a little creativity can go a long way in making each coaster unique.
Color Customization
Try making an entire set in various tulip shades—bright red, golden yellow, soft lavender, or even striped petals using variegated yarn. Mix and match for a spring-ready table display.
Layered Coasters
Want a thicker coaster? Simply make two tulip bases and stitch them together with a slip stitch border. You can insert a circle of felt between for added thickness and absorbency.
Add Embroidery
Use a contrasting yarn to embroider simple lines on the petals to mimic veining. This adds dimension and texture to your tulip coaster.
Make it Hanging Decor
Attach a loop to the back of the coaster and hang it as a wall or window decoration. It can also be used as a festive spring garland when you string multiple together.
Gift Packaging Ideas
Bundle a few coasters in tissue paper, tie with ribbon, and attach a handmade tag. It’s a heartfelt and eco-friendly gift that suits any occasion.
Market and Sell
Because they’re small and quick to make, tulip coasters are ideal for craft markets or Etsy shops. Be sure to list the materials and washing instructions in your product description.
Final Thoughts on the Crochet Tulip Shaped Coaster
The crochet tulip shaped coaster is more than just a home accessory—it’s a joyful way to express creativity while building your crochet skills. Whether you’re making one for yourself or crafting a garden of them for friends and family, this project brings both beauty and practicality to life.
Thanks to its simple structure and minimal material requirement, this is an ideal crochet pattern for beginners who want to try shaping without overwhelming complexity. And for advanced crocheters, it’s a quick project that offers endless customization.
From the tip of the petals to the base of the leaves, every stitch of this coaster blooms with charm. Use it to elevate your coffee breaks, brighten your home, or simply enjoy the meditative process of crafting something by hand.
So grab your hook, pick your favorite petal color, and let your creativity blossom with this charming crochet tulip shaped coaster tutorial!


