
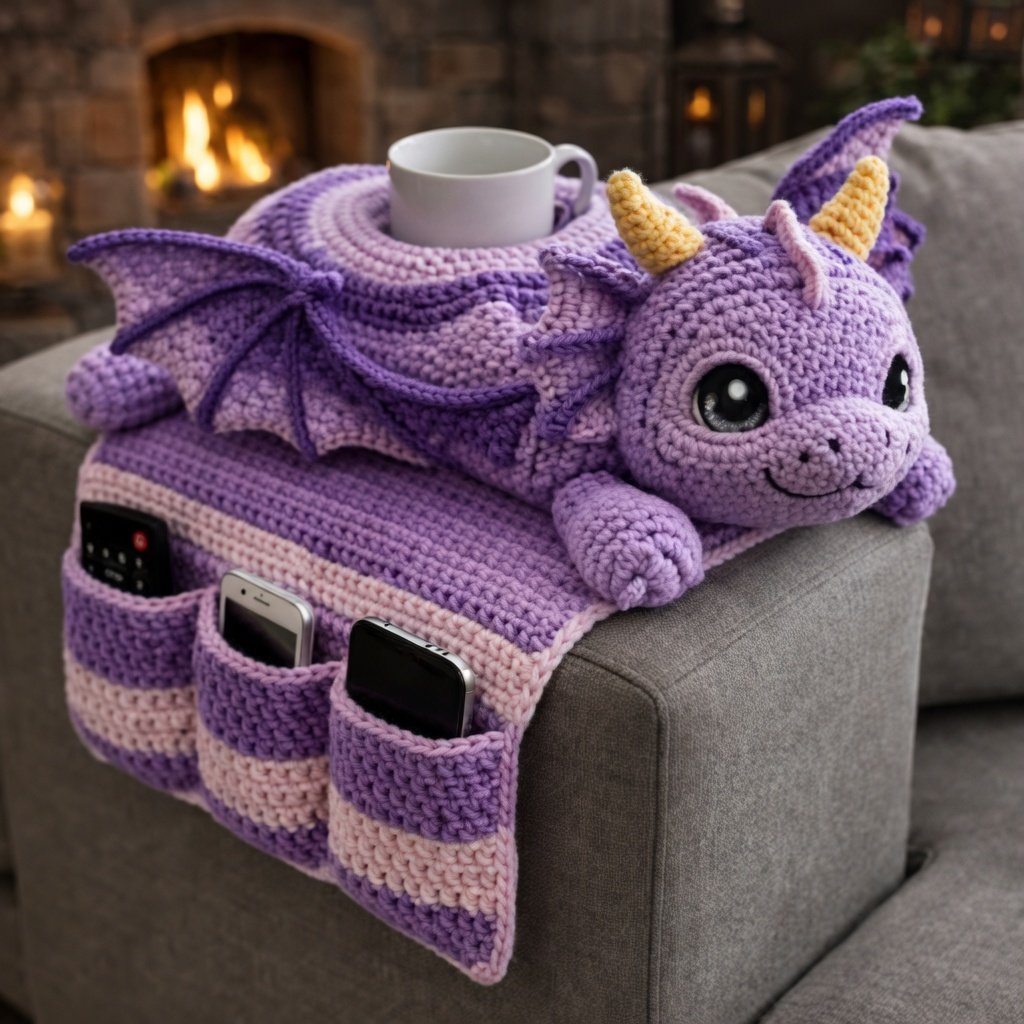
Crochet Tutorial for a Dragon-Shaped Armrest Organizer is a creative and highly functional project that transforms simple yarn into a decorative and practical home accessory. If you are looking for a crochet idea that stands out while also serving a real purpose, learning the Crochet Tutorial for a Dragon-Shaped Armrest Organizer is a perfect choice. This project allows you to create a charming dragon that rests over your sofa arm while holding everyday items like remote controls, phones, glasses, or even small notebooks.
One of the most fascinating aspects of the Crochet Tutorial for a Dragon-Shaped Armrest Organizer is how it blends artistry with usability. Instead of a plain organizer, you get a whimsical dragon character that adds personality to your living space. It is both a conversation piece and a practical tool for keeping things tidy.
Another reason why the Crochet Tutorial for a Dragon-Shaped Armrest Organizer is so popular is its customization potential. You can adapt the size, colors, textures, and details to match your home décor or personal style. Whether you prefer a bold fantasy dragon with vibrant colors or a soft and subtle design in neutral tones, this project offers endless creative possibilities.
Materials and Tools for Crochet Dragon Armrest Organizer
Before starting your Crochet Tutorial for a Dragon-Shaped Armrest Organizer, it is important to gather all the necessary materials. Using the right supplies will ensure that your organizer is sturdy, functional, and visually appealing.
The most important material is yarn. Medium-weight yarn such as cotton or acrylic is ideal because it provides both structure and durability. Cotton yarn is especially recommended for its strength and ability to hold shape, while acrylic yarn offers softness and affordability.
You will need a main color for the dragon’s body and additional colors for details like wings, spikes, eyes, and decorative accents. Choosing contrasting colors will help highlight the dragon features.
A crochet hook between 4.0 mm and 6.0 mm is generally suitable. Using a slightly smaller hook than recommended helps create tighter stitches, which improves the strength and durability of the organizer.
Other essential tools include scissors, a yarn needle for sewing pieces together, stitch markers to track your progress, and a measuring tape to ensure proper sizing.
Optional materials include lining fabric to reinforce the pockets, interfacing for extra structure, safety eyes or embroidery thread for facial features, and light stuffing for the dragon’s head and body.
Preparing all your materials in advance will make the process of creating your Crochet Tutorial for a Dragon-Shaped Armrest Organizer smoother and more enjoyable.
Creating the Base Panel for the Organizer
The foundation of the Crochet Tutorial for a Dragon-Shaped Armrest Organizer is the base panel. This part is essential because it determines how well the organizer fits over your armrest.
Start by measuring the width and length of your sofa arm. Use these measurements to create a foundation chain that matches the width.
Work in rows using single crochet or half double crochet stitches. These stitches provide a dense and sturdy fabric that can support the weight of items placed in the pockets.
Continue crocheting until the panel is long enough to drape over the armrest, with one side hanging down for storage.
Make sure the panel is not too loose, as a snug fit helps prevent slipping.
Once the base panel reaches the desired size, fasten off and weave in all ends neatly.
This base will serve as the structure for your Crochet Tutorial for a Dragon-Shaped Armrest Organizer.
Adding Functional Pockets
The next step in the Crochet Tutorial for a Dragon-Shaped Armrest Organizer is creating the pockets that make the organizer practical.
Attach yarn to one side of the base panel and crochet a rectangular section that will become the pocket.
You can customize the size of the pocket depending on what you plan to store. Larger pockets are ideal for tablets or books, while smaller ones are perfect for remotes or phones.
Once the pocket piece is complete, fold it upward and sew the sides securely to the base panel, leaving the top open.
If you want multiple compartments, sew vertical seams to divide the pocket into sections.
Reinforce the edges with additional stitches to prevent stretching over time.
These pockets are what make your Crochet Tutorial for a Dragon-Shaped Armrest Organizer both functional and convenient.
Creating the Dragon Head and Body
Now it’s time to bring your project to life by creating the dragon features for your Crochet Tutorial for a Dragon-Shaped Armrest Organizer.
Start with the dragon’s head. Use a magic ring and work in continuous rounds with single crochet stitches. Increase gradually to form a rounded shape, then decrease slightly to close the top.
Stuff the head lightly to give it structure without making it too heavy.
Add facial features such as eyes, nostrils, and a mouth using embroidery or safety eyes.
Next, create the dragon’s body segments. These can be crocheted as small rounded shapes or slightly elongated pieces.
Attach these segments along the top edge of the organizer to create a continuous dragon form.
The body should follow the length of the base panel, giving the impression that the dragon is resting along the armrest.
Crafting Wings, Tail, and Spikes
The decorative elements are what make the Crochet Tutorial for a Dragon-Shaped Armrest Organizer truly special.
For the wings, crochet two flat shapes using double crochet stitches. You can use shell or fan patterns to add texture and detail.
Attach the wings to the sides of the dragon’s body, positioning them symmetrically.
Create spikes or scales along the back using small triangle shapes or picot stitches. These details add depth and character.
The tail can be made as a long, tapered piece and attached to the end of the organizer.
You can curl the tail slightly or leave it straight, depending on your design preference.
These elements bring personality and charm to your Crochet Tutorial for a Dragon-Shaped Armrest Organizer.
Assembly and Final Construction
Assembling all the pieces is one of the most important steps in the Crochet Tutorial for a Dragon-Shaped Armrest Organizer.
Begin by attaching the dragon’s head securely to one end of the base panel.
Add the body segments along the top, ensuring they are evenly spaced and aligned.
Attach the wings, spikes, and tail carefully, reinforcing all seams for durability.
Check that all elements are securely fastened, especially if the organizer will be used frequently.
Make final adjustments to positioning to ensure the dragon looks balanced and visually appealing.
This stage brings your entire Crochet Tutorial for a Dragon-Shaped Armrest Organizer together.
Tips for Structure and Durability
Maintaining structure is essential for the success of your Crochet Tutorial for a Dragon-Shaped Armrest Organizer.
Use tight stitches to create a firm fabric.
Consider adding a fabric lining or interfacing to the base panel for extra support.
Reinforce pocket edges and attachment points to prevent wear.
Ensure the organizer fits snugly over the armrest to avoid slipping.
Lightly stuff decorative elements without adding too much weight.
These tips will help your organizer remain functional and long-lasting.
Creative Customization Ideas
One of the most exciting aspects of the Crochet Tutorial for a Dragon-Shaped Armrest Organizer is the ability to customize your design.
Experiment with different color combinations to create unique dragons.
Add embroidery details or embellishments for extra personality.
Create themed versions such as fantasy dragons, pastel dragons, or seasonal designs.
Adjust the number and size of pockets to suit your needs.
You can even create matching décor items to complement your organizer.
These creative ideas allow you to make your Crochet Tutorial for a Dragon-Shaped Armrest Organizer truly one of a kind.
FAQ About Crochet Dragon Armrest Organizer
Is the Crochet Tutorial for a Dragon-Shaped Armrest Organizer suitable for beginners?
It is better suited for intermediate crocheters due to shaping and assembly.
How long does it take to complete?
It can take several hours to a few days depending on your experience.
What type of yarn is best?
Medium-weight cotton or acrylic yarn is recommended.
Can I customize the size?
Yes, you can adjust the base panel to fit different armrests.
Do I need lining?
It is optional but recommended for added durability.
Can I sell finished items?
Yes, handmade organizers are popular and sell well.
Conclusion
The Crochet Tutorial for a Dragon-Shaped Armrest Organizer is a creative, functional, and rewarding crochet project that combines imagination with practicality. Throughout this guide, you learned how to choose materials, create the base, add pockets, design dragon features, assemble the pieces, and finish your organizer with professional techniques.
By practicing the Crochet Tutorial for a Dragon-Shaped Armrest Organizer, you can enhance your crochet skills while creating a unique and useful item for your home. This project is perfect for personal use, thoughtful gifts, or even a handmade business.

