The crocheted four-leaf clover – step by step tutorial is perfect for beginners and experienced crafters alike who are looking for a quick, meaningful project. These lovely little clovers are more than just cute decorations—they’re symbols of luck and prosperity, and they’re great for gifting, keychains, scrapbooking, or holiday embellishments. If you love creating small, satisfying items, this is a project you’ll enjoy from start to finish.
With this crocheted four-leaf clover – step by step tutorial, we’ll walk through the process of crafting each petal and connecting them in a way that forms the recognizable lucky clover shape. This project uses basic crochet stitches and requires minimal yarn, making it a great way to use leftover materials. Plus, the finished clover is so versatile that you can incorporate it into many different items like coasters, appliqués, or greeting cards.
In this guide, we’ll also explore tips to personalize your clover, ideas for using them in various craft projects, and all the materials you’ll need with clear measurements and stitch counts. Whether you’re creating a single crocheted four-leaf clover or a full bouquet, this tutorial is written to be approachable, creative, and completely beginner-friendly.
Materials and Measurements for the Crocheted Four-Leaf Clover
To follow this crocheted four-leaf clover – step by step tutorial, you’ll need some basic tools and yarn. The materials are affordable and easy to find in craft stores or online.
Choose a medium-weight cotton or acrylic yarn for a solid shape and structure. Cotton holds its shape particularly well and creates neat stitch definition. You’ll need about 10–15 grams of yarn in green for each clover.
Use a 3.5mm or 4mm crochet hook depending on your yarn’s weight. A smaller hook will give you a tighter clover, while a larger one will give you a softer, looser version.
Other essential tools include scissors, a yarn needle for weaving in ends, and a stitch marker if you like to keep track of your starting points. Optionally, you may also use a hot glue gun if attaching your clover to surfaces like headbands or cards.
Each petal of the crocheted four-leaf clover is formed individually and connected into a single shape. You’ll be working in rounds, so familiarity with magic rings and circular crochet techniques is helpful but not required.
The finished size of one clover will be around 6–8 cm across, depending on your yarn, hook size, and tension. You can adjust the measurements easily by switching hook sizes or using thinner or thicker yarn.
Always start by making a test petal to check the size and adjust your materials accordingly. This helps keep your finished clover uniform and symmetrical.
Step-by-Step: How to Crochet Each Leaf Petal
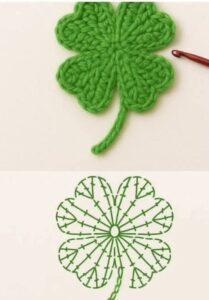
In this section of the crocheted four-leaf clover – step by step tutorial, we’ll make the four identical heart-shaped petals. These are made in a round with common stitches like single crochet, double crochet, and treble crochet.
Start each petal by creating a magic ring. Into this ring, work 2 single crochets, 2 half double crochets, 2 double crochets, 1 treble crochet, and then mirror the same stitches in reverse order.
After completing the mirrored stitches (2 double crochets, 2 half double crochets, 2 single crochets), slip stitch to the starting point to close the petal and pull the magic ring tight.
Fasten off and leave a tail long enough for sewing. Make four of these identical petals before moving to assembly.
Make sure each petal is the same size. Blocking lightly can help maintain uniform shape. Lay them out in a four-leaf configuration before attaching.
You can add subtle shaping by pinching the bottom center of each petal slightly, giving it a true heart-like curve. This helps your crocheted four-leaf clover look more polished.
Repeat this process to create multiple clovers or vary your yarn colors for a whimsical effect. Pale green or variegated yarn can give a more natural appearance.
Assembling the Crocheted Four-Leaf Clover
Now that you’ve created the four petals, this part of the crocheted four-leaf clover – step by step tutorial will focus on assembling them into a clover shape. This can be done using a yarn needle and the long tails left after fastening off.
Lay the petals flat in a cross formation, making sure the top curves of each petal are evenly spaced and aligned. You can pin them in place to help with the stitching.
Thread one of the yarn tails through a yarn needle and begin stitching the centers together with small, neat whipstitches. Make sure they’re all attached securely.
After joining the four petals, flip the clover and weave in the yarn ends on the back. Trim excess yarn for a clean finish.
Optionally, add a small green or yellow button at the center for a decorative touch. This works well if the clover is used for pins or keychains.
To make a stem, chain 10 stitches with green yarn, turn, and slip stitch back down. Sew or glue the stem to the base of one petal.
Once assembled, you can block the clover by pinning it and spraying lightly with water. This helps even out any puckering in the stitches and keeps it flat.
Creative Uses for Crocheted Four-Leaf Clovers
The beauty of the crocheted four-leaf clover lies in its versatility. Here, we’ll explore how to use the finished clovers creatively for gifts, home decor, and holiday accessories.
Sew or glue your clover onto a plain tote bag for a handmade, lucky charm accent. These make sweet and meaningful gifts for friends.
Attach a jump ring or keychain hardware to one petal to turn your clover into a lucky keychain or bag charm. It’s simple, fast, and popular in handmade markets.
Use them as embellishments for greeting cards, especially around St. Patrick’s Day. They add a warm and personal handmade touch to holiday messages.
Stitch them onto hats, scarves, or gloves to add seasonal flair or playful pops of color.
Make a garland by stringing several clovers together with a crochet chain or ribbon. These garlands work beautifully for party decor, door frames, or mantels.
If you’re a small business owner, crocheted four-leaf clovers make excellent inventory items. They’re fast to produce, lightweight to ship, and always in demand during festive seasons.
FAQ about Crocheted Four-Leaf Clover – Step by Step Tutorial
What yarn is best for crocheted four-leaf clovers?
Cotton yarn is the best choice for this project because it holds its shape well and provides great stitch definition. However, acrylic yarn can also work if you prefer a softer texture.
Can beginners follow this tutorial?
Absolutely. This crocheted four-leaf clover – step by step tutorial uses basic stitches and simple rounds. Even beginners can create a beautiful clover with just a little practice.
How long does it take to make one clover?
It typically takes about 20–30 minutes to complete one clover from start to finish, depending on your speed and familiarity with the stitches.
Can I scale the clover to be larger or smaller?
Yes. Use a larger hook and thicker yarn for a bigger clover or smaller hook and thread yarn for a mini version. Just be sure to keep your stitch tension consistent.
How can I attach the clover to other projects?
You can sew it onto fabric or use fabric glue. For accessories, hot glue works well, especially for attaching to clips, pins, or paper.
What other projects can I make with these clovers?
You can make bookmarks, gift tags, garlands, magnets, scrapbooking pieces, appliqués for clothing, and even wedding or party favors.
Conclusion
In this crocheted four-leaf clover – step by step tutorial, we’ve explored how to create an adorable and meaningful crochet piece using basic materials and stitches. From crafting each heart-shaped petal to assembling them into a symbolic four-leaf shape, the process is rewarding and creatively fulfilling.
You’ve also learned various creative ways to use your finished clovers, from accessories to seasonal decor. This tutorial was designed to be beginner-friendly while offering room for creativity and personalization.
Whether you’re crocheting for relaxation, profit, or gifts, this tiny clover carries big charm. We’d love to know your thoughts—please leave a sincere opinion or suggestion so we can continue bringing you fun and valuable tutorials tailored to your crafting journey.


