If you’re looking for a cozy and creative way to stay warm this winter, the CUTE Granny Square Mittens Tutorial is a must-try. Perfect for both beginners and seasoned crocheters, this project brings together the charm of vintage squares with the functionality of handmade mittens. Using simple crochet patterns, you’ll be able to craft a beautiful and practical accessory that’s sure to turn heads.
Crochet mittens are not only fun to make but also make thoughtful, personal gifts. The timeless appeal of granny squares allows you to mix and match colors, patterns, and textures, making each pair of mittens unique. Whether you’re crafting for yourself or a loved one, these mittens will be both fashionable and functional.
In this article, we’ll guide you through every step of making these adorable mittens. From selecting your materials to the final stitch, you’ll learn how to follow this crochet pattern with ease. Let’s get started and turn those leftover yarns into something special!
Choosing Materials and Tools
Before diving into the pattern, let’s talk about the materials and tools you’ll need to get started. The beauty of this project is that it doesn’t require any specialty supplies—just a few basics that you likely already have in your crochet kit.
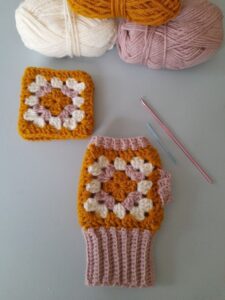
You’ll need worsted weight yarn in your choice of colors. For a classic look, stick with two or three colors that complement each other. If you prefer a fun and playful appearance, go wild with a rainbow palette. The versatility of crochet patterns means you can customize endlessly.
Next, choose an appropriate crochet hook. Typically, a size H/8 (5.0 mm) hook works well with worsted weight yarn, but always refer to the yarn label to make sure you’re using the recommended size.
You’ll also need scissors, a yarn needle for weaving in ends, and a measuring tape to ensure accuracy. If you’re a beginner, stitch markers can be helpful for keeping track of your rounds and rows.
Make sure to prepare a workspace with good lighting and enough room to spread out your materials. Keeping your supplies organized will help you enjoy the process more and avoid frustration.
Once you have everything ready, you’re all set to dive into this crochet adventure. The simplicity of the tools allows you to focus entirely on creativity and craftsmanship.
Making the Granny Squares
Each mitten is composed of several granny squares, so we’ll start by creating those. Traditional granny squares are made by working in rounds, using clusters of double crochets.
To begin, make a magic ring and chain 3 (this counts as your first double crochet). Work two more double crochets into the ring, then chain 2. Repeat three more times to create four corners. Slip stitch to the top of the beginning chain to join.
For Round 2, slip stitch into the corner space and chain 3. Work 2 double crochets, chain 2, and 3 double crochets into each corner. Between corners, place 3 double crochets into the side space. Continue around and join.
Repeat the process for Round 3, expanding your square by adding more double crochet clusters on each side. Keep your stitches even and tension consistent.
You’ll need 6 squares per mitten—3 for the front and 3 for the back. Try to make all your squares identical in size for easier assembly. Use your measuring tape to ensure each square is about 4×4 inches.
Once all your squares are completed, block them lightly if needed to help them lay flat and even. Now you’re ready to assemble the pieces into a cozy pair of mittens.
Assembling the Mittens
Lay out your squares in a rough mitten shape—two on the bottom, two in the middle, and two on top. The middle squares should overlap slightly to form the thumb area. Visualizing this shape helps guide the joining process.
Start by seaming the side squares together using a whip stitch or slip stitch. Make sure to align the stitches carefully to avoid bunching. Join the front and back pieces together, leaving an opening for the thumb.
Once the squares are joined, you’ll shape the top of the mitten. Fold the top two squares inward and stitch them closed to form the rounded tip. You can adjust this shaping depending on how pointy or round you want the mittens.
For the thumb, crochet a small tube separately or work directly into the opening left between the squares. Use single crochets to form the thumb tube and adjust the length as needed.
Try on the mitten frequently during this stage to check fit. If necessary, add a row or two to increase length or width. Customizing your crochet work ensures a snug and comfy fit.
Once satisfied, weave in all loose ends using your yarn needle. Your mittens are now assembled and ready for the finishing touches.
Adding the Ribbed Cuff
To keep your mittens secure and cozy, add a ribbed cuff at the wrist. This detail also gives your project a polished, professional look.
Start by attaching your yarn to the bottom of the mitten. Chain 11 and work single crochets in the back loop only across each chain. Slip stitch into the next stitch on the mitten to anchor your row.
Continue working back and forth in rows, attaching each row to the mitten base with a slip stitch. This method creates a stretchy ribbing that hugs the wrist comfortably.
Make sure your cuff fits snugly but not too tight. You want it to stay in place without cutting off circulation. Use stretchy stitches and test fit as you go.
Once you’ve gone all the way around the wrist, slip stitch the first and last rows of the cuff together. Fasten off and weave in the ends securely.
This ribbed edge not only adds style but also increases warmth and functionality. Now your granny square mittens are complete and ready to wear!
Final Tips and Variations
Crocheting these mittens is a fun way to practice combining crochet patterns with construction techniques. Don’t be afraid to experiment with color and texture.
Use different yarn weights or fibers for seasonal variations. Lighter cotton yarn is great for spring, while wool offers maximum warmth in winter.
Add embellishments like buttons, pom-poms, or embroidery to personalize your mittens even further. This project offers endless room for creativity.
You can also adapt the pattern for children or larger adult sizes by changing the size of the granny squares or using a larger hook.
Consider making a matching set with a crochet beanie or scarf for a thoughtful handmade gift. The coordinated look is both adorable and practical.
Remember to block your finished mittens lightly for a neat appearance. Blocking helps even out your stitches and gives your project a clean finish.
With this CUTE Granny Square Mittens Tutorial, you now have a detailed, beginner-friendly guide to creating cozy, colorful mittens using timeless crochet patterns. From the first stitch to the last seam, every step is a celebration of handmade charm and warmth. So grab your yarn and hook, and bring these beautiful mittens to life!


