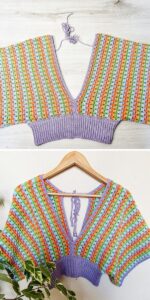
Learning how to create an Easy Crochet Granny Stitch Top is a rewarding and enjoyable project, especially for crochet enthusiasts who love working with simple crochet patterns. This stylish and versatile top can be worn in various seasons and is an excellent way to showcase your creativity using the timeless crochet granny stitch technique. From beginners to seasoned crafters, this project offers the perfect balance of simplicity and elegance.
The Easy Crochet Granny Stitch Top is an adaptable garment that can be customized in terms of colors, sizes, and patterns, making it a staple in your handmade wardrobe. Whether you are making it for yourself or as a thoughtful gift, this crochet top is not only fashionable but also a functional addition to any collection. Its lightweight texture and breathable structure make it ideal for layering or wearing alone.
By following this comprehensive step-by-step guide, you will learn the specific crochet patterns and techniques required to make a crochet granny stitch top. From gathering materials to finishing touches, this tutorial will walk you through each phase, ensuring your finished piece meets your expectations. Let’s dive into the process and bring your creative vision to life!
Materials and Measurements
When starting your Easy Crochet Granny Stitch Top, it is essential to gather all the necessary materials to ensure a smooth crafting experience. Choosing the right yarn and hook size is crucial to achieving the desired texture and fit for your top.
- You will need approximately 400-600 grams of lightweight cotton yarn, depending on the size you wish to create. Cotton is breathable and comfortable for wear in warmer months.
- Select a 4.0 mm crochet hook to work effectively with the chosen yarn, ensuring the stitches are neither too tight nor too loose.
- Additional materials include a measuring tape, scissors, and a yarn needle for weaving in ends. These tools will assist in achieving neat finishes and accurate sizing.
- The fabric cuts involve creating multiple granny stitch squares. Each square should measure approximately 12 cm x 12 cm. For a medium-sized top, you will need around 20 squares.
- Depending on your preferred color scheme, you can use a single color for a uniform look or combine different colors for a vibrant, patchwork effect.
- Keep your workspace organized and well-lit to maintain accuracy and enjoy the process of crafting your crochet granny stitch top.
Creating the Granny Stitch Squares
The foundation of the Easy Crochet Granny Stitch Top lies in crafting the classic granny stitch squares. This familiar crochet pattern is beginner-friendly and serves as a versatile building block for many crochet projects.
- Begin by creating a slip knot and chaining four stitches. Join the chain into a loop with a slip stitch to form the center ring of your square.
- Chain three stitches to act as the first double crochet, then work two double crochets into the center ring. Chain two to form the first corner.
- Continue by making three double crochets, chain two, three more double crochets, chain two, and repeat this sequence until you have four clusters with chain-two spaces in between.
- Join the round with a slip stitch into the top of the starting chain three. Fasten off if changing colors, or continue for additional rounds if you prefer larger squares.
- Each additional round begins with chain three and follows the pattern of working three double crochets into each space and chaining two at each corner to maintain the square shape.
- Create the required number of granny squares based on your measurements, ensuring each square is uniform in size for easy assembly later.
Assembling the Crochet Granny Stitch Top
After creating the individual granny stitch squares, the next step involves assembling them to form the crochet granny stitch top. This step is essential in achieving the desired structure and fit of the garment.
- Lay out your squares on a flat surface to visualize the front, back, and shoulder sections of the top. For a medium size, arrange two rows of five squares for the front and the same for the back.
- Use a yarn needle and whip stitch method to join the squares together, ensuring that the stitches are secure but not overly tight to allow some flexibility.
- Seam the shoulder sections by connecting the top squares on both the front and back panels, leaving enough space for the neckline.
- To create the sides, join the squares while leaving openings for the armholes. Typically, one square per side is left open to comfortably accommodate arm movement.
- Once the squares are connected, try on the top to ensure the fit is as desired. Adjust seams if necessary for better alignment and comfort.
- Weave in all loose ends using the yarn needle, ensuring a clean and polished finish that enhances the overall appearance of your crochet granny stitch top.
Adding Finishing Touches and Customizations
The final phase of crafting your Easy Crochet Granny Stitch Top involves adding borders, straps, and any custom details that will make your top uniquely yours. These finishing touches contribute significantly to the garment’s aesthetic and fit.
- To create neat edges, crochet a single crochet border around the neckline, armholes, and bottom hem of the top. This provides a clean outline and enhances durability.
- For added stability, consider working a second round of single crochet stitches or incorporate a scalloped edging for a decorative touch.
- You can crochet simple straps by chaining the desired length and attaching them securely to the top’s front and back. Adjust strap length for comfort and style.
- Adding buttons or decorative motifs to the squares can give your crochet granny stitch top a personalized flair. Embellishments like small flowers or beads work well.
- For those looking to make the top longer, add extra granny squares to the bottom or incorporate additional rows using the granny stitch pattern for a tunic-style garment.
- After completing all customizations, give your top a gentle hand wash, lay it flat to dry, and steam lightly to set the stitches and achieve a professional finish.
By following this detailed tutorial, you now have all the knowledge needed to create your own Easy Crochet Granny Stitch Top. This project not only showcases your skill in crochet patterns but also offers endless possibilities for customization and creative expression.


