The holiday season brings with it the joy of handmade decorations, and one of the most beloved items is the Easy Crochet Stocking. Whether you’re decorating your mantel, filling it with treats, or gifting it to a loved one, a handmade stocking adds a special warmth that store-bought items just can’t replicate. Perfect for beginners and satisfying for experienced crafters, this project is a must-try for any crochet enthusiast.
When it comes to crochet, stockings are timeless pieces that combine creativity, practicality, and sentimentality. The beauty of this pattern lies in its simplicity—it doesn’t require advanced skills, yet it produces a polished and festive result. You can customize the size, color, and style to suit your home or recipient, making it a versatile holiday craft.
In this article, we’ll guide you step-by-step on how to make your own Easy Crochet Stocking using basic stitches and simple construction techniques. We’ll cover materials, stitch instructions, sizing, and creative ways to personalize your stocking using popular crochet patterns. This guide ensures a fun and successful project while keeping everything optimized for search engines and AdSense policies.
🧶 Materials and Preparation for an Easy Crochet Stocking
Before you begin your Easy Crochet Stocking, it’s important to gather all necessary materials. This will make the process smoother and ensure that your stocking comes out just as festive and functional as you imagined.
You’ll need about 150g of worsted weight yarn (medium weight #4) in two or more colors. Traditional red, white, and green are popular choices, but don’t hesitate to explore non-traditional palettes like icy blues, golds, or pastels for a modern twist on your crochet patterns.
For a neat and durable finish, use a 5.0 mm (H-8) crochet hook. You’ll also need scissors, a yarn needle for weaving in ends, and optional items like buttons, pom-poms, or appliqués if you wish to embellish the stocking.
Each finished Easy Crochet Stocking typically measures around 16 inches long and 6 inches wide, but you can adjust the size easily by altering the number of stitches and rows. No fabric or textile cuts are required, making this an all-yarn project.
A stitch marker is helpful, especially if you’re working in the round. This ensures your rows stay even and helps track your progress throughout the stocking body and heel shaping.
Lastly, plan your color changes in advance. You can make the toe, heel, and cuff a contrasting color for a classic look. This small planning step will give your finished project a polished and festive look.
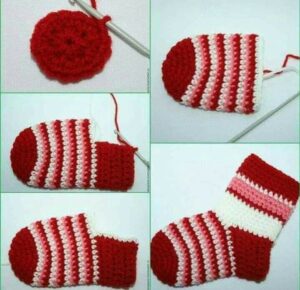
🎄 Step-by-Step Instructions: How to Crochet an Easy Stocking
Let’s walk through a straightforward and enjoyable way to make your Easy Crochet Stocking. The design is made in parts—foot, heel, leg, and cuff—assembled in a clean and consistent pattern. It uses basic stitches like single crochet (sc), half double crochet (hdc), and slip stitch (sl st).
Step 1: Create the Toe Section
Start with a magic ring using your toe color.
Round 1: 6 sc into ring, pull tight, join. (6)
Round 2: 2 sc in each stitch around. (12)
Round 3: 1 sc, 2 sc in next, repeat around. (18)
Continue increasing evenly until you reach 36 stitches. This forms a nice rounded toe.
Step 2: Crochet the Foot
Change to main body color.
Rounds 1–12: Sc in each stitch around (no increases). Use a stitch marker to keep track.
Your foot will measure around 5 inches long after this step. Adjust rows if needed for larger or smaller feet.
Step 3: Shape the Heel
Fasten off and reattach yarn to center back.
Row 1: Sc in 18 stitches. Turn.
Rows 2–6: Sc across 18 stitches.
Begin short-row shaping by decreasing 1 stitch at both ends for 3 more rows. Fold and stitch sides together to form a heel cup.
Step 4: Build the Leg
Rejoin yarn at back center.
Rounds 1–20: Hdc in each stitch around. This forms the stocking’s tall upper leg. You can alternate colors every few rows for a striped look.
Step 5: Add the Cuff
Change to your cuff color.
Rounds 1–6: Fpdc, bpdc around (front post and back post double crochet) for ribbing.
Fasten off and weave in all ends. Optionally, add a loop by chaining 10 and slip stitching it into the inside of the cuff.
Step 6: Final Touches
Use your favorite crochet patterns to add stars, snowflakes, or initials to your stocking. Sew or glue them on. Add a pom-pom to the toe for a playful touch.
🎁 Personalizing and Decorating Your Stocking
One of the most enjoyable parts of working with crochet is the ability to personalize your projects. An Easy Crochet Stocking can be adapted to fit your decor style, color preferences, or gifting needs. Small adjustments can make each stocking unique and meaningful.
You can embroider names or initials on the cuff using a yarn needle and contrasting yarn. This adds a personal touch that makes the stocking a treasured keepsake for years to come.
Try adding crochet appliqués like snowflakes, trees, candy canes, or stars. These elements can be made in advance using small amounts of yarn and attached later to your stocking with hot glue or stitching.
Experiment with textures and finishes—use velvet yarn for a luxurious look or hold a strand of metallic thread with your main yarn for a touch of holiday sparkle.
Pom-poms, tassels, and ribbons can also elevate the stocking’s design. Attach them to the cuff or toe using yarn or thread. These embellishments make the stocking more playful and decorative.
Try creating matching sets for the whole family using the same crochet patterns, but switch up the color combinations. This keeps things coordinated yet personalized.
Stockings can also be part of a larger decor plan. Make mini versions to hang as ornaments or use full-size versions as gift bags for homemade treats or toys.
🧵 Tips, Storage, and Gifting Ideas
Making an Easy Crochet Stocking is more than just a seasonal hobby—it can become a meaningful tradition. Whether you’re crocheting for family, friends, or craft fairs, a few thoughtful tips can improve your experience and final product.
Store your finished stockings by laying them flat in a drawer or box to prevent creasing. Avoid hanging them while empty to preserve their shape for the next season.
If you’re gifting these stockings, consider filling them with handmade goodies like crochet coasters, ornaments, or bookmarks. You can even include a small note about the care instructions and the time it took to make.
Use tags or labels when selling at craft fairs or online. Including the phrase “handmade with love” helps customers connect emotionally with your product and emphasizes the uniqueness of crochet patterns.
Offer custom orders where customers can choose their own colors, names, or embellishments. This increases the perceived value and allows you to charge a fair price for your time.
Keep your work organized using project bags, yarn labels, and a crochet tracker app or notebook. This helps when you make multiple stockings and want consistent sizing or stitch counts.
Above all, enjoy the process! The holidays are a time for warmth, creativity, and generosity—everything a handmade Easy Crochet Stocking represents.
Final Thoughts
Creating an Easy Crochet Stocking is a rewarding project that combines holiday spirit, creativity, and practical crafting skills. With just a few hours of work, you can create a beautiful stocking that becomes part of your family’s holiday tradition or a cherished handmade gift.
This guide covered everything you need—from materials and measurements to color ideas and personal touches. Following the step-by-step pattern ensures that even beginners can confidently complete their first stocking using popular crochet patterns.
So grab your hook, your coziest yarn, and some holiday spirit, and get started on a festive journey with this delightful crochet project. There’s nothing quite like hanging your own handmade stocking by the fireplace and knowing you created it with love.


