If you’re looking to add charm and versatility to your handmade projects, this Granny Daisy Square Tutorial is the perfect way to get started. Whether you’re new to crochet or a seasoned crafter, granny squares are timeless, and adding a daisy at the center gives them a refreshing, floral touch. This square can be used in a variety of crochet patterns, from blankets to bags, pillows, and even garments.
The granny daisy square blends the classic structure of granny squares with the cheerful appeal of daisies, resulting in a square that’s as decorative as it is functional. One of the best things about this project is its simplicity—it uses basic stitches, so even beginners can follow along and produce stunning results.
In this tutorial, we’ll walk you through everything: materials, yarn choices, measurements, stitch instructions, and joining techniques. Get ready to fall in love with this cozy and colorful crochet pattern as you create beautiful squares that can be used in countless creative ways!
Choosing Materials and Color Palette
Before starting the actual crochet work, selecting the right yarn and tools is crucial. For the Granny Daisy Square, a soft, worsted weight (medium #4) yarn is ideal. Cotton or acrylic yarns work wonderfully, especially for maintaining structure and color over time.
You’ll need three yarn colors:
-
White or yellow for the daisy center
-
White or cream for the daisy petals
-
Any color for the granny square background (green, blue, or pastel shades work beautifully)
A 4.0 mm (G-6) crochet hook is recommended for a balanced stitch definition and square size. You’ll also need a yarn needle for weaving in ends and scissors for clean cuts.
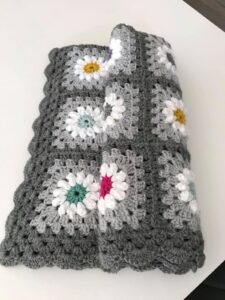
Each completed square measures approximately 4.5 x 4.5 inches using worsted weight yarn. To make a standard throw blanket (40 x 60 inches), you would need about 117 squares, depending on your gauge and spacing between joins.
For the petals and center, only a small amount of yarn is needed—leftover scraps from other crochet patterns work well here. Make sure to use consistent yarn weights for all parts to maintain even sizing.
Keep a tape measure nearby. If needed, block your squares after finishing to ensure they all match in shape and dimensions.
Step-by-Step: How to Crochet the Daisy Center
Now that you have your materials ready, it’s time to begin the Granny Daisy Square Tutorial with the centerpiece: the daisy flower. This small motif forms the heart of the design and adds the distinctive floral look.
Start with your flower center color (usually yellow). Create a magic ring, and work 12 double crochets (DC) into the ring. Slip stitch into the first DC to close the round. This forms a tight circle that will become the daisy’s center.
Switch to the petal color (typically white). Begin the second round with a chain of 2 DCs in one stitch, chain 2, then slip stitch in the next stitch. Repeat this pattern all the way around to create 6 petal bumps.
Each petal is worked by chaining 2 and double crocheting multiple times into the same stitch to create volume. You can use 5 DCs per petal for fuller flowers or 3 DCs for a more subtle look.
Once you’ve completed all petals, join the round with a slip stitch. Fasten off and weave in ends. The daisy is now complete and ready to be framed into a square.
Blocking the flower slightly before moving on can help keep the petals flat, especially if they tend to curl up.
You can make several daisies in one sitting to create a batch of ready-to-square motifs, making assembly faster and more efficient.
Crocheting the Granny Square Frame
After finishing your flower, the next step in this granny daisy square tutorial is building the traditional granny frame around the flower to complete the square. This part involves basic granny square construction using chains and double crochets.
Attach your background color yarn to any ch-2 space from the flower’s petal round. Begin with a chain 3 (counts as DC) and then work 2 DCs into the same space. This forms the first granny cluster.
Chain 1, then move to the next space and work 3 DCs. Continue this pattern all the way around the flower. In each corner, you’ll create a 3 DC, chain 2, 3 DC to build the square corners.
The number of rounds you add depends on your desired square size. Typically, two or three rounds are enough to create a 4.5-inch square. If you’re making a larger afghan or pillow, feel free to increase the rounds.
After reaching the desired size, slip stitch to join the final round, cut your yarn, and weave in the ends. Your square should now resemble a beautiful daisy framed by colorful granny stitches.
Ensure that each square is the same size by measuring with a ruler or template before joining them. This step ensures a neat and balanced final product.
Don’t forget to block each square if they are slightly misshaped. Blocking helps flatten and define the square, making assembly smoother and more professional.
Joining the Squares and Finishing Touches
Once you’ve completed several granny daisy squares, the next phase is joining them together. Depending on your project—whether it’s a crochet blanket, pillow, tote, or garment—choose the best joining method for both function and appearance.
For a clean and almost invisible join, try the invisible whip stitch using a yarn needle and matching yarn. Work on the wrong side of the squares to keep seams hidden.
Another option is the join-as-you-go method, where the last round of the square is worked while simultaneously attaching to adjacent squares. This is efficient and looks seamless if done correctly.
After joining, add a border to unify your design. You can work 3–4 rows of single crochet or half double crochet around the entire project. Using the background color gives a cohesive look, or choose a contrasting hue for a pop of fun.
Weave in all loose ends carefully. Use a yarn needle to tuck the ends back into the stitches and trim the excess. This ensures durability and a polished final look.
If you’re making a blanket, line the back with a soft fabric or fleece to add warmth and comfort. For tote bags, add a lining with a zipper or snap button for secure storage.
Take time to photograph your finished work—it’s a piece you’ll be proud of! Share it with fellow crafters, or gift it to a loved one.
Final Thoughts on the Granny Daisy Square Tutorial
The Granny Daisy Square Tutorial is more than just a craft—it’s a delightful way to express your creativity and bring color into your everyday life. These versatile squares are perfect for any crochet enthusiast looking to try new crochet patterns and make something beautiful and useful.
Whether you’re creating a cozy blanket, a statement tote bag, or a charming baby accessory, this pattern adapts effortlessly to any project. The simplicity of the stitches makes it suitable for beginners, while the floral details add sophistication that appeals to seasoned makers.
Don’t hesitate to play with different color combinations. Soft pastels offer a vintage vibe, while bright primary colors deliver a cheerful and youthful aesthetic. The design is flexible and can be customized to suit any taste or theme.
Be sure to keep your stitches consistent and block your finished pieces for best results. Taking your time to craft each square thoughtfully will ensure a final product you’ll love for years.
Looking for more crochet patterns? Be sure to browse our blog for tutorials, free patterns, and project inspiration. Until next time—happy crocheting!


