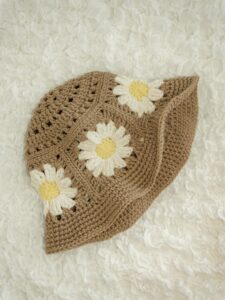
If you’re looking for a fun and trendy project to add to your summer wardrobe, the Granny Square Bucket Hat Flowers Free Crochet Patterns are a perfect choice. These vibrant and retro-style hats combine the timeless beauty of granny squares with cheerful floral motifs, making them an exciting crochet adventure. Whether you’re a seasoned crocheter or just beginning your journey with crochet patterns, this project is approachable and highly customizable.
The appeal of this crochet project lies in its flexibility. You can use your favorite colors, experiment with various flower motifs, and tailor the size to suit your head perfectly. Plus, it’s a fantastic way to use up yarn scraps from previous projects, giving your hat a charming, scrappy look that adds character and sustainability to your craft.
This article provides a complete guide on how to make a Granny Square Bucket Hat with Flowers using free crochet patterns. We’ll break it down into manageable steps, list all necessary materials, and share helpful tips to ensure your success. Let’s dive into this cheerful and creative crochet journey.
Materials and Fabric Cutting Requirements
To begin with, let’s look at what you need to create your own Granny Square Bucket Hat Flowers using crochet patterns. Gathering the right materials ensures a smooth experience and a polished final product.
You’ll need medium weight (category 4) cotton yarn in at least 3 colors. One color for the base square, one for the flower center, and another for the flower petals. Cotton is preferred because it holds its shape and feels breathable in warmer weather.
A 4.0 mm (G) crochet hook is generally suitable for this yarn weight, but feel free to adjust based on your tension and preference. You’ll also need a yarn needle for weaving in ends, and scissors.
The total yarn required will vary depending on your head size and the number of squares used. On average, you’ll need about 100–150g of yarn. Prepare 13 granny squares for the hat (5 for the crown, 5 for the sides, and 3 for the brim).
There are no fabric cuts involved in this crochet pattern, but you can prepare a lining fabric (optional) if you’d like a more structured look. For the lining, cut a circle approximately 7″ in diameter for the crown and a 22″ x 4″ strip for the sides.
Before you start stitching, decide on your color placement. You might want your flower granny squares to follow a repeating sequence or go full rainbow for a whimsical touch.
How to Make the Flower Granny Squares
The base of the Granny Square Bucket Hat is made up of individual crochet flower granny squares. Each square consists of a floral center surrounded by the classic granny square format. Let’s walk through the process of making one square.
Start with the flower center. Make a magic ring, and chain 2 (counts as first DC). Make 11 more double crochets into the ring, then slip stitch to the top of the chain 2. (12 DC total)
Change to a new yarn color for the petals. Chain 2, DC into the same stitch, chain 2, slip stitch into the next stitch. Repeat from * to * around. You should have 6 flower petals.
Next, change to your third yarn color for the granny square background. Start in any space between petals. Chain 3 (counts as first DC), 2 DC into the same space. Chain 1, 3 DC into next space, repeating around. In corner spaces (where petals meet), make 3 DC, chain 2, 3 DC.
Work in rounds until your square measures about 3.5″ to 4″ across. You may add more rounds to make the squares slightly larger if needed to match your desired hat size.
Make 13 total granny squares using this method. Feel free to mix and match flower and background colors to make your crochet pattern pop!
Joining the Squares to Create the Hat Shape
Once your squares are complete, it’s time to assemble the pieces of your Granny Square Bucket Hat Flowers Free Crochet Pattern. Proper alignment and seam techniques will ensure a neat and comfortable fit.
First, choose 5 squares for the crown. Arrange them in a circle and whip stitch or single crochet them together along their edges. Join the first and last squares to complete the ring.
Now select another 5 squares for the side band. Join them into a straight strip by sewing or crocheting along the edges. Then, attach this strip to the crown ring you just created. Match the corners for a neat alignment.
Use the remaining 3 squares to begin forming the brim. Depending on the hat size, you might want to add a few rows of single crochet around the bottom to expand the brim.
Join the 3 brim squares into a strip and attach them to the bottom edge of the hat’s side band. If needed, add more crochet rows after joining to create a flared brim shape.
To give the hat more structure, consider edging all seams with a round of single crochet. This helps unify the design and reinforces the joins.
Try the hat on as you go! You might need to adjust the number of rows or add a few stitches to achieve your ideal fit. This is what makes free crochet patterns so adaptable.
Edging, Finishing, and Optional Lining
Finishing touches can elevate your crochet hat from good to great. Once your granny square construction is complete, a few simple steps will help ensure it’s wearable and durable.
Start by weaving in all loose yarn ends. Use a yarn needle to tuck them neatly into the reverse side of the fabric. This gives the hat a polished appearance and prevents unraveling.
Next, add an edging round to the brim. A round of single crochet or reverse single crochet (crab stitch) adds a professional look and helps the brim hold its shape.
If the hat feels too loose or lacks structure, consider adding a fabric lining. Cut and sew the fabric pieces (circle for the crown, strip for the band, and optional brim reinforcement). Hand-stitch or use fabric glue to secure the lining inside the hat.
For added flair, attach a tie string or chin strap using matching yarn. You can also sew on embellishments like buttons or extra crochet flowers.
Give your hat a gentle steam block if needed. Pin it into shape and hover a steam iron over the stitches to relax the yarn and smooth out seams.
Congratulations—you’ve completed your Granny Square Bucket Hat with Flower Free Crochet Pattern! Wear it proudly or gift it to a friend who loves unique accessories.
Creative Tips and Styling Ideas
Your handmade crochet hat is more than a sun accessory—it’s a bold fashion statement. Get creative with how you style and personalize your piece.
Experiment with color themes. Try pastel tones for spring, bold primaries for summer, or earthy tones for fall. Every palette gives the hat a unique personality.
Use different flower motifs! Try daisy, sunflower, or even rose patterns in the center of your granny squares. This transforms the look without altering the basic construction.
Consider making a matching set. Use the same color scheme to create a coordinating crochet bag, scarf, or headband.
Share your creation online. Use hashtags like #grannysquarebucket or #crochethatpattern to connect with other crafters. Many free crochet patterns are inspired by community creativity.
Gift this hat to someone special. It’s a thoughtful handmade item that showcases your skills and personal touch.
Most importantly, enjoy the process. The true value of crochet lies in the joy and relaxation it brings. Whether you’re crafting for style, function, or fun, the journey is always worth it.
If you’re looking for more crochet patterns, don’t forget to explore other articles on our blog. We regularly share free, beginner-friendly designs that you can start today.
Whether it’s bags, coasters, accessories, or wearables—there’s a world of crochet waiting to be explored.


