The Granny Square Butterfly is a charming and creative addition to your collection of crochet patterns. This delightful design merges the traditional granny square with the playful beauty of a butterfly, resulting in a piece that’s both nostalgic and unique. Whether you want to add it to a blanket, a pillow cover, or use it as an applique, this project is perfect for crochet enthusiasts of all skill levels.
Using the Granny Square Butterfly design, you can experiment with a vibrant palette of yarn colors and make whimsical pieces to decorate your home or gift to a loved one. It’s a wonderful introduction for beginners to learn classic crochet patterns, and also an enjoyable project for experienced crafters looking for something quick and satisfying.
This tutorial will guide you through every step of creating a Granny Square Butterfly, including what yarn to use, the stitches needed, and how to assemble your butterfly from a basic granny square base. Let’s dive into this inspiring and colorful crochet journey.
Choosing Materials and Preparing Your Workspace
Before starting your Granny Square Butterfly, make sure you have the right materials and an organized space to work. The simplicity of this project makes it ideal for using up scrap yarn or trying out new yarn color combinations.
You will need:
-
Worsted weight yarn in 3 or more contrasting colors
-
A 4.0 mm (G) crochet hook
-
Yarn needle
-
Scissors
-
Stitch marker (optional)
Choose soft, medium-weight yarn for a comfortable grip and a clean finish. Cotton yarns are great for defined stitches, while acrylics give vibrant color without losing shape. When picking your palette, imagine butterfly wings in nature—bold, bright, and full of contrast.
Begin by creating a clean, well-lit workspace. Keep your yarn skeins organized to prevent tangling. If this is your first time working with crochet patterns, print or bookmark the steps for easy reference.
Warming up with a few practice stitches like double crochets and slip stitches can help maintain even tension throughout the piece. Take your time and enjoy the relaxing rhythm that crochet offers.
Creating the Basic Granny Square
At the heart of every Granny Square Butterfly lies a traditional granny square. This part serves as the base, which you will later fold and shape into the butterfly.
-
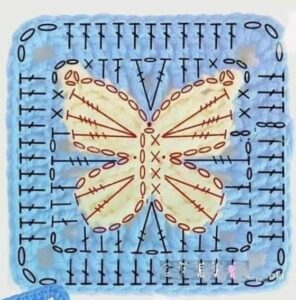
Start with a magic ring or chain 4 and slip stitch into the first chain to form a ring.
-
Round 1: Chain 3 (counts as first dc), make 2 dc into the ring, chain 2, 3 dc into the ring, chain 2 repeat 3 times. Join with a slip stitch to the top of the beginning chain 3.
-
Round 2: Slip stitch into next two stitches and into the corner space. Chain 3, 2 dc, chain 2, 3 dc into the same corner. In next corner: 3 dc, chain 2, 3 dc. Repeat around. Slip stitch to join.
-
Round 3: Continue the pattern by adding sets of 3 dc in each space between clusters, and 3 dc, ch 2, 3 dc in each corner. This builds out the square.
For this butterfly, stop at Round 3 or 4 to keep the granny square a manageable size for folding into wings. You may opt for solid color or alternating rounds for a striped effect.
Make sure your square is symmetrical and flat, as any curling or uneven sides will affect the final butterfly shape. Block the square slightly if necessary by dampening it and pinning to shape.
This classic granny square pattern is one of the most versatile crochet patterns, forming the building blocks for blankets, clothing, bags, and of course—adorable butterflies.
Transforming the Square into a Butterfly
Now that your square is complete, it’s time for the magic: folding and shaping the Granny Square Butterfly. This step breathes life into your project and brings out the whimsical winged form.
Begin by folding the square diagonally into a triangle. Then fold it again, bringing the corners to meet at the center. This creates a four-winged butterfly shape with natural dimension and symmetry.
To secure the shape, use a yarn needle and matching thread to stitch the center together. You can also wrap a small band of yarn tightly around the center several times to create the butterfly’s body and antennae base.
For a more defined body, crochet a small strip:
-
Chain 6
-
Row 1: SC into second chain from hook and across.
-
Fasten off and wrap this piece tightly around the butterfly’s center.
Add antennae by inserting a few strands of contrasting yarn through the top and knotting them. Trim to desired length and curl the ends if desired for added charm.
Adjust the wings by gently pulling and shaping them. You can even starch or lightly block the wings for structure. This folding method is intuitive and adds a personal, handmade touch to your crochet creation.
Decorating and Using Your Granny Square Butterfly
Now that you’ve shaped your butterfly, it’s time to think creatively about how to use it. One of the greatest joys of crochet patterns is their endless versatility.
Sew your Granny Square Butterfly onto tote bags, headbands, hats, or pillow covers for a handmade embellishment. These look adorable on children’s accessories or scattered across a baby blanket.
You can also make a garland by attaching several butterflies to a long chain stitch strand. Hang across a nursery, craft room, or patio for a festive touch.
For added texture and sparkle, sew on beads, buttons, or sequins. Just ensure any decorations are secure, especially if your project is for young children.
These butterflies make great party favors, stocking stuffers, or bookmarks. You can even glue them onto greeting cards for an extra layer of love and detail.
Because the Granny Square Butterfly uses minimal yarn and simple stitches, it’s an ideal stash-buster project and a fun way to practice color theory in your crochet work.
Final Thoughts and Tips
Creating a Granny Square Butterfly is a delightful way to celebrate your love for crochet while embracing color, creativity, and classic technique. Whether you’re a beginner looking for an easy and rewarding project or an experienced crocheter seeking a quick make, this pattern is the perfect fit.
Remember to keep your stitches even, experiment with bold color combinations, and enjoy the meditative process of turning yarn into art. The beauty of this crochet pattern lies in its simplicity and adaptability.
Don’t be afraid to make modifications! Try different yarn weights, hook sizes, or even a double-layered butterfly for extra fluff and volume.
And most importantly—have fun! Every Granny Square Butterfly you make carries your creative energy and joy, making it a truly special handmade treasure.
If you loved this project, explore more crochet patterns on our blog. We offer a range of tutorials for all levels, from beginners to advanced makers.
Happy Crocheting!


