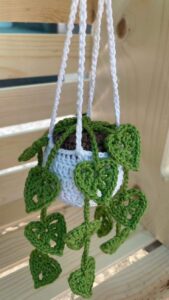
If you’re looking to bring a touch of handmade greenery into your home, Hanging Crocheted Pots with Leaves are the perfect solution. These charming decorative items mimic the look of potted plants while adding a cozy, handmade touch to any space. Whether you’re an experienced crafter or just starting out, this project offers a fresh and stylish way to decorate using your favorite crochet patterns.
Not only do these hanging pots serve as whimsical home décor, but they also make wonderful gifts. Ideal for those who love plants but lack a green thumb, crochet plant pots offer the aesthetics of nature without any maintenance. You can customize them with different yarn colors, textures, and hanging string styles to match your room perfectly.
In this blog post, you’ll discover how to create your own Hanging Crocheted Pots with Leaves, including a complete list of materials, specific measurements, and a detailed, step-by-step guide. This project is a beautiful example of how versatile and enjoyable crochet can be—and with our clear instructions, you’ll be hanging your leafy creations in no time.
Materials, Measurements, and Design Overview
Before diving into the stitches and shaping, it’s important to get organized with the right tools and materials. Having everything prepared makes the project flow more smoothly and ensures a polished final product.
-
Yarn Selection: Choose 100% cotton yarn for its durability and structure. You’ll need about 50g of green for the leaves, 30g of brown or terracotta for the pot, and optional white or pastel for decorative trim.
-
Hook Size: Use a 3.5mm (E) or 4.0mm (G) crochet hook, depending on your yarn’s thickness. A tighter stitch helps the pot maintain its shape and hang sturdily.
-
Pot Dimensions: The finished pot should measure approximately 4.5 inches in diameter and 5 inches in height, ideal for a medium hanging accent.
-
Support Materials: Include stitch markers, a yarn needle, scissors, and a small plastic or felt circle (optional) to reinforce the base and add stability.
-
Hanging String: You’ll need 3 strands of sturdy cotton twine or crocheted chains, about 18 inches long each. These will connect the pot to the hanging ring or hook.
-
Pattern Style: This crochet pattern uses mostly single crochet (sc), double crochet (dc), and chain stitches (ch), making it beginner-friendly with just enough challenge to stay engaging.
Step-by-Step: Crocheting the Pot Base and Sides
The base of the hanging pot sets the foundation. We’ll start from the center and work in the round to build up a sturdy container that resembles a terracotta plant pot.
-
Begin with a Magic Ring: Create a magic ring and crochet 6 sc into the ring. Pull the loop closed tightly and slip stitch (sl st) into the first stitch to close the round.
-
Increase Evenly: For Round 2, crochet 2 sc in each stitch around (12 sts). Continue increasing by 6 stitches in each round (e.g., sc in next, 2 sc in next) until your base measures about 4.5 inches across.
-
Build the Walls: Once the base is complete, work one round in the back loop only (BLO) to form a crisp edge. Then continue to crochet evenly around without increasing to build the sides of the pot.
-
Create the Height: Repeat sc rounds until the pot stands about 5 inches tall. For a decorative rim, you can alternate dc and sc stitches or switch to a contrasting color in the final 2–3 rows.
-
Finishing the Pot: Slip stitch to the last stitch, cut the yarn, and weave in ends using a yarn needle. If desired, insert a small felt disc at the bottom to maintain the pot’s round shape.
-
Attaching Hanging Strings: Crochet three 18″ chains using the same yarn or twine. Evenly space and securely sew each string to the top rim of the pot. Tie the ends together, forming a loop for hanging.
Crafting the Crochet Leaves
Now comes the fun part: adding lush, crocheted greenery to your pot. The leaves add movement and life to the design, giving your hanging pot its distinctive charm.
-
Leaf Yarn Choice: Stick with shades of green in DK or worsted-weight cotton. Feel free to vary the colors for a more natural, botanical look.
-
Basic Leaf Pattern:
-
Ch 10.
-
Sc in 2nd ch from hook, hdc in next 2, dc in next 3, hdc in next 2, sc in last.
-
Working down the opposite side of the chain, repeat the same stitch sequence.
-
-
Shaping the Leaf: After completing the two-sided stitch, sl st into the base and fasten off, leaving a long tail for sewing. For added realism, you can add a central vein using surface slip stitches or embroidery.
-
Make Multiple Leaves: Create 8–10 leaves of varying lengths (chains of 8, 10, and 12) to add diversity. This gives the arrangement a fuller, more realistic appearance.
-
Attach to the Pot: Use your yarn needle and the long tail to sew each leaf around the inside rim of the pot. Allow some to drape and others to stand upright for visual interest.
-
Optional Flower Embellishments: Add small crochet flowers using chain, sc, and slip stitches to introduce a pop of color. These extras elevate your pot from charming to stunning.
Personalization Ideas and Hanging Tips
You’ve completed the structure, but there’s always room for creative tweaks. Here’s how to make your crochet hanging pot with leaves truly unique.
-
Different Pot Shapes: Instead of a round base, try an oval or square-shaped pot using the same crochet techniques, adjusting your increases accordingly.
-
Add Tassels or Beads: Attach fringe, tassels, or wooden beads to the bottom for a boho flair. Just be sure all additions are well-secured, especially if the pot hangs in a high-traffic area.
-
Use Variegated Yarn: For the leaves, use yarn with natural gradient color changes. This provides a more organic and lifelike look with minimal extra effort.
-
Double Hanging Design: Make two pots and hang them at staggered heights from the same loop. This is especially beautiful in corners or near windows.
-
Match to Interior Decor: Coordinate yarn colors to match your living room, nursery, or kitchen palette. Neutral tones offer sophistication, while brights add playful charm.
-
Make a Gift Set: Pair the hanging pot with other handmade crochet patterns like coasters, placemats, or plant-themed appliqués for a perfect housewarming or birthday gift.
Care Instructions and Conclusion
Just like any fiber art, your Hanging Crocheted Pots with Leaves need a bit of care to stay looking fresh and beautiful for years to come.
-
Dusting: Gently dust with a lint roller or soft brush. Avoid soaking the leaves unless absolutely necessary.
-
Washing: If made with cotton, the pot and leaves can be hand-washed in cold water with a mild detergent. Always air dry and avoid direct sunlight to preserve color.
-
Storage: When not in use, place your crochet plant in a breathable container. Flatten the leaves slightly or stuff the pot with tissue to keep its shape.
-
Repairs: If a string or leaf loosens, use your yarn needle to reinforce or replace. Cotton yarn is forgiving and easy to match, even after long use.
-
Safe Hanging: Hang only on sturdy hooks or knobs. Avoid placing over heat sources or in reach of pets who might be tempted to chew.
-
Finishing Touches: You might sew a small tag with the maker’s initials or the year on the bottom of the pot—these small details make handmade items even more special.
Final Thoughts
The Hanging Crocheted Pots with Leaves project is more than just a craft—it’s a delightful piece of home décor that brings joy, beauty, and a handmade touch to any space. With its combination of structure and softness, nature and design, this crochet pattern is sure to inspire and impress.
Whether you’re making it for yourself, a loved one, or to sell at a local market, this project is a testament to the charm of handmade items. It’s fun to make, customizable, and sure to be admired wherever you hang it.


