As the leaves begin to change and autumn approaches, there’s nothing cozier than crafting a tiny symbol of the season. How to crochet a mini pumpkin keychain is a delightful project that’s easy to make, pocket‑sized, and full of pumpkin‑spiced charm. Whether you’re gifting it, using it as a seasonal decoration, or just want a festive key accessory, this pattern delivers maximum cuteness with minimal effort.
This crochet pattern works well for beginners and experienced makers alike. You only need a small amount of yarn, a keyring, and about 30 minutes of focused crafting. The finished mini pumpkin is about 2 inches tall—just the right size to brighten up backpacks, lanyards, or your set of keys.
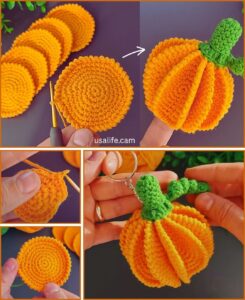
In this full tutorial, I’ll walk you through materials and precise yarn cuts, followed by four clear sections: crocheting the pumpkin body, adding the stem and ridges, attaching to a keychain, and creative finishing touches. Let’s get your hooks warmed up and dive into this charming autumn craft!
🎃 Materials & Yarn Cuts for the Mini Pumpkin Keychain
Before starting the crochet pattern, it’s essential to gather everything you need and prep your yarn lengths. This makes the project smooth and efficient.
-
Yarn Selection
-
Use worsted-weight (category 4) cotton or acrylic yarn for structure.
-
Main color: Pumpkin orange (about 8g or ~90cm).
-
Stem: Medium brown or olive green (about 2g or ~20cm).
-
-
Crochet Hook
-
Recommended size: 3.0 mm (US D/3) for tight stitches.
-
Adjust to 2.75 mm if your gauge is loose.
-
-
Keychain Supplies
-
Small keyring or lobster clasp.
-
Short length of yarn or a metal jump ring for attachment.
-
-
Other Tools
-
Stitch marker.
-
Tapestry needle for weaving.
-
Polyester fiberfill stuffing.
-
Scissors.
-
-
Pre-Cut Yarn Lengths
-
Pumpkin body: pre-measure 90cm of orange.
-
Stem: 20cm of brown/green.
-
Ridges: optional extra 30cm of orange (for surface stitching).
-
-
Finished Size & Style
-
Completed pumpkin: approx. 2″ (5 cm) tall, 1.8″ (4.5 cm) wide.
-
Adjust size by using a larger hook or chunkier yarn.
-
🧶 Crochet the Pumpkin Body (Rounds 1–6)
Let’s begin the main part of this crochet pattern: the pumpkin body. We’ll work round by round, increasing, maintaining, then stuffing and closing.
-
Round 1 – Magic Ring
-
Form a magic ring and work 6 single crochets (sc) into it.
-
Pull tight and place your stitch marker. (6 sts)
-
-
Round 2 – Increase
-
Work 2 sc in each stitch around. (12 sts)
-
This shapes the base of your pumpkin.
-
-
Round 3 – More Increases
-
1 sc, inc around. (18 sts)
-
Keep the shape bulbous and even.
-
-
Round 4 – Final Increase Round
-
2 sc, inc around. (24 sts)
-
This round finishes shaping the widest part.
-
-
Rounds 5 & 6 – Work Even
-
1 sc in each stitch for two rounds.
-
You’re creating the pumpkin’s midsection.
-
-
Prep for Ridges
-
Stuff lightly when you reach Round 6.
-
Add more stuffing before sense of closure.
-
🌿 Create Stem and Pumpkin Ridges
After forming the body, we’ll make the stem and add ribbed ridges—essential pumpkin details.
-
Ridges – Surface Slip-Stitch
-
Insert hook at top center and bring yarn up.
-
Wrap yarn around hook and work slip stitches down to base.
-
Repeat this process 6–8 times to create vertical ridges.
-
-
Stem – Magic Ring
-
Using brown or green, make a magic ring and 6 sc into it.
-
Join with slip stitch to form a small circle.
-
-
Stem Height
-
Work 2–3 more rounds of 6 sc, for 2–3 cm of height.
-
Keep stitches snug, forming a stubby pumpkin stem.
-
-
Attach the Stem
-
Sew the stem securely to the top center using your tapestry needle.
-
Weave in all ends inside the body.
-
-
Stuff After Stem
-
Add any leftover stuffing to plump the pumpkin if needed.
-
Close the pumpkin by tightening remaining stitches.
-
-
Check Shape
-
Use hands to gently pinch and squeeze—your ridges should stand out.
-
🧷 Attach the Keychain and Final Touches
We’re nearly done! Now attach it to a keyring and refine final details—making it durable and adorably finished.
-
Create Attachment Loop
-
Cut ~12 cm strand of orange yarn.
-
Fold in half and sew to top next to stem, forming a loop.
-
-
Add Keyring
-
Slip a keyring or lobster clasp through the yarn loop.
-
Tie and knot securely, then weave the end inside the pumpkin.
-
-
Secure with Glue (optional)
-
Dab a bit of fabric or craft glue at attachment point.
-
This protects from accidental pulling.
-
-
Weave In Yarn Tails
-
Use your tapestry needle to hide and secure all loose ends.
-
-
Style the Ridges
-
Run your finger along each ridge to sharpen lines.
-
Add more slip stitches if some feel too loose.
-
-
Quick Quality Check
-
Tug gently on keyring to ensure it’s not prone to ripping.
-
Squish lightly—should rebound cleanly.
-
🎁 Display Ideas & Creative Variations
With your mini pumpkin keychain complete, the fun part begins: styling, gifting, or customizing it!
-
Seasonal Gift
-
Add a “Happy Fall” or Halloween tag.
-
Attach to gift wrap or use as place‑card décor.
-
-
Set of Fall Keychains
-
Crochet mini apples, leaves, acorns to pair with the pumpkin.
-
Bundle as a cozy autumn set for markets or stores.
-
-
Halloween Theme
-
Use black yarn to stitch a spooky face.
-
Turn it into a Jack‑o’-lantern keychain—spooky and sweet!
-
-
Color Variations
-
Try white pumpkins, green gourds, or pastel “haunted” versions.
-
Change stem color for personalization.
-
-
Bag Charm or Zipper Pull
-
Soft enough to decorate backpacks, purses, or zipper pulls.
-
Add a tassel or pom-pom for more flair.
-
-
Care & Washing Tips
-
Recommend spot‑cleaning with a damp cloth.
-
Avoid machine washing—this keeps the shape and key parts intact.
-
💡 Final Thoughts: A Cozy, Quick Autumn Crochet Pattern
Learning how to crochet a mini pumpkin keychain 🧶 is not just fun—it’s fast, festive, and functional. With just scraps of yarn and a small hook, you can create something adorable in under 30 minutes. This crochet pattern hits all the fall vibes: orange hue, ridged texture, and cute pumpkin shape.
Perfect for gifts, crafting markets, or just adding charm to your keys, this little pumpkin will bring an autumn smile wherever it’s attached. Whether you’re a seasoned crocheter or just starting, you’ll find joy in each stitch—and hopefully, share that warmth and creativity all season long.
Happy autumn crafting—and may every pumpkin you make be full of love and seasonal delight! 🎃


